If you have an iPhone, iPad or Mac and an email account configured on the mail client you may have noticed a service malfunction with the mail certificate.
This error can have several causes, luckily there are several solutions to fix it. There is no need to be in despair.
Sometimes the problem can be solved simply by confirming the alert message that the iPhone, iPad or Mac mail app shows us. In other cases, it is not so trivial and we need to understand the cause of the problem in order to solve it.
Without further delay, let’s see what are the causes of this problem and how we can solve it.
Table of Contents
What causes the “not trusted certificate” problem?
There can be many causes of this problem.
This error can occur in several ways, including these:
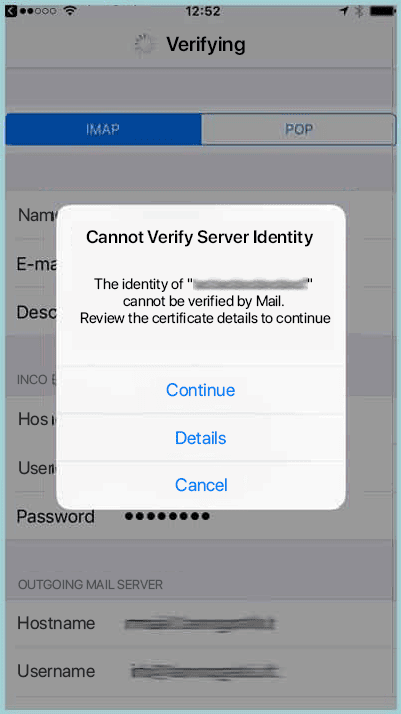
- The identity of imap cannot be verified by mail
- Cannot verify iphone server identity
- Cannot verify identity of imap.gmail.com
- Unable to verify server identity
In two words, you see this error because your iPhone performs a more rigorous verification on the SSL certificate compared to other mail clients. For the same reason, we can also find the same error on iPad and Mac.
In fact, this is one of the most common errors we find on IOS and Mac OSX.
The cause of the error is due to SNI, or server name indication. Initially, it was possible to install an SSL certificate only if you had a dedicated IP, so one certificate per IP. SNI has changed, giving the possibility to install more than one SSL certificate on the same IP address, with a system called server name indication.
The problem is that mail servers don’t support/support correctly SNI technology, that’s why you can get “mail certificate” error in some cases.
As I said the Apple mail client performs tighter checks, which in some cases give us the error “server identity verification error”.
This error becomes less and less common as mail clients are improved and support SNI properly.
To explain in simpler terms what happens is this:
- You configure the mail client using mail.dominio.it (where domain.it is your domain)
- The mail client finds the root mail certificate of the server, which was generated for hostname.serverdomain.com (where serverdomain.com is the domain of the provider)
- The mail client sees that the mail certificate is for another domain and returns an error.
Basically the client sees the mail certificate as fake (domain mismatch) and gives you the error.
In other cases the problem may be due to the fact that the certificate is signed by an unknown authority, as in the case of self-signed certificates. This doesn’t happen with us since we use SSL certificates issued by Let’s Encrypt.
If you have this problem with your current hosting you may decide to change hosting to solve it. Whether you choose shared hosting or WordPress hosting you will have a valid mail certificate available.
Now that we have figured out what the cause of the error is let’s see how to fix it once and for all.
Accepting mail server certificate: the solution
If you have received the error telling you that it is impossible to verify the mail server you have come to the right place. This is the section of the article that interests you. Let’s see how to do it.
These steps are valid for iPhone, iPad and Mac.
Close the mail application and reopen
This “grandma’s” solution can sometimes bring the desired results. It is very likely to be useless, but sometimes it works, and since it takes us less than a minute to do the test we might as well try it.
Delete the mail account and try again
If the attempt from the previous point didn’t bring the desired results, then this will be our second option.
This operation is valid for iPhone, iPad and Mac, obviously the steps to follow will be different.
Delete Mail account on iPhone and iPad
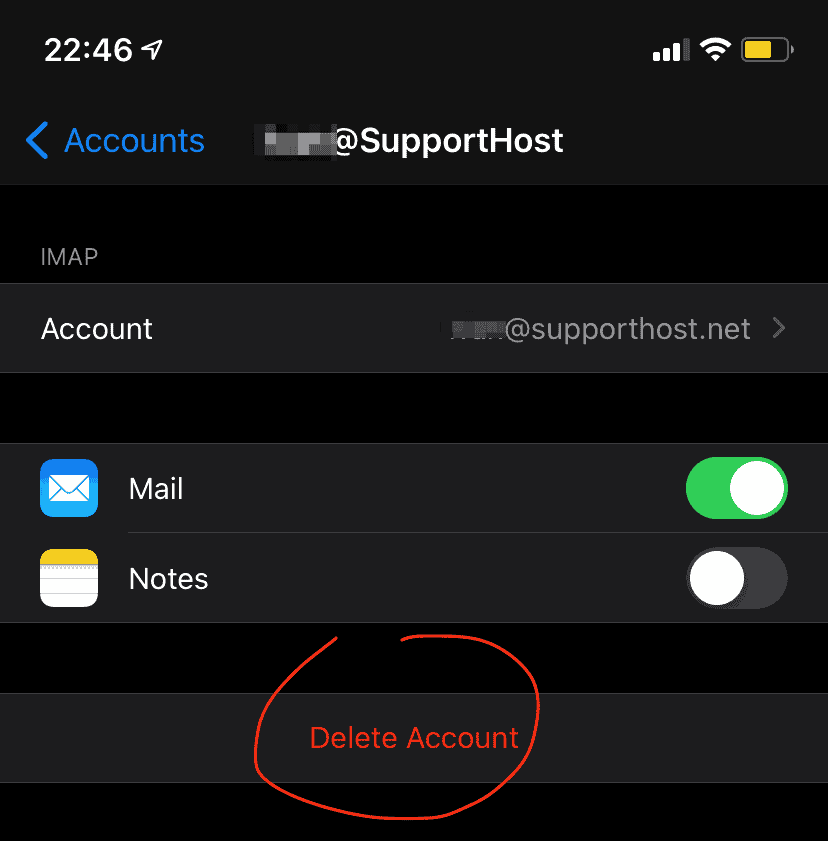
To delete your mail account on iPhone and iPad, go to Settings -> Mail -> Accounts.
Then tab on the account you want to delete, the one that’s giving you problems. Click on “Delete account” or “Delete account if you have the phone set to English.
Delete the mail account on Mac Mail
If you have the mail certificate problem on Mac Mail go to file -> preferences or press the buttons on your computer’s keyboard “command + ,” to open the Mac Mail preferences.
At the top select account, then select the account that is giving problems in the left bar and click on the “-” symbol at the bottom to delete the account.
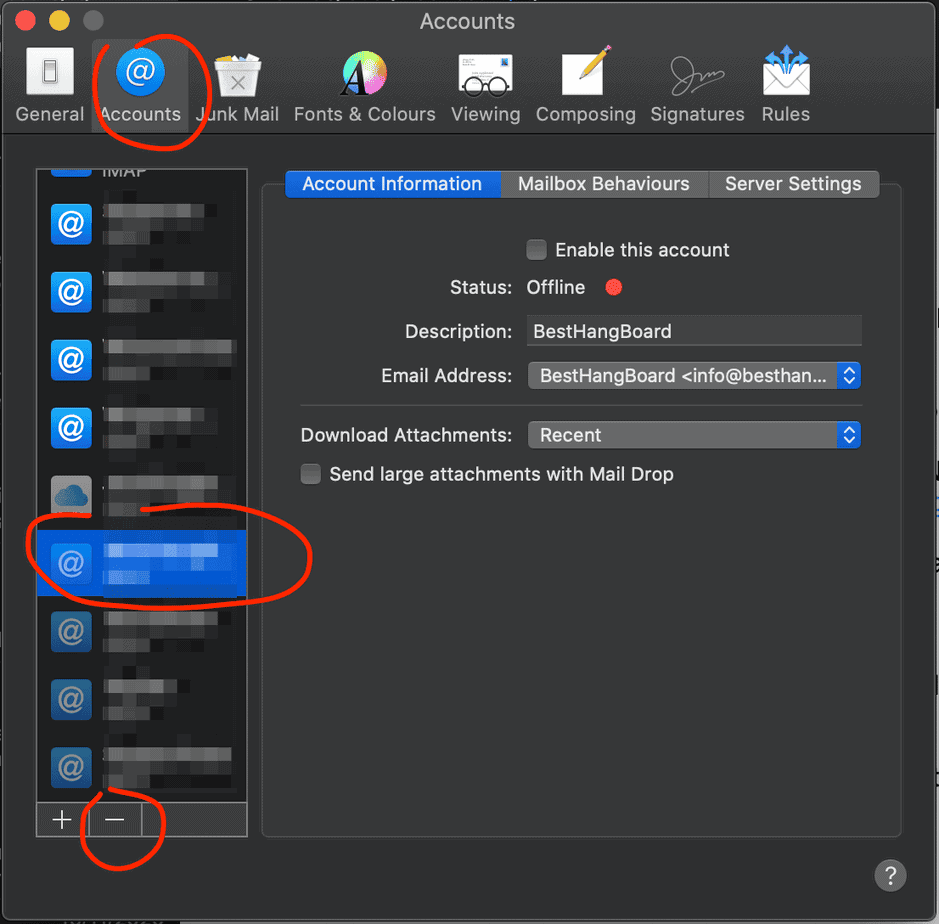
At this point it will ask you for a confirmation to proceed with the deletion.
Add mail account again
At this point add the account again on the mail client to resolve the issue.
During the installation of the account the program will show you the usual error message; when this window appears press on Details and then on Authorize.
In this way even if the certificate is not trusted by Apple you can force the mail client of your iPhone to trust the certificate.
As always restart and verify the operation.
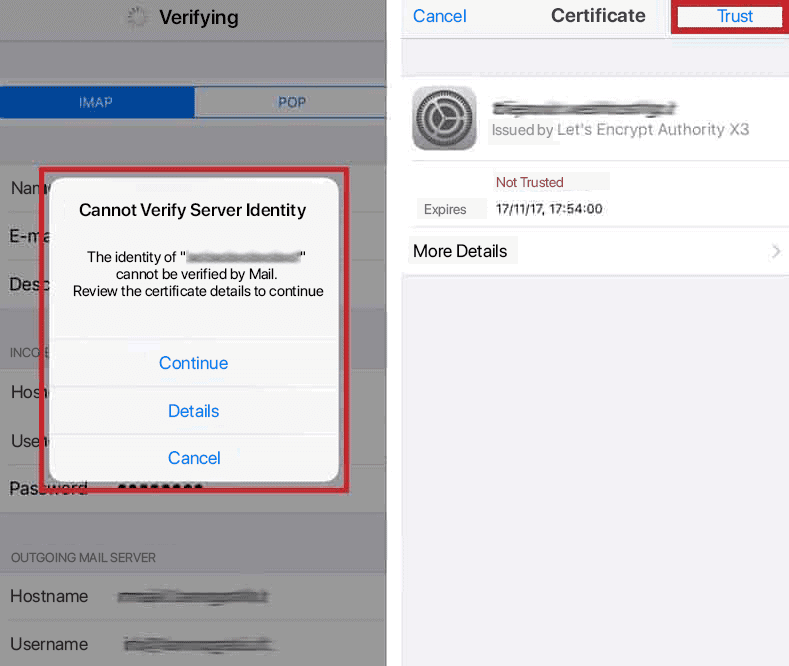
On Mac Mail the steps are slightly different but the principle is the same, you have to tell your computer to trust the certificate by giving your permission.
Trust the mail certificate
As we see in the image above, under the mail certificate error we see a details button.
The same happens for Mac Mail, we have the option to see the certificate details.
The idea here is to fix the problem by telling the client to always trust this certificate. This mail certificate error can in fact be fixed by clicking on “Install certificate” or “Always accept certificate”.
Of the solutions described so far, this is the one most likely to solve your mail certificate problem.
Change the mail server
I explained earlier in a brief manner how SNI works and why we get this mail certificate error.
If you are using mail.dominio.it (domain.it is the name of your site), you can try to solve it by changing the mail server.
We don’t recommend doing this, because in case your site is moved from one server to another (for example if you upgrade from a shared hosting to a semi-decicated hosting) you will have to reconfigure the mail client.
When you add an email address on the mail client you have to specify an incoming mail server and an outgoing mail server. You can change these two parameters at any time.
You can use the name of the server, which in our case will be name.svrsh.com
Disable SSL
If you still couldn’t solve the problem, this is the last option you have.
If the problem persists, you need to disable the use of SSL for incoming mail.
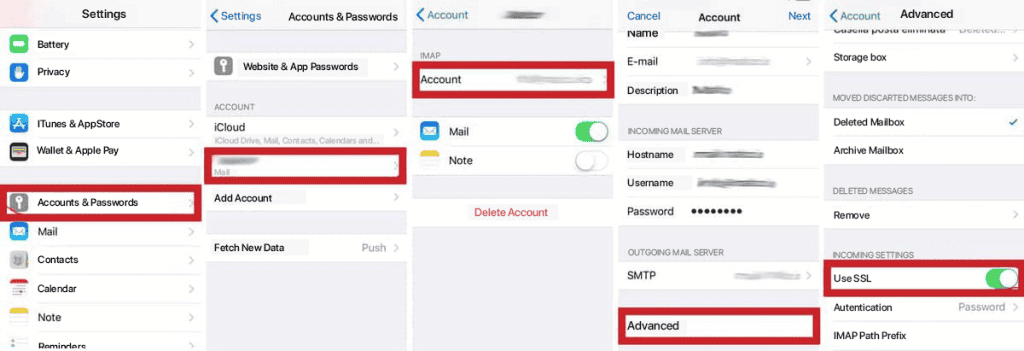
- From your phone settings, select Accounts and passwords;
- Scroll down to the Account section and select your email;
- In the IMAP section, select your email again;
- Under Outgoing Mail Server select Advanced;
- Under Inbox settings select Use SSL;
Now restart your phone and check if the certificate has been correctly accepted.
Conclusion
In this guide we have seen what causes the “unable to verify server identity” error.
We have seen various ways to solve it and examined how to authorize the mail certificate and how to delete it.
Did you manage to solve the problem? Not yet? Let me know in a comments below!


Leave a Reply