
Are you encountering an error when trying to establish a database connection, preventing you access to your WordPress site? In this guide, we will explain the potential causes and how to fix them.
The error may stem from configuration issues, internal database errors, or problems contacting the server hosting the database.
We’ll first describe what this error looks like and its variants before moving on to the step-by-step solutions.
Table of Contents
What is the Error in Establishing a Database Connection?
The error in establishing a database connection is a problem related to the WordPress database, which can occur when you try to access your site.
WordPress sites need to request data from the database to function and display information. All content, including posts and pages, is stored in the database, along with information necessary for themes and plugins to operate.
Therefore, a problem with database requests can cause the entire website to stop working.
When there is an issue connecting to the database, you will see a blank screen with the following error message:
“Error Establishing A Database Connection.“

Depending on the page, you might see a more specific error message that helps identify the problem. Let’s look at some examples.
Errore “Cannot select database”
The “Cannot select database” error indicates that the username and password are correct, but the database cannot be connected.
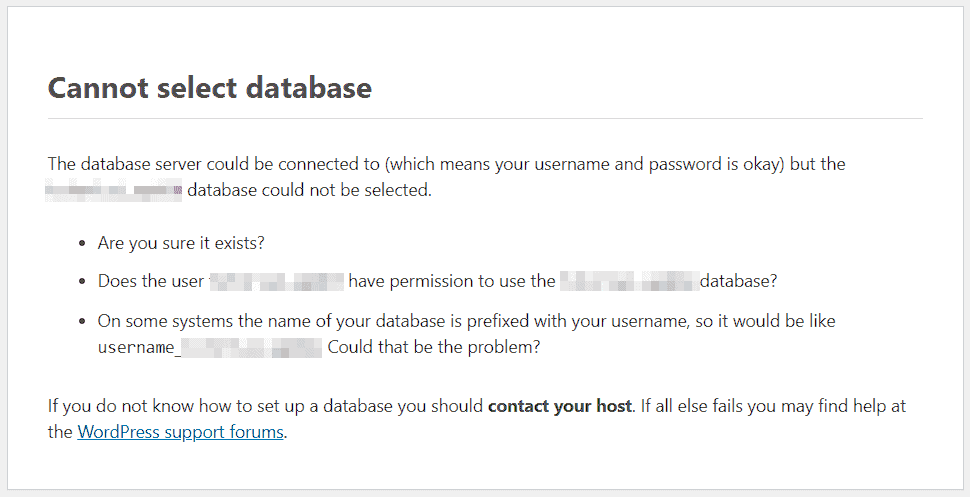
Solutions to follow:
- Ensure the database exists.
- Verify user permissions.
- Check that the database name is correct, as it may be prefixed with the username.
Error establishing a database connection
In other cases, you might see “Error establishing a database connection” with a warning to check for errors in the wp-config.php file information or for issues connecting to the server where the database is hosted.
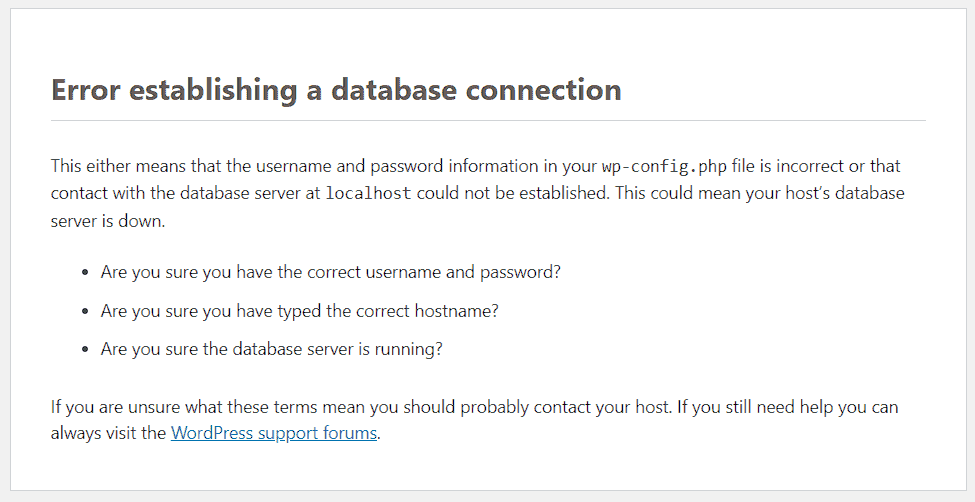
Steps to take in this scenario:
- Verify the username and password are correct.
- Check the hostname. If the database is on a different server, you must specify it; otherwise, you won’t be able to connect. For local databases, the hostname is typically “localhost”.
- Determine if the problem is server-related.
“One or more database tables are unavailable” error
If the database information is corrupted, you might see this warning:

“One or more database tables are unavailable. The database may need to be repaired.”
Clicking “repaired” will provide instructions on how to start repairing the database.
In the following sections, we’ll explain exactly how to do this.
Understanding the Error in Establishing a Database Connection
A WordPress database connection error can occur due to several common issues:
- Incorrect database access information: This often happens if you transferred a WordPress site and didn’t update the database details.
- Corrupt database.
- Corrupt WordPress files.
- Database server is unreachable.
In summary, the error in establishing a connection to the WordPress database can be due to configuration errors, database issues, or server connection problems.
Let’s go through how to fix these issues.
How to Fix the Error in Establishing a Database Connection
We’ll discuss solutions to the database connection error.
First, let’s check that the database login information is correct. After that, we’ll cover how to recover a corrupted database, restore WordPress files, or recover a backup.
Check the Database Access Information
In most cases, the WordPress database connection error results from incorrect database login information.
As mentioned earlier, you should verify the correctness of this information. But what data are we referring to, and how do we verify it?
WordPress needs the following information to access the database:
- Database name
- Username
- password
- Host name
This information is provided to WordPress through the wp-config.php file.
So, we need to check that the information in the wp-config.php file is correct. Here’s how to verify each piece of data.
Check the Database Name
First, we can check if our WordPress site is connected to the correct database.
To do this, open the wp-config.php file located in the folder where you installed WordPress.
Tip: If your WordPress installation is in the domain root, you’ll find the configuration file in the public_html folder (sometimes the folder may be named after the site). If the site is installed in a subfolder, such as “domain.com/blog,” the file will be in the “blog” folder, accessible via the public_html > blog path.
The code line we need to check is the following:
/** The name of the database for WordPress */
define( 'DB_NAME', 'tutorial_wp11' );
In this example, the database name is “tutorial_wp11”. Now, we need to verify that this database is associated with the site.
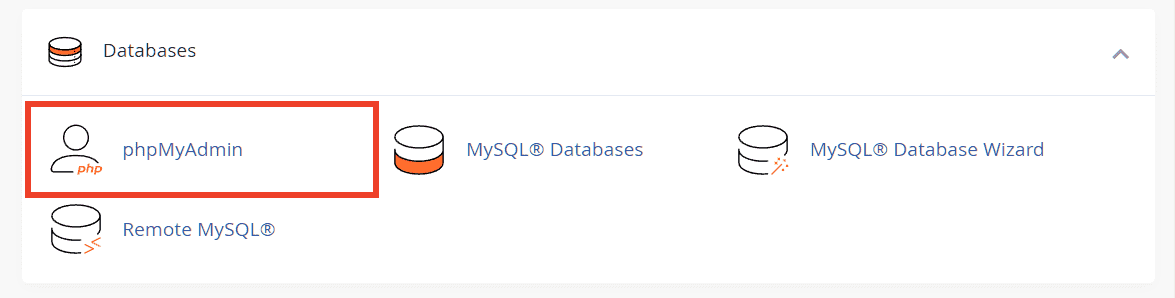
To do this, open phpMyAdmin: you can access it directly from cPanel by going to Database > phpMyAdmin, or by using the search bar.
On the left side, you will see a list of databases. Click on the one with the same name found in the wp-config.php file, and then click on the “wp_options” table.
Important: The table name may not be exactly “wp_options”; the prefix might differ. To find the correct table, look for the one where the part after the underscore is “options”.
Next, check the values of the “siteurl” and “home” options to ensure they match the site address.

Check the database username and privileges
Similar to the previous step, open the wp-config.php file to find the database username and verify its correctness.
Look for this line:
/** Database username */
define( 'DB_USER', 'tutorial_user123' );
In this example, the username is “tutorial_user123”.
Now, verify that this user is connected to the database and has the necessary privileges.
In cPanel, open the MySQL Database tool. In the Current Databases section, you will see the database name and the associated user.

Note: Sometimes the username may have a prefix, like “prefix_name”. Always ensure that the full name is entered in the wp-config.php file.
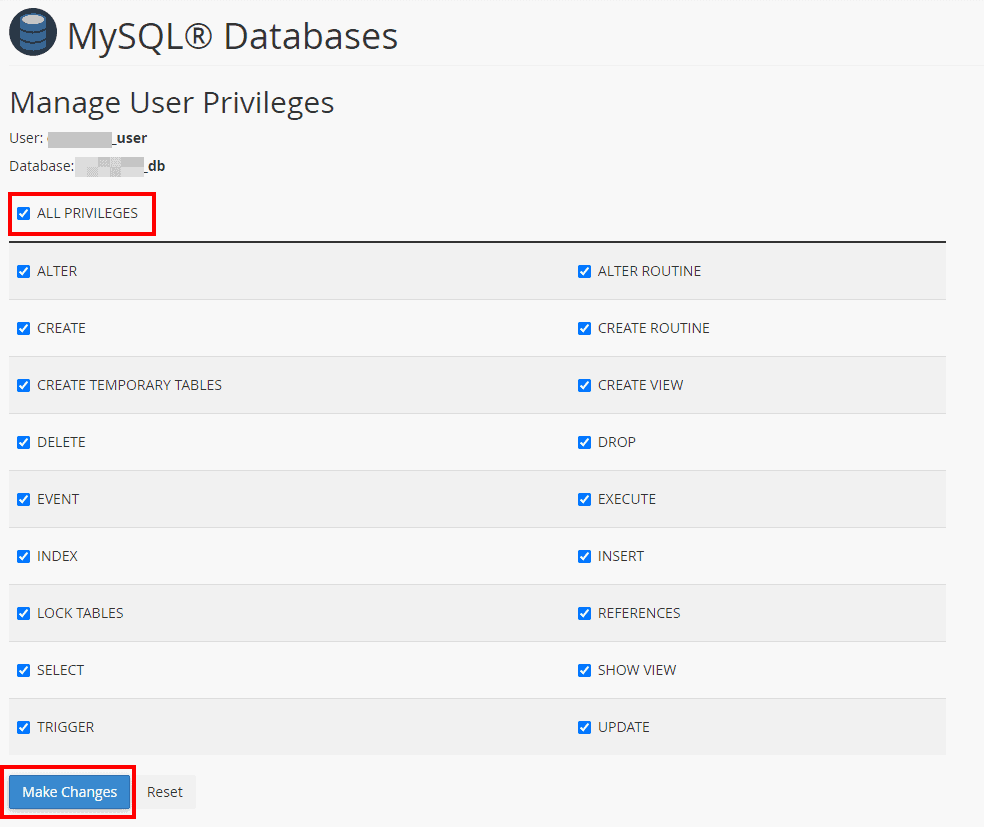
From the list of current databases, click on the username to check privileges. Ensure that “All privileges” is selected. If it’s not, check it and click the “Make Changes” button.
Verify the password
When you create a database user, you also create a password. You cannot retrieve the database password from cPanel, but you can reset it.
Open the wp-config.php file and locate the password with this line:
/** Database password */
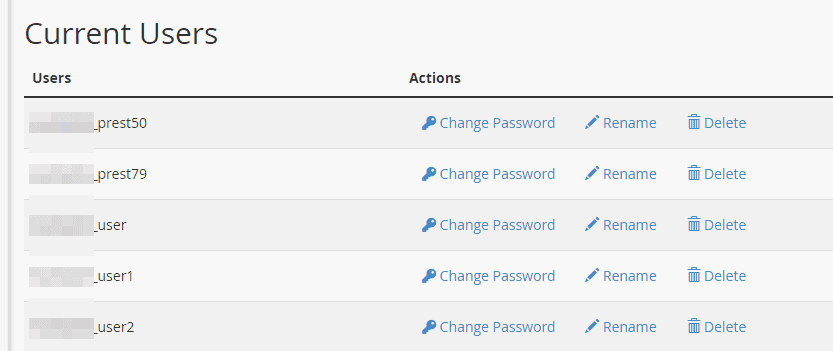
define( 'DB_PASSWORD', '657p857@S' );Go to the MySQL Database section in cPanel and scroll down to “Current Users.” Click on “Change password” next to the user, in this case, “tutorial_user123”.
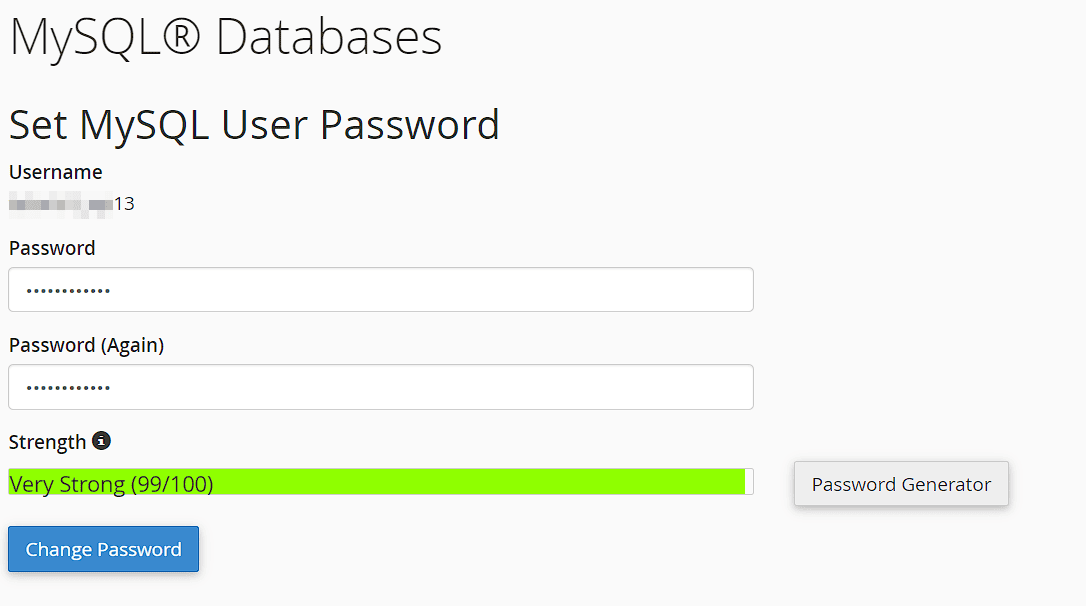
Enter the same password from the wp-config.php file in both fields and click the Change Password button.
Verify the database hostname
Finally, verify the hostname needed to connect to your database.
The hostname identifies the server where the database resides. It can be “localhost” if the database server is the same as the web server, or an IP address if they are on separate servers.
By default, SupportHost uses localhost as the hostname.
If your provider uses a separate database server, enter the IP address of the correct server. This information is typically provided when your plan is activated, or you can contact support for assistance.
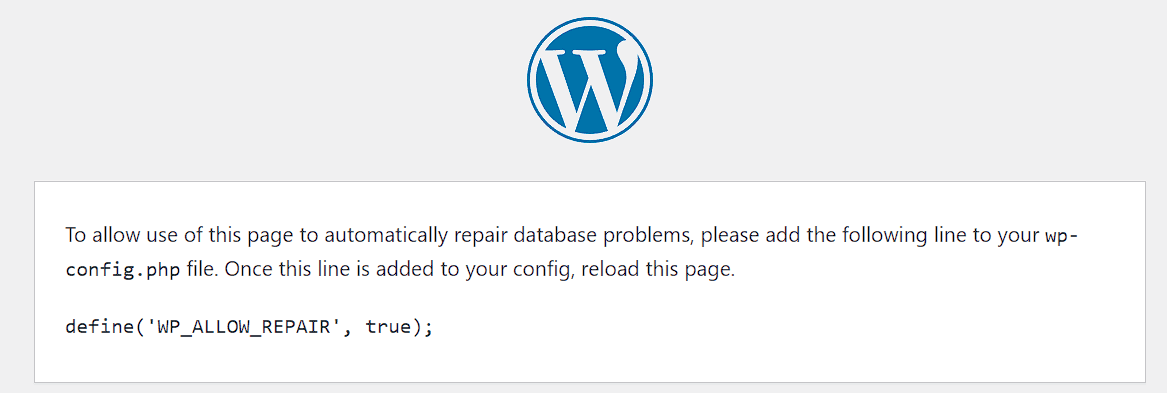
Repairing the Database
As we mentioned at the beginning of this guide, sometimes the error alert indicates problems in one or more tables in the database. We may be able to fix them by initiating a repair.
WordPress has a built-in database repair feature that can be activated by modifying a line of code in the wp-config.php file. This feature can also be useful if you encounter an HTTP error 405.
Note: Before proceeding, it is highly recommended to make a full backup of the site’s files and database. Always make a backup when modifying configuration files.
The first step is editing the wp-config.php file and inserting the following line:
define('WP_ALLOW_REPAIR', true);Add this line before the line that says, “That’s all, stop editing! Happy publishing.” For example:

Save the changes and visit the following URL, replacing domain.com with your domain name:
https://domain.com/wp-admin/maint/repair.php
On this page, you will see an option to either “Repair Database” or “Repair and Optimize Database.” To speed up the process, choose “Repair Database.”

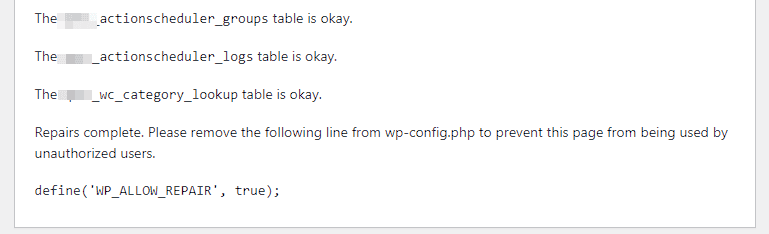
Once the repair is complete, you will see a report detailing the repaired tables.
It is very important to edit the wp-config.php file again and delete the line you added earlier:
define('WP_ALLOW_REPAIR', true);Other Methods to Repair the WordPress Database
There are additional ways to initiate a WordPress database repair:
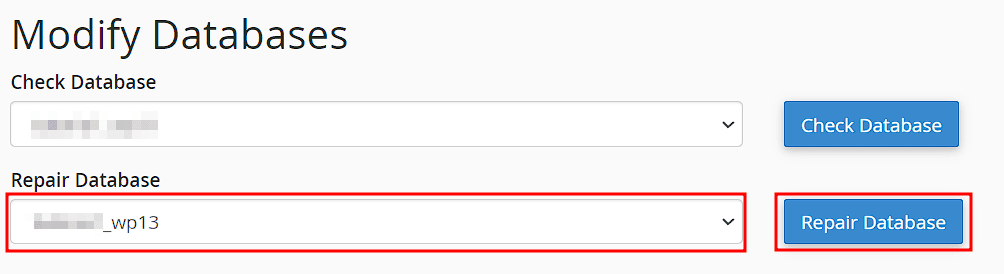
For example, from cPanel we can open the tool “MySQL Databases” from the Database section and then select the database and click on “Repair Database” as in this example.
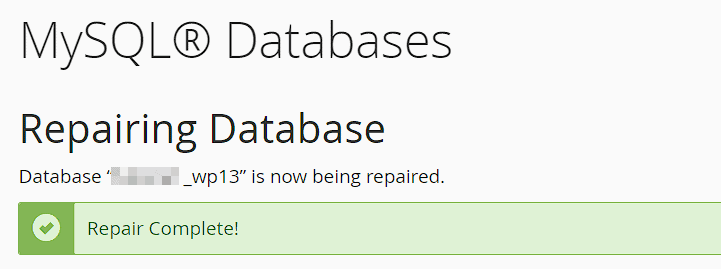
Upon completion, we will see a message like the following if the operation was successful.
You can also repair the database using phpMyAdmin:
- Open phpMyAdmin.
- Select the correct database from the left menu.
- Select all tables and click on “Repair Table.”

Restoring WordPress Core Files
If the previous methods didn’t work, another possible solution is to replace the core files, which are essential for the site to function.
Note: Restoring the core files won’t result in data loss, but it’s always a good idea to back up your site before proceeding.
To do this, download the version of WordPress that matches your site from WordPress.org to replace the existing files.
First, go to WordPress.org and download WordPress. This will provide you with a zipped version of the WordPress files. Extract the contents from the archive and delete the wp-content folder. It’s important to delete this folder to avoid losing installed plugins and themes.
Next, upload the files and folders to your server, overwriting the existing files.
After completing the procedure, ensure that the wp-config.php file remains unchanged.
Restoring a Backup
Another method to solve the WordPress database connection issue is to restore a backup. This can be helpful if the error is caused by corrupt files or databases. It’s advisable to perform a complete file and database restore.
There are several ways to restore a backup. For a manual backup, you just need to upload the files and import the database. You can find the complete restore procedure in the WordPress backup guide.
If you’re a SupportHost customer and you have a WordPress hosting plan, you can also restore from an automatic Jetbackup backup. Tutorials for restoring files and databases can be found here.
Checking if It’s a Server Issue
One of the main causes of the error in establishing a database connection could be an issue with the server hosting the database.
For instance, several simultaneous database calls might have triggered the error, or the server might be down for maintenance. If the server is down, you shouldn’t be able to access the database through phpMyAdmin.
If you suspect this is the case, contact your hosting provider to report the problem and check if the error is due to a server issue.
Conclusions
We’ve explored how to fix the error in establishing a database connection on WordPress.
First, verify that the database connection details are correct.
Next, perform other checks, such as ensuring the server is reachable or attempting to repair the database. If all else fails, you can restore a backup.
Were you able to fix the problem? Which solution worked for you? Let us know in the comments.
Ready to build your WordPress site?
Try our service free for 14 days. No obligation, no credit card required.


