
Are you trying to use regular blog posts for every style of content on your WordPress site?
If you’re mixing products, team bios, portfolio projects, and case studies all into your blog, things probably feel messy. Your content gets cluttered, it’s hard to find what you need, and your readers will have a poor experience.
Luckily, you can solve this problem with custom post types. These make it easy to create dedicated sections for different kinds of content.
Below, you’ll learn what custom post types are, when you need them, and two ways to create them. You’ll learn the quick and easy way by using a WordPress plugin and a manual code approach for more flexibility.
Table of Contents
What Are WordPress Custom Post Types?
WordPress uses something called post types to organize different kinds of content on your site. When you create a blog post, you’re using the post post type. When you create an about page, you’re using the page post type.
But WordPress actually includes several post types by default. Here are the most widely used post types built into WordPress:
- Post. Your blog entries and articles
- Page. Static content like About, Contact, or Services pages
- Attachment. Media files like images, PDFs, and videos
- Revision. Saved drafts and edit history
- Navigation Menu. Your site’s menu items
Custom post types let you add your own content types to this list. For example, say you run a book review site. You’d probably want to create a Book Reviews post type. A photography portfolio site might need a Projects post type. While eCommerce stores use a Products post type (WooCommerce actually creates this for you automatically).
Each custom post type can have its own layout, custom fields, categories, and tags. This keeps everything organized and makes your site much easier to manage as it grows.
Many popular WordPress plugins actually use custom post types behind the scenes. WooCommerce creates a product post type for your store. WordPress form plugins like WPForms create a wpforms post type to store your form submissions.
Do You Actually Need a WordPress Custom Post Type?
Before you start creating custom post types, take a minute to think about whether you really need one.
Sometimes you can get the same result with regular posts and categories. If you’re just trying to organize WordPress blog content by topic, categories, or tags will work fine. You don’t need a custom post type for that.
Here’s when you should use a custom post type.
You need content that’s fundamentally different from blog posts. Products aren’t blog posts. Client case studies aren’t blog posts. Portfolio projects aren’t blog posts. These deserve their own post types.
You want different layouts or templates for different content. Maybe your portfolio items need a grid layout while your blog uses a standard list. Custom post types make this easy.
You need custom fields that only apply to specific content. Your book reviews need fields for author, rating, and release date. Your regular blog posts don’t. Custom post types let you add these fields to only the content that needs them. You can always convert to custom post types later if your needs change.
Method 1: Creating WordPress Custom Post Types Using a Plugin
The easiest way to create custom post types is with a WordPress plugin. This method is perfect if you want to get things done quickly without writing any code or if you’re building a site for someone else who needs a visual interface to manage their content types.
For this, we’ll be using the Custom Post Type UI plugin. It’s free, has over 1 million active installations, and makes the whole process really straightforward.
Installing Custom Post Type UI
First, you need to install and activate the plugin. To do this, go to Plugins > Add New in your WordPress dashboard. Then, search for Custom Post Type UI in the search bar. Click Install Now on the plugin, then click Activate once installation finishes. Now, you’ll see a new CPT UI menu item in your WordPress sidebar.

Adding Your First Custom Post Type
Go to CPT UI > Add/Edit Post Types to get started. You should be on the Add New Post Type tab. This is where you’ll set up your custom post type.
The first field you’ll see is Post Type Slug. This is the internal name WordPress uses for your post type. It appears in URLs and database queries, so it can only contain lowercase letters and numbers. No spaces, no special characters.
Let’s say you’re creating a book review site. You’d enter book as your slug. For a portfolio site, you might use project. Keep it simple and descriptive.
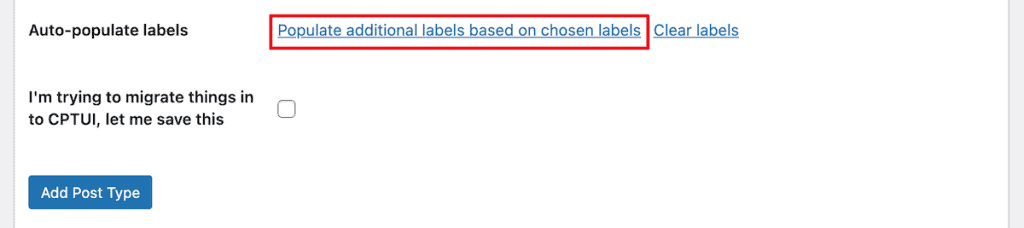
Below the slug, add the plural and singular labels for your post type. These are the names that appear in your WordPress admin area. For our book example, you’d put Books for plural and Book for singular.

After that, click the link that says Populate additional labels based on chosen labels. This automatically fills in all the other label fields using the names you just entered. You can always customize them later if needed, but this gets you 90% of the way there instantly.
Configuring Additional Labels
After that, scroll down to the Additional Labels section. These labels appear throughout the WordPress interface when you’re working with this post type. If you clicked the auto-populate link, most of these will already be filled in.

Setting Up Basic Options
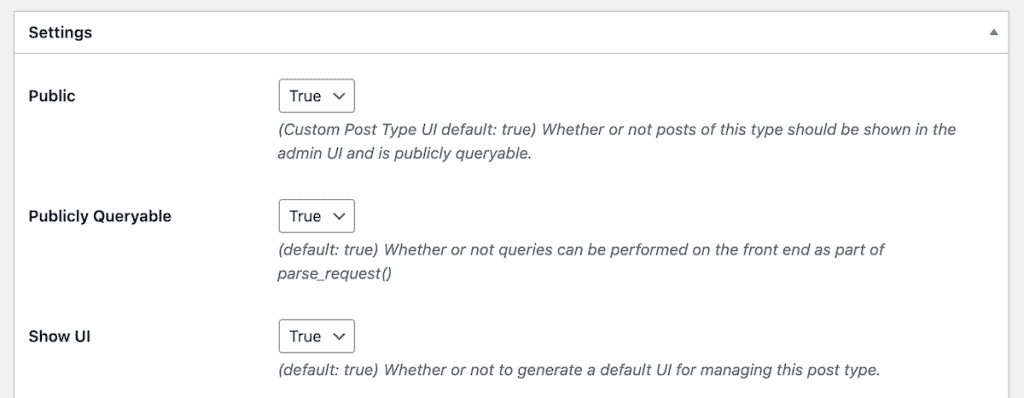
Next comes the settings section. This is where you control how your post type behaves.
The Public setting should be set to True. This makes your custom post type visible on your site. If you set it to False, the post type would only be visible in the admin area.
Then, set Archive to True if you want an archive page that lists all items of this post type. Think of it like your blog page, but for your custom content. Most of the time you’ll want this enabled.
The Hierarchical setting determines whether your post type works like posts or pages. Posts are not hierarchical (they’re just a flat list). Pages are hierarchical (you can have parent and child pages). For most custom post types, you’ll want to leave this set to False so they work like posts.
Choosing Features and Taxonomies
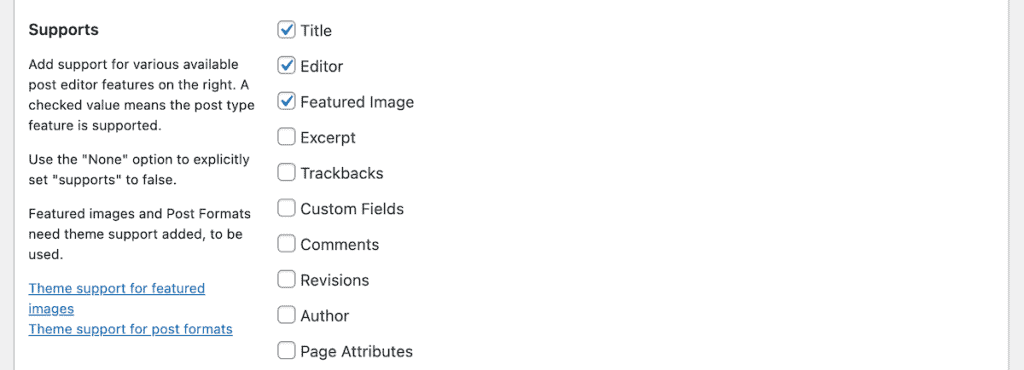
Under Supports, check the boxes for features you want to include in the editor. Most custom post types will want Title, Editor, and Featured Image at a minimum. You might also want Excerpt, Custom Fields, or Comments, depending on your needs.
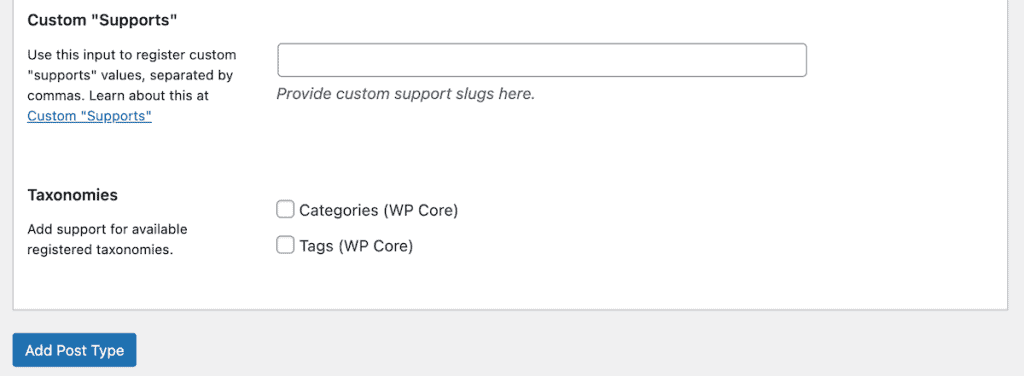
If you want categories and tags for this post type, scroll down to the Taxonomies section and check the boxes for Categories and/or Tags. Once you’re happy with all the settings, click the Add Post Type button at the bottom of the page.
That’s it. You’ve created your first custom post type. You’ll now see it in your WordPress sidebar, and you can start adding content to it just like you would with regular posts.
Method 2: Creating WordPress Custom Post Types Manually With Code
Creating custom post types with code gives you more control and flexibility. It also means your custom post type won’t disappear if you deactivate a plugin. This method is best if you’re comfortable with basic PHP and want complete control over every aspect of your custom post type.
There are two ways to add the code. You can use your theme’s functions.php file, or you can create a site-specific plugin. We’ll show you the site-specific plugin method because it’s safer and won’t get erased when you update your theme.
Creating a Site-Specific Plugin
First, you need to connect to your site using FTP or File Manager in your hosting control panel. If you’re using SupportHost, you can access File Manager through cPanel.
Navigate to the wp-content/plugins folder. This is where all your WordPress plugins live.
Create a new folder inside the plugins directory. Name it something descriptive like custom-post-types or site-specific-plugin. The name doesn’t really matter as long as it’s unique.
Inside your new folder, create a PHP file with the same name. So if your folder is called “custom-post-types”, create a file called custom-post-types.php.
Now open that PHP file in a text editor and add this basic plugin header at the very top.
<?php
/**
 * Plugin Name: Custom Post Types
 * Description: Registers custom post types for this site
 */
This tells WordPress that this folder contains a plugin. You can customize the name and description however you want. Then, save the file, and go back to your WordPress dashboard.
Navigate to Plugins > Installed Plugins and find your new plugin in the list. Click Activate to turn it on.
Now you’re ready to add the code that actually creates your custom post type.
The Basic Custom Post Type Code
Here’s the simplest code to create a custom post type. Add the code below the plugin header in your PHP file.
function create_book_post_type() {
    register_post_type( 'book',
        array(
            'labels' => array(
                'name' => 'Books',
                'singular_name' => 'Book'
            ),
            'public' => true,
            'has_archive' => true,
            'rewrite' => array('slug' => 'books'),
            'show_in_rest' => true,
        )
    );
}
add_action( 'init', 'create_book_post_type' );
Let’s break down what this code does.
The register_post_type() function is what actually creates the custom post type. The first parameter ('book') is the post type slug. This is the internal name WordPress uses.
The labels array defines what appears in your WordPress admin, 'name' is the plural label, 'singular_name' is the singular version.
public set to true makes this post type visible on your site and in the admin area.
has_archive set to true creates an archive page for this post type, similar to your blog page.
The rewrite array customizes the URL slug. Instead of yoursite.com/book/post-name, this makes it yoursite.com/books/post-name.
show_in_rest set to true enables the block editor (Gutenberg) for this post type. Without this, you’d be stuck with the classic editor.
The add_action() line at the end hooks this function into WordPress so it runs when WordPress initializes.
Save your file and visit your WordPress dashboard. You should see Books in your sidebar. You can now add content just like you would with posts.

Adding More Options and Features
The basic code works fine, but you might want more control over your custom post type. Here’s a more complete version with additional options.
function create_book_post_type() {
    $labels = array(
        'name' => 'Books',
        'singular_name' => 'Book',
        'menu_name' => 'Books',
        'add_new' => 'Add New',
        'add_new_item' => 'Add New Book',
        'edit_item' => 'Edit Book',
        'new_item' => 'New Book',
        'view_item' => 'View Book',
        'all_items' => 'All Books',
        'search_items' => 'Search Books',
        'not_found' => 'No books found',
        'not_found_in_trash' => 'No books found in trash'
    );

    $args = array(
        'labels' => $labels,
        'public' => true,
        'publicly_queryable' => true,
        'show_ui' => true,
        'show_in_menu' => true,
        'query_var' => true,
        'rewrite' => array( 'slug' => 'books' ),
        'capability_type' => 'post',
        'has_archive' => true,
        'hierarchical' => false,
        'menu_position' => 5,
        'menu_icon' => 'dashicons-video-alt3',
        'supports' => array( 'title', 'editor', 'thumbnail', 'excerpt', 'custom-fields', 'revisions' ),
        'taxonomies' => array( 'category', 'post_tag' ),
        'show_in_rest' => true,
    );

    register_post_type( 'book', $args );
}
add_action( 'init', 'create_book_post_type' );
This expanded version gives you much more control. The labels array defines text for every screen in the WordPress admin. The supports array determines which features appear in the post editor.
You can enable the title, editor, featured image (thumbnail), excerpt, custom fields, comments, author info, and revision history. Just add or remove items from the supports array.
The menu_icon parameter lets you choose an icon for your sidebar menu. WordPress includes a set of built-in icons called Dashicons. Just replace ‘dashicons-video-alt3’ with the name of any icon you want.
The menu_position parameter controls where your custom post type appears in the sidebar. Lower numbers move it higher in the menu. Here are the default positions.
- 5 = Below Posts
- 10 = Below Media
- 20 = Below Pages
- 25 = Below Comments
- 60 = Below first separator
- 65 = Below Plugins
- 70 = Below Users
- 75 = Below Tools
- 80 = Below Settings
Setting it to 5 places your custom post type right below Posts at the top of your menu.
The taxonomies array lets you enable categories and tags for your custom post type. If you don’t want them, just remove that line or set it to an empty array.
Customizing Your Custom Post Type
Now that you’ve created a custom post type, let’s look at a few practical customizations you might want to make.
Making Your Post Type Hierarchical
By default, custom post types work like blog posts. They’re listed chronologically and don’t have parent-child relationships. If you want your custom post type to work more like pages (with the ability to set parents and children), you need to change the hierarchical setting.
In your code, change this line.
'hierarchical' => true,You also need to make sure your supports array includes ‘page-attributes’. This adds the parent selector dropdown in the editor.
'supports' => array( 'title', 'editor', 'thumbnail', 'page-attributes' ),Now, when you edit items in this post type, you can set parent-child relationships just like you can with pages.
Adding Custom URL Slugs
The rewrite parameter controls what your URLs look like. By default, WordPress will use your post type name in the URL. If your post type is book, the URL will be yoursite.com/book/post-name.
You can customize this to anything you want.
'rewrite' => array( 'slug' => 'novels' ),Now your URLs will be yoursite.com/novels/post-name instead. This is useful if you want cleaner or more descriptive URLs.
Excluding from Search Results
Sometimes you might want a custom post type that doesn’t appear in your site’s search results. Maybe you’re using it for internal data or draft content that shouldn’t be publicly searchable.
Add this parameter to exclude the post type from search.
'exclude_from_search' => true,Items in this post type will still be accessible if someone has the direct URL, but they won’t show up when visitors use your site’s search feature.
Changing the Menu Icon
We mentioned this earlier, but it’s worth emphasizing because it makes your admin area look more professional. The default icon for custom post types is the same pushpin icon used for Posts.
You can change it to anything from the Dashicons library. Here are some popular choices.
'menu_icon' => 'dashicons-video-alt3',  // Video camera
'menu_icon' => 'dashicons-portfolio',    // Portfolio/grid
'menu_icon' => 'dashicons-products',     // Products/box
'menu_icon' => 'dashicons-star-filled',  // Star
'menu_icon' => 'dashicons-book',         // Book
You can also use a custom image if you want. Just provide the full URL to your image file instead of a Dashicons name.
WordPress Custom Post Types FAQs
What’s the difference between a custom post type and a category?
A custom post type is a completely different content type, while a category is just a way to organize existing posts. If you run a recipe site, Recipes would be a custom post type, while Desserts and Main Courses would be categories within that post type. Custom post types let you have different fields, templates, and structures. Categories just group similar content together.
Will deleting a custom post type delete all my content?
No, the content stays in your database. But it becomes hidden and inaccessible through the WordPress admin. If you re-create the custom post type with the exact same slug, all your content will reappear. That said, you should always back up your site before removing any post types, just to be safe.
Can I convert regular posts to a custom post type?
Yes, but you’ll need to use a plugin or manually change the post type in your database. The Post Type Switcher plugin makes this easy. Just install it, edit any post, and you’ll see a dropdown to change the post type. This is helpful if you started with regular posts and later realized you needed a custom post type.
Do custom post types slow down my site?
Not really. Custom post types are a built-in WordPress feature, so they’re very efficient. Using a plugin to create them adds minimal overhead. The only time performance becomes an issue is if you create dozens of custom post types or add very complex queries. For most sites with a handful of custom post types, there’s no noticeable performance impact.
Can I add custom fields to my custom post type?
Absolutely. In fact, that’s one of the main reasons to use custom post types. You can use a plugin like Advanced Custom Fields to easily add custom fields to any post type. This lets you add structured data like ratings, prices, dates, or any other information specific to that content type.
Closing Thoughts: Creating and Using WordPress Custom Post Types
Custom post types are one of WordPress’s most powerful features for organizing content. Once you start using them, you’ll wonder how you managed without them.
Whether you choose the plugin method or the manual code approach, the result is the same. You get dedicated content sections that keep your site organized and make managing content much easier.
Start simple. Create one custom post type for your most important content type (products, projects, team members, whatever makes sense for your site). Get comfortable with how it works. Then you can always add more later as your needs grow.
The Custom Post Type UI plugin makes the process incredibly easy if you’re not comfortable with code. But if you want maximum flexibility and control, learning to register post types manually is worth the effort.
Now it’s your turn. What custom post types are you planning to create for your site? Let us know in the comments below.
Ready to build your WordPress site?
Try our service free for 14 days. No obligation, no credit card required.


