
Building a website doesn’t have to be complicated. With Divi for WordPress, you can create a professional site without writing a single line of code. It’s a powerful WordPress theme and page builder in one. Divi gives you all the tools to customize your site exactly how you want without needing technical skills.
In this guide, we’ll walk you through how to build a website with Divi, step by step.
Table of Contents
What is Divi?
Divi is a WordPress theme and page builder by Elegant Themes. It comes with a simple drag-and-drop visual editor (called Divi Builder) that makes website creation easy. You can tweak layouts, adjust colors, change fonts, and add elements like buttons and images without ever touching a single line of code.

Why is Divi so Popular?
- No coding required. Just move elements around and see changes instantly.
- Over 2,600 templates to choose from, so you don’t have to start from scratch.
- Every design is automatically responsive, meaning it looks great on phones, tablets, and desktops.
- You have total customization to adjust colors, fonts, spacing, and layouts without limits.
- Comes with built-in SEO, forms, sliders, and more, so you don’t need many plugins.
Who is Divi Best For?
Divi works for almost anyone who wants to build a website without dealing with technical headaches, but the following groups will enjoy it the most:
- Beginners – If you’ve never built a website before, Divi makes it easy.
- Business Owners – Create a professional site for your company without hiring a developer.
- Bloggers – Customize your blog layout and make posts look exactly how you want.
- Ecommerce sellers – Works seamlessly with WooCommerce to build an online store.
How Much Does Divi Cost?
Divi is a premium WordPress theme, which means there’s no free version. However, it comes with flexible pricing options and a 30-day money-back guarantee, so there’s no risk to try it.
Divi offers two main pricing options:
Divi Standard: $89/year or $249 for lifetime access. This includes the Divi Theme, Divi Builder, and all Elegant Themes products. You can use it on as many websites as you like.
Divi Pro: $277/year or $297 for lifetime access. This includes everything in the Standard plan plus some extra features:
- Divi AI – AI-powered design tools
- Divi Cloud – Unlimited cloud storage for layouts and content
- Divi VIP – Faster support (responses within 30 minutes) and 10% off Divi Marketplace
- Divi Teams – Share access with up to 4 other users
- $50 Divi Marketplace Credit.
Does Divi Have a Free Trial?
No, Divi doesn’t offer a free trial or a free plan. However, they have a 30-day refund policy, so if you don’t like it, you can get your money back, no questions asked.
If you plan to use Divi for multiple sites, the lifetime deal is a great option since it saves money in the long run.
How to Try Divi for Free
If you want to try Divi before making a purchase, you can take a product tour and experiment with the Divi Builder for free. Try Divi for free.
How to Build a Website with Divi
Let’s walk through the steps of building a website with Divi!
For this tutorial, we assume that you already have a hosting plan with a domain name. If not, learn about web hosting and how to choose a host.
We also assume that you have WordPress installed on your website. If not, check out our WordPress installation guide.
If you use a SupportHost WordPress hosting plan, there’s no need to install WordPress manually. Everything comes installed and ready to go.
Step 1: Purchase and Install Divi
Choose your Divi plan and make your purchase. Then log into your Elegant Themes account and navigate to the Members Area.
Click the Download The Divi Theme button to save the Divi Theme zip file to your desktop.

Next, navigate to your WordPress dashboard and visit Appearance > Themes. Click the Add New Theme button at the top.

On the next page, click the Upload Theme button. This will show a file upload form.

You can either drag and drop the Divi.zip file that you downloaded earlier, or click the Choose File button and locate the file on your computer. Once you see the Divi.zip file in the field, click Install Now. Once the theme is installed, click the Activate button.

Step 2: Authenticate Divi
In order to use Divi, you have to authenticate your Elegant Themes membership. This tells the theme that you have a valid license.
Log into your Elegant Themes account and navigate to Account > API Keys. Copy your API Key. If you don’t see an API key, click Generate New API Key.

Head back to your WordPress website dashboard and visit Divi > Theme Options > Updates. Enter your username and API key in the appropriate fields. Click Save Changes.

Now your Elegant Themes membership is linked with Divi. You have full access to the theme and will receive future updates.
Step 3: Configure Global Settings
Before you start building individual pages, it’s a good idea to configure your global settings. These settings will impact your entire site. Visit Divi > Theme Options.

There are a lot of settings to explore, so we won’t go through them all, but here’s a quick overview.
- General: Options for your site’s logo, color palette, social media links, fonts, performance, CSS and Javascript, JavaScript Libraries, and more ways to improve your site speed.
- Navigation: Control your navigation bar, what appears on it, and in what order, including sub-categories. You can even disable parts of it.
- Builder: Enable or disable the builder on certain post types, options to control how CSS is written, and when/whether to use the Classic Editor.
- Layout: Choose what information to display in the post info section, show or hide comments, and place thumbnails on posts and pages.
- Ads: Settings that configure ads displayed on your website.
- SEO: Enable custom titles, descriptions, and keywords on various pages.
- Integration: Enable header code, enable body code, add code to the <head> of your blog, add code to the <body> tag, and more.
- Updates: This is where you authenticate your Elegant Themes membership.
Step 4: Create a Global Header and Footer
Every website needs a header that appears on every page. It typically includes your site logo, a search bar and a navigation menu. Some sites like to use this space for a call to action button.
To create a Global Header, navigate to Divi > Theme Builder > Add Global Header.

You will be redirected to the Divi Builder where you can create your own header. Start by inserting a row, usually with two or three columns.

Next add an image module for your logo and select or create your navigation menu.
Finally, personalize each component of your head (the section row, image, and menu) with whatever settings are right for your site. You can adjust background colors, fonts, sizes, hover effects, and more.
Creating a footer operates in the same way. Visit Divi > Theme Builder > Add Global Footer.
Customize your footer by adding a row with multiple columns. Use modules such as menus, links, social icons, terms, and signup forms as needed.
Step 5: Build Your Home Page
The first page most people create is the home page. Before you start designing, you’ll need to designate a page as the home page.
Click Pages > Add New Page. Title the page as “Home” and click Publish.

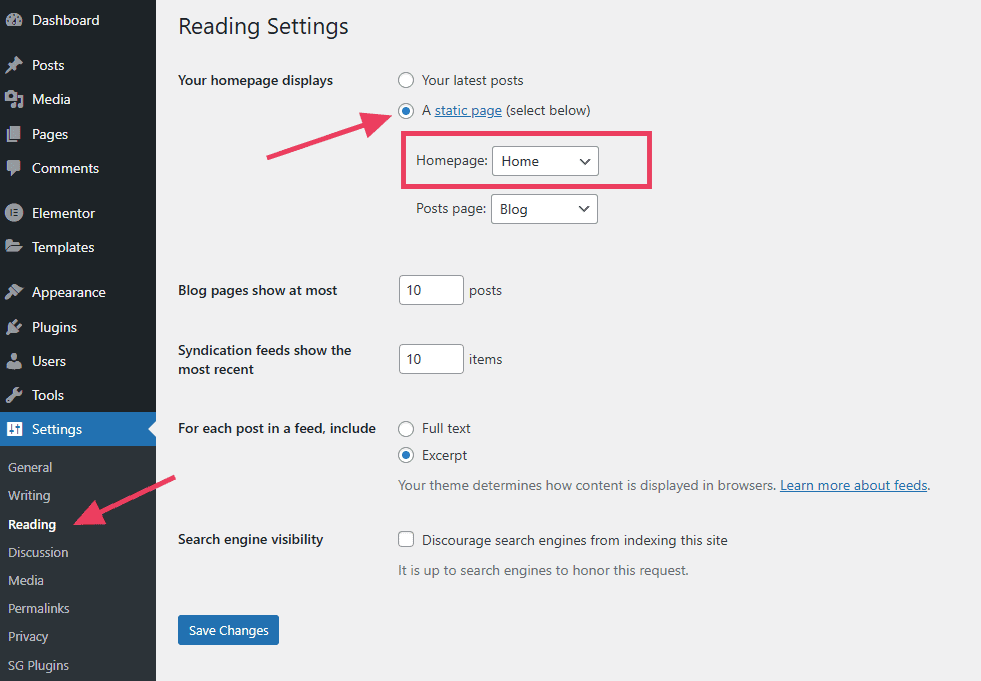
Then visit Settings > Reading, select the radio button next to A static page and select your home page from the drop down menu. Click Save Changes when you’re finished.
Now your website will show the empty home page when someone visits your site. So your next step is to add some content to the page with Divi’s help. Return to the page editor to design your page.
When it comes to editing a page, post, header, or footer, you have two options: the default editor or the Divi Builder.

Default editing happens in the usual WordPress editor that you’re probably familiar with. You’ll see the various parts of your page as blocks: sections (in blue or purple), rows (light blue-green) and modules (in gray).

This mode use a drag-and-drop system. You can drag and move the various elements throughout the space of your web page. Click the gear icon in any row or module to adjust its content and style settings.
But you can also click the Use Divi Builder button. You will be taken to the live version of your site. Here you can edit your page directly and see how your customizations look in real-time.
The Divi Builder offers three methods to start building your page:

- Build from scratch: Start with a blank page without any premade elements.
- Choose a premade layout: Choose from hundreds of premade layouts that you can customize for your needs.
- Clone existing page: Duplicate another page you’ve already made.
If you decide to build from scratch, you will be redirected to a blank page with the Divi Builder. If you want to choose a layout, you’ll need to select the one that most closely resembles the site you want to build.

Next, add or customize elements based on your needs. Simply hover your mouse over an element to display the tool panel.

Click the gear icon to edit that element’s settings. A new panel will appear. This panel includes options to adjust the content and design of the selected element. You can even add custom CSS or change the visibility on different devices in the Advanced tab.

In order to change the text of a heading or paragraph, click the text and start typing.

If you want to change the location of an element, simply click the move icon and drag it to a new spot.
If you use a contact form, make sure to configure the settings so the right person receives the submission. You can also customize the email content and integrate the form with your email marketing tool

Once you’re happy with your design, click the Save button.
Step 6: Create Other Pages
Now that you know how to build a page with Divi, create any other pages you need. You might create an About Us page, Contact page, Services page, or Blog.
If you want to include any of your new pages in the primary navigation menu, navigate to Appearance > Menus to include them. If you previously included a navigation menu in your Global Header, these items will appear automatically.

Step 7: Explore Divi’s Extra Features
Divi is an all-in-one solution, so it has a lot of features you may find helpful to build a professional website for your brand. Let’s look at some of the features we think you’ll find useful.
Woocommerce
Divi comes with dozens of custom WooCommerce modules and countless design settings so you can build a unique, well-branded ecommerce store.
Divi AI
Divi’s AI tool is like having your own personal designer and developer. You talk to it like a real person and it generates an entire website in just a few clicks, including the page content.
Dynamic Content
Divi lets you pull in dynamic content to make special pages that update themselves. You can pull data from posts, pages, and popular plugins like ACF.
Advanced Display Conditions
Choose how and when to display content within a page. Set any conditions you like. Create content for specific users based on how they interact with your website
Additional Plugins
Like any WordPress site, you can add as many plugins as you like to extend the platform’s functionality. Here are some plugins we recommend that pair nicely with Divi.
- Rank Math – Helps optimize your site for search engines, making it easier to rank on Google.
- Wordfence – Adds security features like firewall protection and malware scanning to keep your site safe.
- WP Rocket – Speeds up your site with caching and performance optimizations.
- Site Kit by Google – Connects Google Analytics and Google Search Console to your site so you can track traffic and visitor behavior.
- UpdraftPlus – Creates automatic backups of your site, so you don’t lose important data.
- Bloom (by Elegant Themes) – A built-in Divi plugin for creating email opt-in forms and growing your email list.
Divi Marketplace
The Divi Marketplace is an online store where you can buy and sell premium Divi child themes, layouts, extensions, and modules to enhance your website. It offers a wide range of professionally designed add-ons that help you customize Divi even further without coding.

Step 8: Test Before Publishing
Before launching your site, you need to test everything. A broken page, a missing link, or a typo can make your site look unprofessional. Here’s how to check everything so your users have a smooth experience.
Check All Pages and Content
Go through every page carefully. Look for formatting issues and spelling and grammar errors. You may have to read it aloud to catch mistakes. If you used a template, replace all dummy text and images.
Click Every Button and Link
Test all navigation links to make sure they go to the correct pages. Check to see that all buttons and links work properly.
Test Your Contact Forms
Fill out all contact and inquiry forms to confirm they send emails correctly. If you’re using a plugin like WPForms or Contact Form 7, check your email inbox for test submissions.
Check Mobile Responsiveness
Divi automatically makes sites mobile-friendly, but you should double-check by viewing your site on a phone and tablet. Look for any elements that don’t fit or overlap. Use the Divi Visual Builder to adjust sections if needed.
Test Site Speed
A slow site frustrates visitors and hurts SEO. Run your site through Google PageSpeed Insights or GTmetrix to check loading times. If it’s slow, compress images with a tool like Smush, enable caching with WP Rocket, and use a CDN (Content Delivery Network) like Cloudflare.
Get a Second Opinion
Have a friend, family member, or colleague look at your site. Ask them to navigate through pages and give feedback, test different devices, and try filling out forms and clicking links.
Final Backup Before Launch
Before you go live, create a full backup using a plugin like UpdraftPlus. This saves your progress in case anything goes wrong after launch.
Build Your Divi Site Today
Divi makes building a website simple, even if you have no technical experience. With its drag-and-drop builder, pre-made layouts, and powerful customization options, anyone can make a professional site. Now it’s time to put your ideas into action and create something amazing!
Ready to build your WordPress site?
Try our service free for 14 days. No obligation, no credit card required.


