WordPress search helps your visitors find what they’re looking for on your website. The default WordPress search might be good enough for small websites, but as your site grows, you’ll run into its limitations.
In this post, you’ll learn how WordPress search works and several ways you can enhance the search function to offer your visitors a better experience.
Table of Contents
How WordPress Search Works
WordPress includes a built-in search functionality that’s relatively basic but functional. When a visitor enters a query in your search box, WordPress uses the WP_Query class to search through your database and return relevant results.
By default, WordPress search will look through the following:
- Post titles
- Post content
- Page titles
- Page content
- Attachment titles
- Image captions
- Image alt text
- File names
The search algorithm prioritizes results by first returning content with the search term in the title (in reverse chronological order), followed by content with the search term in the body.
This approach does work, but there are a lot of limitations. For example, it doesn’t search categories, tags, custom fields, or product data. Since the algorithm is relatively straightforward, it might miss content that’s actually more relevant to your visitors.
Plus, it’s missing advanced features that users expect from modern search engines, like autocomplete, live results, filtering, and more.
If you’re starting to notice issues like these or want to provide a better search experience, then you might want to think about upgrading your existing WordPress search.
Why You May Want to Improve the Standard WordPress Search
Here are some of the main reasons you might want to upgrade your WordPress search functionality:
1. Better User Experience
Users have been conditioned by Google and other search engines to expect instant, relevant results. When your site search doesn’t deliver this experience, visitors may become frustrated and leave.
2. Increased Engagement
An effective search function helps visitors discover more of your content. This leads to longer session durations, more page views, and lower bounce rates, which are all positive signals for both user experience and SEO.
3. Higher Conversion Rates
For eCommerce sites or other websites where your content is monetized, effective search directly impacts conversion rates. If a potential customer can’t find what they’re looking for, they’ll likely go elsewhere.
4. Content Discovery
As your site grows, a good search function becomes essential for helping users navigate your content library. This is especially important for sites with extensive blog posts, product catalogs, or documentation.
5. Performance Optimization
The default WordPress search queries your entire database, which can slow down your site as your content grows. Advanced search solutions can significantly improve performance through caching, indexing, and more efficient algorithms.
6 Ways to Improve WordPress Search
Now that you know how WordPress search works and why you want to improve it, let’s explore a few ways you can enhance your sitewide search experience.
1. Add WordPress Search Icon to Your Menu
One of the first things you can do is make your search bar more accessible from anywhere on your site. It depends on the WordPress theme you’re using, but most themes let you add search via the WordPress customizer. For the example below, we’re using the GeneratePress theme.
First, navigate to Appearance > Customizer. After that, click on Layout. Then, click on Primary Navigation.

With this theme, there’s a built-in search feature, so all you need to do is check the box that says Enable navigation search modal.
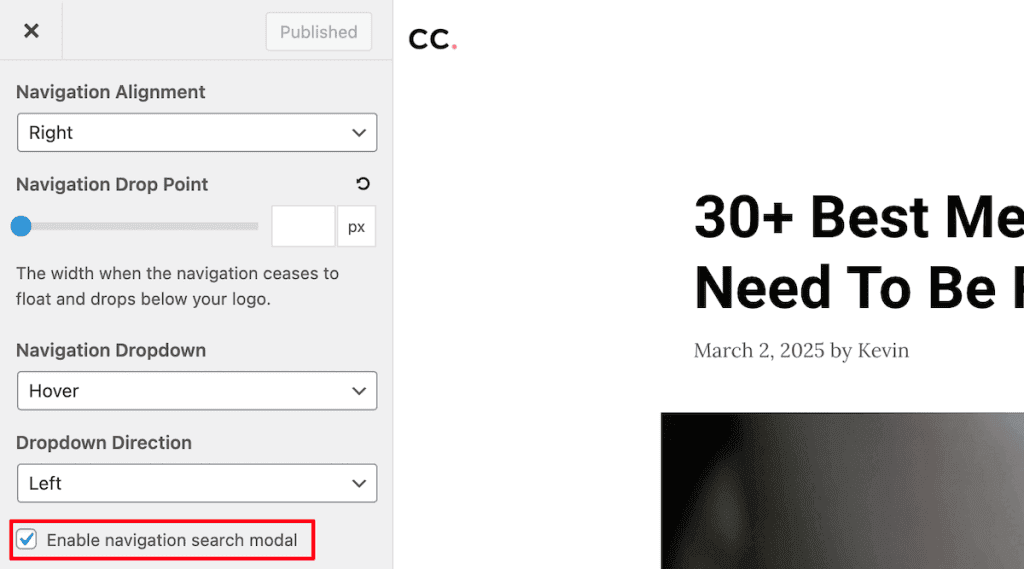
Then, you’ll notice the magnifying glass search icon in your menu.

This will differ depending on the theme you’re using. For some WordPress themes, you may need to edit your menu items and add the search feature that way.
If your theme doesn’t support adding search to your WordPress menu, then you’ll need to use a WordPress plugin. Below, you’ll learn how to do this using a plugin called Ivory Search.
2. Add the WordPress Search Widget to Your Site
Another approach is to add a search widget to your sidebar, footer, or other widget areas. To add a search form to a widget area, simply go to Appearance > Widgets and then click the Plus button on the widget area you want to edit.
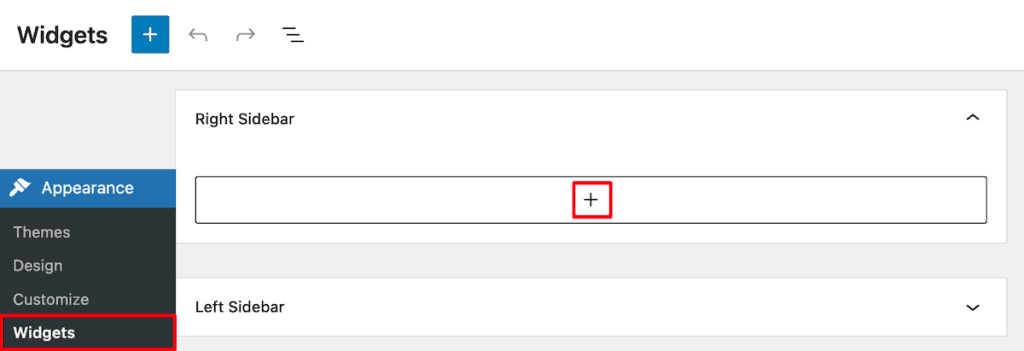
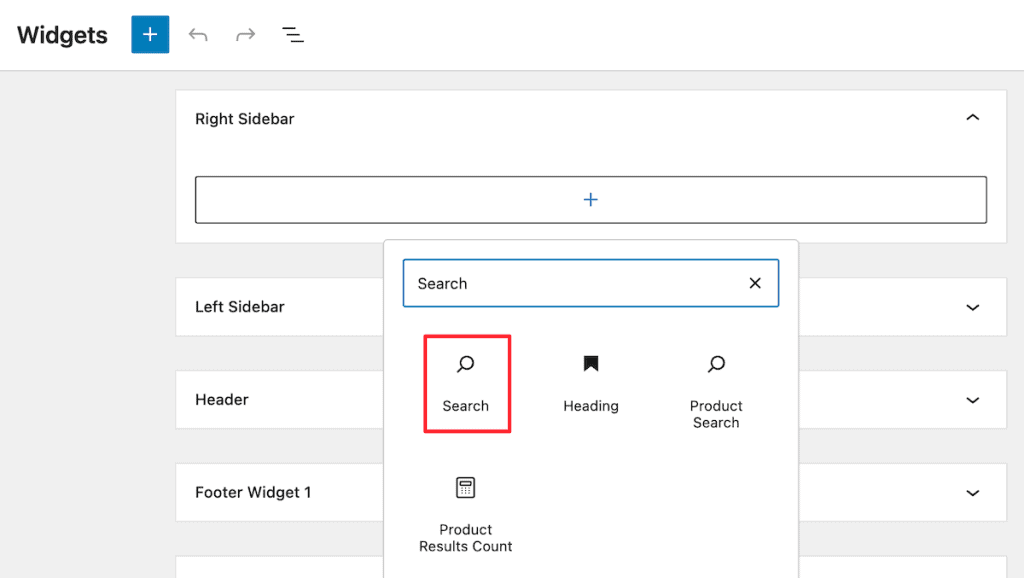
After that, search for the “Search” widget and then click on it to add it to your site.
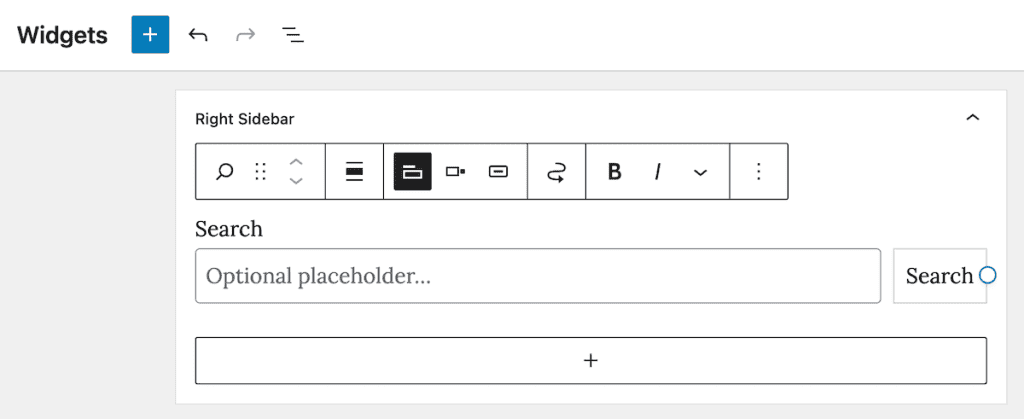
Then, you can add a title if you’d like, adjust the width, and change the placeholder text. Once you’re done making changes, click the Update button.
Now, you can visit your site to see your search form in action.

3. Show Instant (Live) Search Results
Another great feature that can improve your search experience is Ajax search, also known as live search. This is a feature that Google and the other search engines have, where while you search, it offers a drop-down list of suggestions.
This isn’t native to WordPress, but you can easily add this with the help of a plugin.
There are a handful of plugins that can do this as part of a larger feature set. However, the Ajax Search Lite plugin adds this and a few more useful features. Plus, it has a five-star rating with over 80,000 active plugin installs.
Once you install and activate the plugin, the live search feature will be active on your site.
This plugin gives you a shortcode that you can add anywhere on your WordPress website, whether that’s in your menu, a widget area, a page, a post, or anywhere else.
First, click on Ajax Search Lite in your WordPress dashboard, then copy the shortcode that’s at the top of the page.
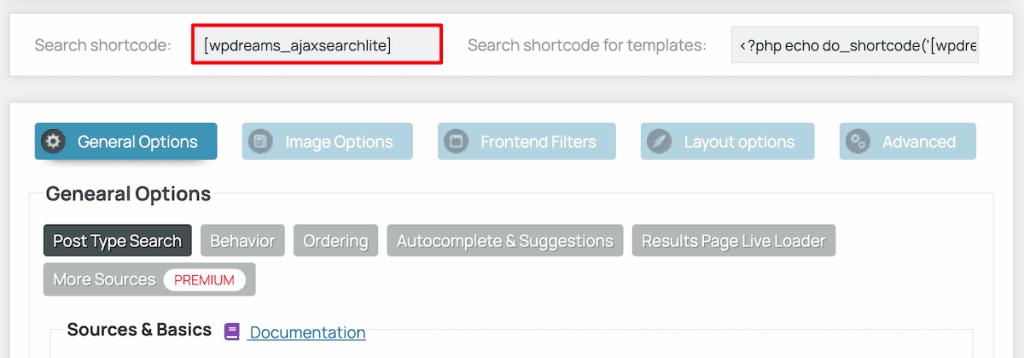
After that, you can add the shortcode anywhere on your site. Here’s what it looks like added to a separate page created just for search.

Note this plugin has a lot of customization options available. When you head back to the plugin dashboard, you can control the post types you want the plugin to search, decide if you want to show images, change how your search content displays, and much more.
The default options instantly add live search, while the plugin customization options give you control over what appears in the search results.
4. Create Specific Search Forms for Your Site by Modifying Default WordPress Search
We started customizing your site search algorithm above using the Ajax Search Lite plugin. If this plugin offers you enough search customization, then feel free to keep using that plugin. However, there are some other plugins that let you do additional things with your site search.
Note that it’s recommended to use only one WordPress search plugin on your site since these plugins can be resource-intensive. So, figure out the features your site needs the most, then choose the plugin that aligns with that.
Now, we’ll get to creating specific search forms for your website. If you want search to behave differently on different pages, then this method is for you. For example, say you want a general search bar on your homepage that searches everything and a tutorial-specific search bar for your support page. You can do it, using this method.
We’ll be using the WP Extended Search plugin. This plugin modifies the default WordPress search and gives you more control over your internal search algo. It’s also great because it’s a relatively lightweight plugin (aka won’t impact performance too much).
Once the plugin is installed and activated, navigate to Extended Search > Setting Names, then give it a name, and click the Configure Search Setting button.

Now, you can control what you want to appear in the search results.
You can control things like:
- Whether you want to search titles, content, and excerpts
- Searching select taxonomies
- Making author names searchable
- The post types you want to include in search
- Whether you want to do exact match search only
- Dates to exclude in the results
- The order that results are displayed
After you’ve finished customizing the settings, click the Save Changes button.
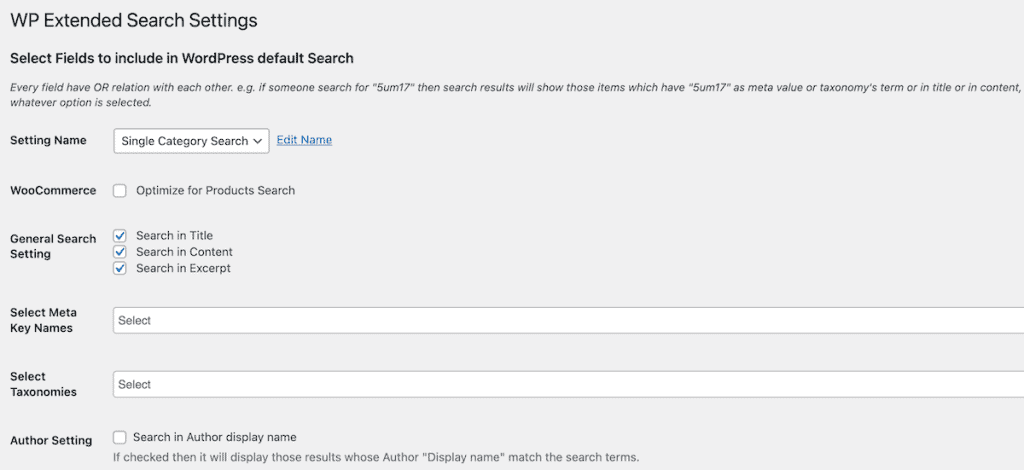
Then, head back to the Setting Names page and open up the search setting you just created, then copy the shortcode in the Shortcode box.
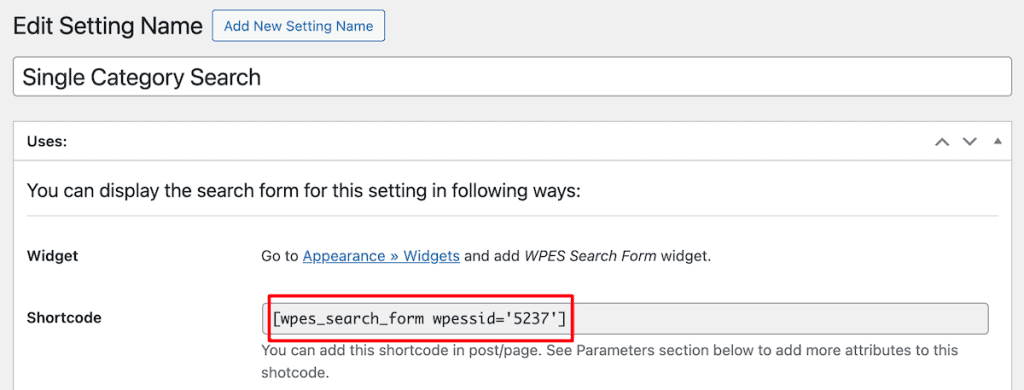
Now, you can add this anywhere on your site.
We’ll be adding it to a page, but you can also add it to posts, widget areas, and anywhere else you can add shortcodes.
To add it to a page, simply open up a page you want to edit or create a new page. Then, give it a title and search for the shortcode block. Next, paste the shortcode you just copied and click Publish or Save.
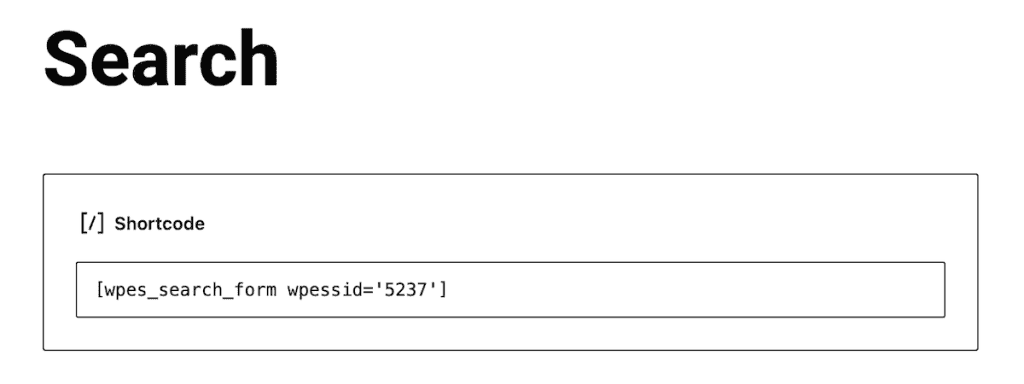
Here’s how the form looks in real time. Notice how it simply modifies the default WordPress search and looks the same as the original. However, you have much more control over the search results it displays.

5. Change the Appearance of Search Results and Forms (and Gain Even More Search Control)
Another thing you can do with your WordPress search is create a custom search form and change the appearance of that search form and results. This is similar to creating a specific search form, as we did above. However, we’ll be using a different plugin that gives you even more control over your search form style, deeper algorithm control, and much more.
To do this, we’ll be using the Ivory Search plugin. This plugin has a 4.9/5 star rating with over 100,000 active installations.
Once you install and activate the plugin, navigate to Ivory Search > Search Forms and then click Add New Search Form. Note that you can create multiple search forms with their own shortcodes that you can add to different areas of your site.
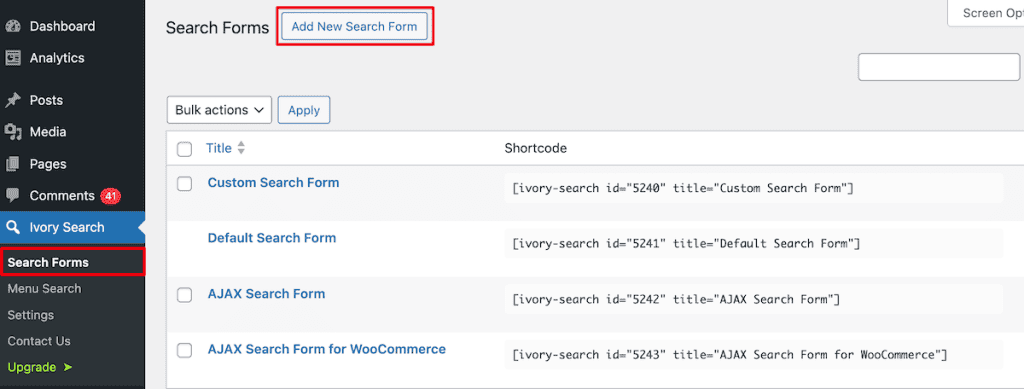
Here, there are a lot of settings you can customize. So, we’ll start at the top. First, on the left-hand side, you’ll see different options, Search, Exclude, Design, AJAX, and Options.
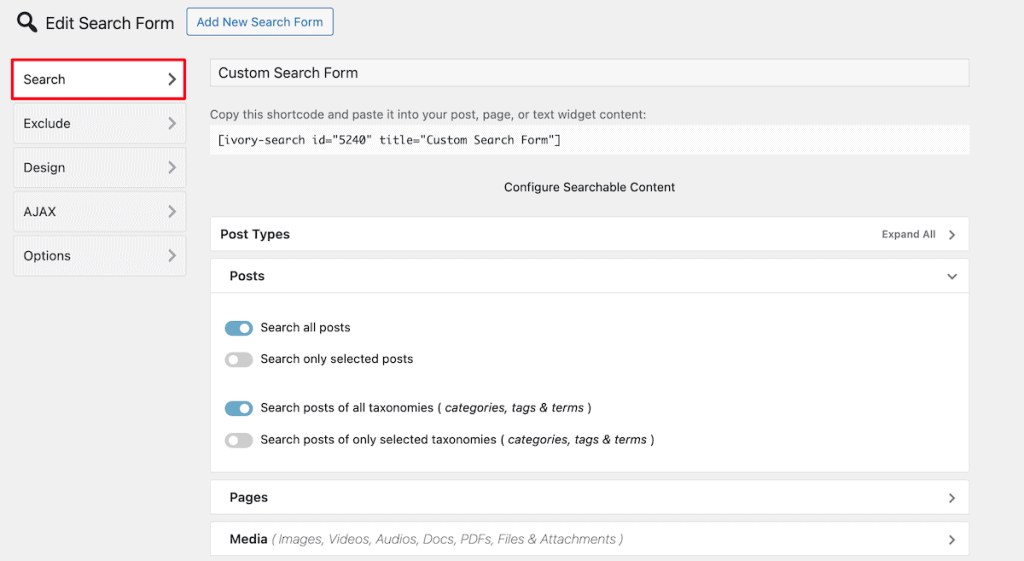
Clicking Search brings up a list of options that let you customize what shows up in search. For example, in the Post drop-down, you can choose to allow all posts, selected posts, all taxonomies, or specific taxonomies. You can customize the same for your pages, media, and other content elements.
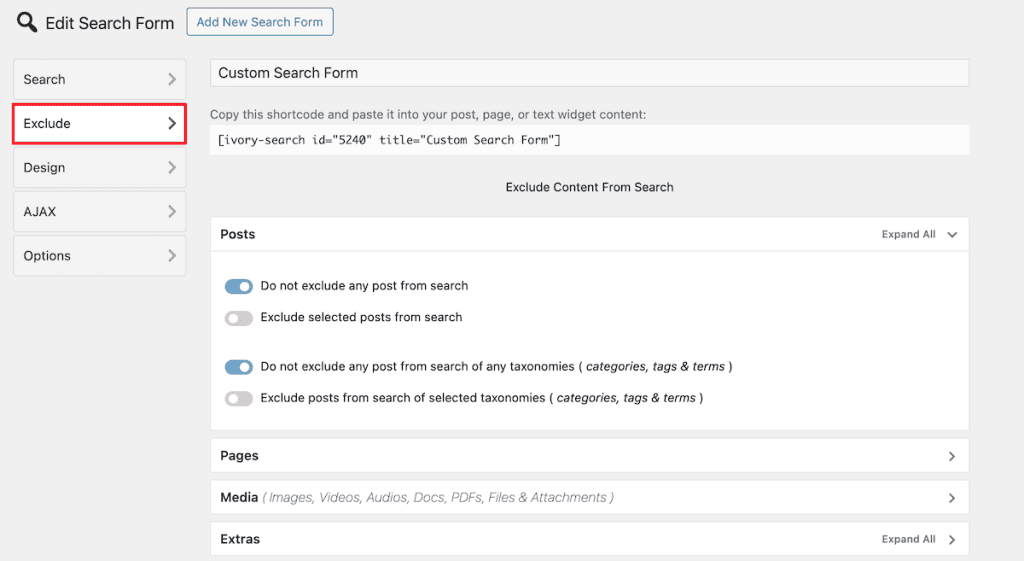
The Exclude option lets you specify anything that you want to exclude from search. This includes pages, posts, media, and any custom fields.
Next, we have the Design section. Click the Search Form Customizer link to bring up the search form customizer.
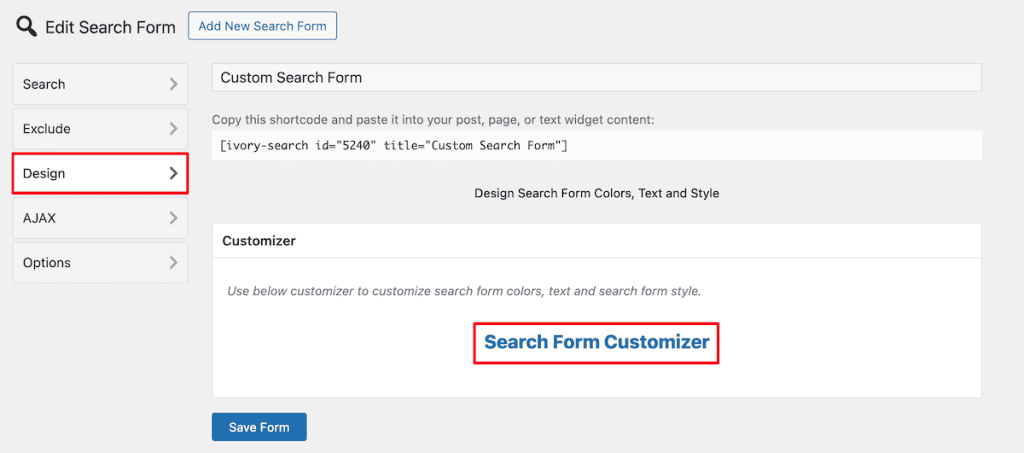
Customizing your search form is similar to the standard WordPress visual customizer. You can change the search form style, button and box colors, and more.
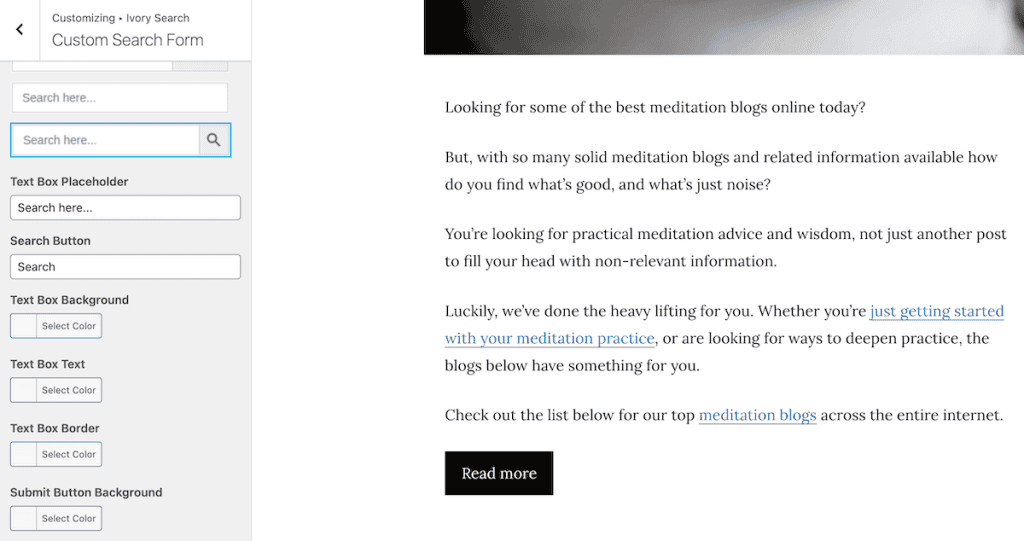
Once you’re finished making changes, click Publish to make the changes live.
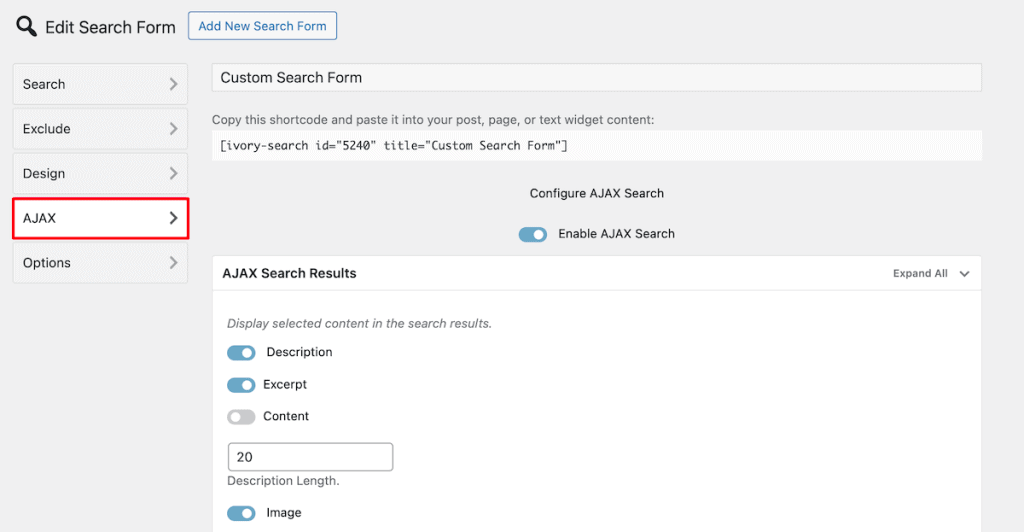
The AJAX section lets you enable AJAX search for your search forms. Simply click the Enable AJAX search toggle, and then you can customize your search settings.
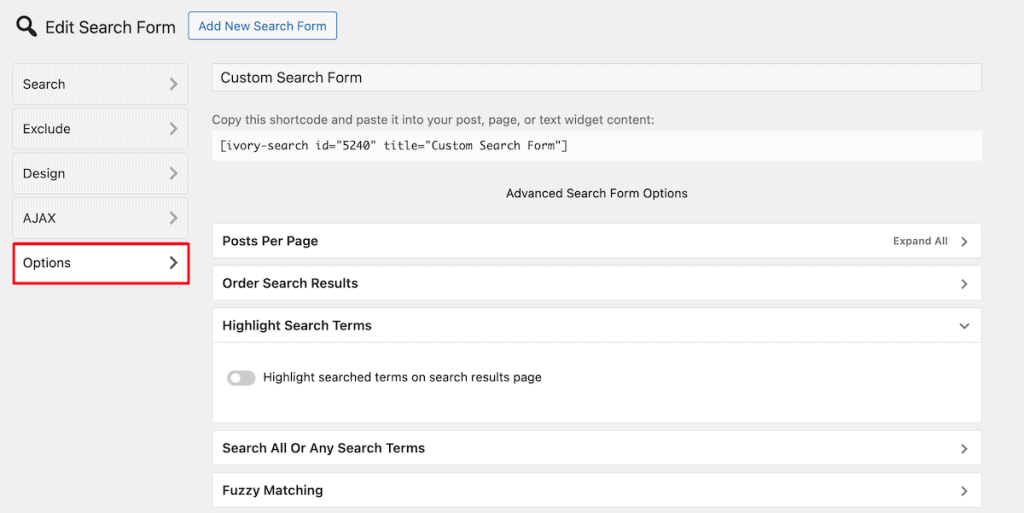
The final Options tab gives you more customization options and features. Here, you can set the number of posts per page, change the search result order, enable highlighting of search terms in the results, enable fuzzy matching, and more.
Once you’ve finished customizing your form options, click the Save Form option.
To add it to your site, you’ll be using the shortcode at the top of the page. Just copy this and then open up the page, post, or widget where you want your search form to appear. Then, search for the Shortcode block, paste the shortcode, and save your changes.
Here is what the search results look like:
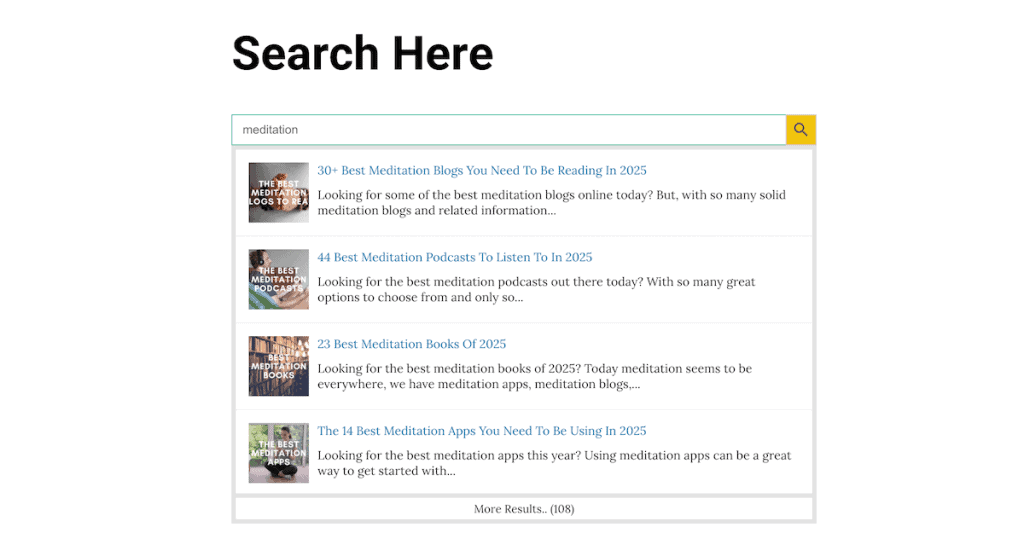
Adding a Search Form to Your Menu
Another thing this plugin can do is add a search form to different menu locations on your website. All you have to do is go to Ivory Search > Menu Search and then turn on the toggle for where you want the search form to appear. Then, click Save.

After that, the search form will now appear in your menu.

6. Add WooCommerce Product Search
For online stores, improving product search can have a direct impact on sales.
The default WooCommerce search is limited and doesn’t search product attributes, variations, or SKUs effectively.
Luckily, you can add WooCommerce search easily with a WordPress plugin. There are a few different plugins that add this feature, but if you’re just looking to add WooCommerce product search, then we recommend Advanced Woo Search.
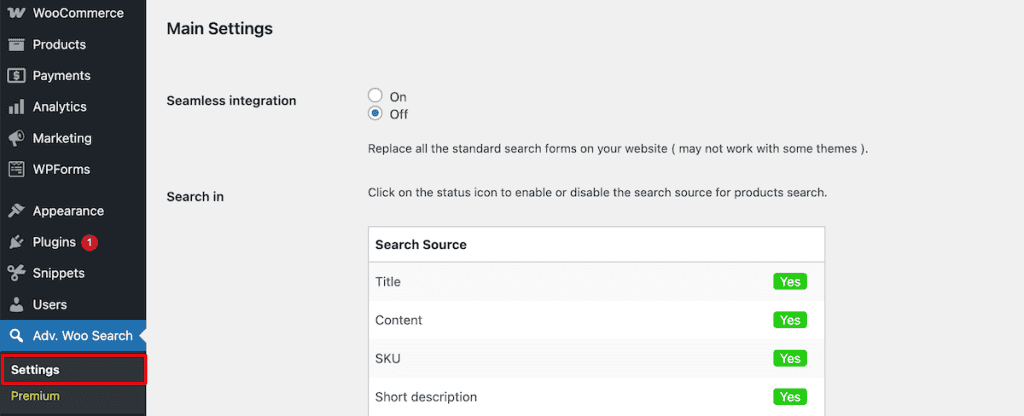
This plugin has 70,000 installs and a 4.8/5 star rating. Once the plugin is installed and activated, navigate to Advanced Woo Search > Settings.
On the main settings page, you can choose the elements you want your visitors to be able to use for search. You can also customize the options for your search page here. When you’re finished making changes, click the Save Changes button.
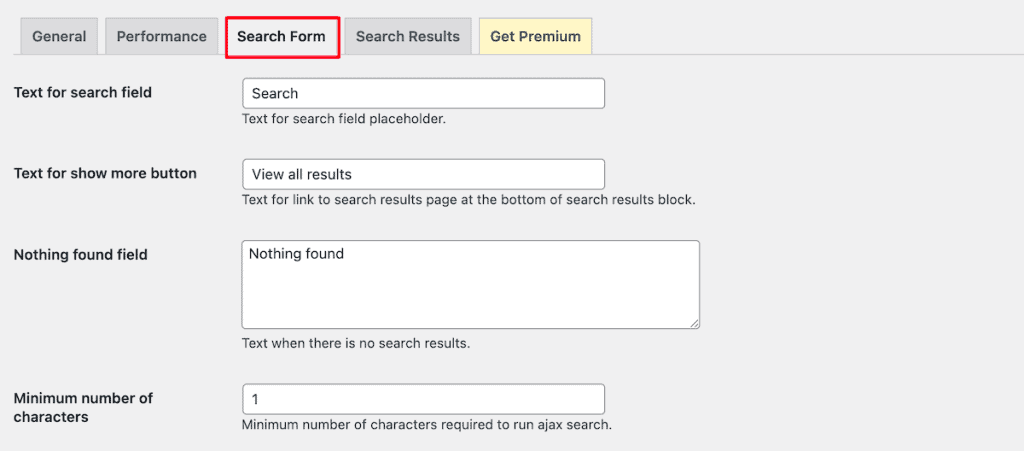
Next, click the Search Form tab. Here, you can change the search field text, message, enable AJAX search, customize your buttons, and more. Once you’re finished, click the Save Changes button.
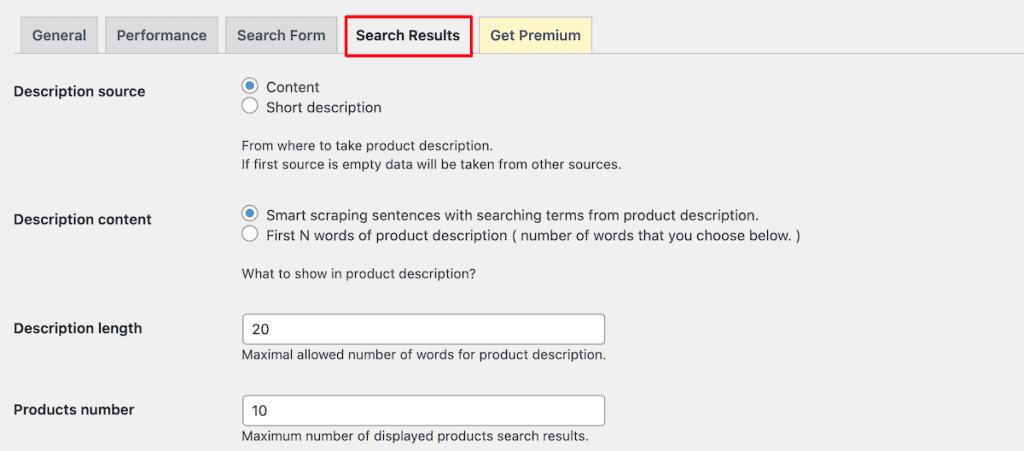
The Search Results tab lets you change the number of products that show up in search, description length, and a ton of other display options to enhance your search appearance. When you’re done customizing, click the Save Changes button.
After you’ve finished customizing your search options, it’s time to add it to your site. You have a few different options.
First, you can enable the Seamless Integration option. This replaces the search forms on your site with WooCommerce search, but it might not work with every theme.
You can also use the included shortcode or widget, or if you’re using a page builder like Elementor, then add the AWS widget via the page builder.
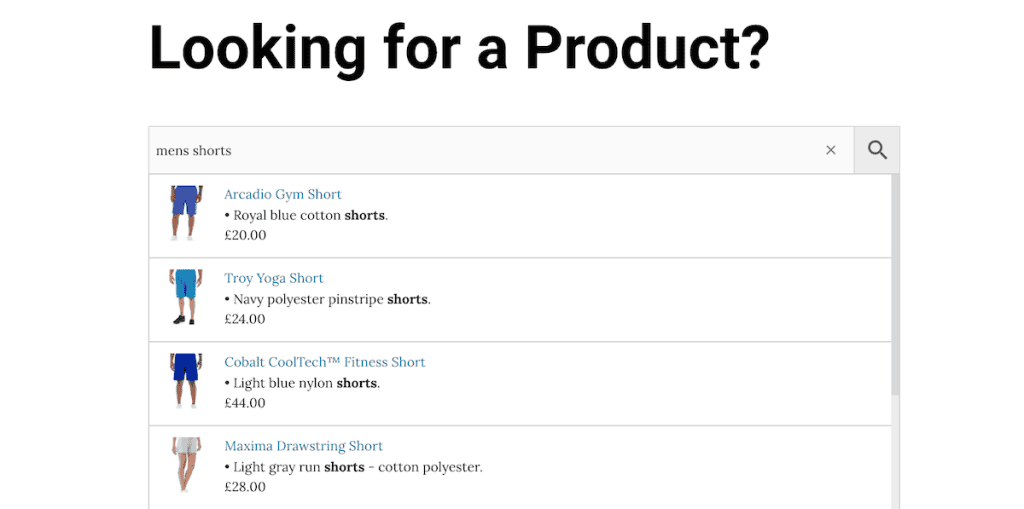
Here’s how the search results look on our test site:
WordPress Search FAQs
Does WordPress have a search function?
Yes, WordPress has a built-in search function that allows visitors to search through posts, pages, and other content on your site. It’s included in all WordPress installations by default, though its capabilities are basic compared to dedicated search plugins.
What’s the best search plugin for WordPress?
The best search plugin depends on your specific needs. However, Ajax Search Lite is great for sites that want to add auto-suggestion search. Ivory Search is great for creating highly customized search forms. WP Extended Search is a lightweight plugin that improves default WordPress search. And Relevanssi (not featured here) is a solid plugin for creating an advanced custom WordPress search algorithm.
Can WordPress search WooCommerce products?
The default WordPress search can find WooCommerce products, but it’s very limited. For a proper WooCommerce product search, you should use a dedicated plugin like Advanced Woo Search, which lets you search through product titles and attributes, supports product variations, and shows live search results.
Closing Thoughts: Improving WordPress Search
The default WordPress search is functional but limited. As your site grows, investing in improving your search functionality can help to improve your user experience, engagement, and conversions.
Whether you choose a lightweight solution like WP Extended Search or a more powerful option like Ivory Search, enhancing your site’s search capabilities will help visitors find exactly what they’re looking for, and that’s always good for business.
Remember that search is just one part of your overall user experience. Combine an improved search solution with SupportHost’s optimized WordPress hosting for the best possible performance and user satisfaction.
Have you improved your WordPress search? Which solution worked best for your site? Share your experience in the comments below!


Leave a Reply