Find out how to install Linux Ubuntu on USB and be in a position to use the Ubuntu operating system. An operating system that over the years has proven to be an excellent alternative to the big giants.
Inside this article, there are two operational guides to execute installation on both Apple devices and Windows operating system devices.
Table of Contents
Linux Ubuntu
It would be convenient to always have the Linux Ubuntu operating system with you, but how can you do that? The solution is quite fast: all you need is a simple USB Pendrive on which you can install the ISO image and set the PC to boot via USB.
So let’s see how to put Ubuntu in this small and convenient portable device and create a Ubuntu bootable USB in the perfect way. This solution is optimal to make a test Ubuntu since we will not install anything in the hard disks of the computer. We are not going to install Ubuntu alongside windows.
But first let’s find out, for the ones who don’t know, what this is all about.
What is Ubuntu?
Ubuntu is a free Linux operating system that was launched in 2004 and it’s a version based on the classic Debian GNU/Linux system. Linux is the operating system that we use on dedicated servers and shared hosting, in short, the heart of Linux beats under all our servers. The difference is that for servers we use AlmaLinux a different version of Linux that is more suited to our needs.
The South African entrepreneur Mark Shuttleworth launched this open-source version on the market with the intention of creating an operating system that could be used by everyone. “Ubuntu” is an African term that stands for “Civic Sense” or “humanity.” Dealing with its development is the software company Canonical whose founder is the same as Ubuntu.
Thanks to this company that collaborates with different developers a new version of the platform is launched every 6 months, all of them include Ubuntu on a USB stick. The new versions always bring new features especially in security, system optimization and features.
Thanks to its great simplicity, Ubuntu, has immediately distinguished itself from all other Linux distributions and has therefore become popular in a very short time. It is usually used as an operating system for home PCs, ranking second among Linux distributions, thanks to the possibility create a Ubuntu bootable USB.
Nowadays there is also a mobile version available called Ubuntu Touch.
Why choose Ubuntu?
We all know about Windows which is practically the most famous operating system in the world, paralleled only by MacOs. So the question arises, why should I choose the Ubuntu operating system and not a popular and well-known version?
First of all, having a Windows operating system does not stop us from also having Ubuntu, in fact, we can provide a dual-boot installation, or rather have both on the PC. This will allow us to make a choice every time we turn on the device.
Over time then you may choose to remove the one you feel less used to, and it is an ideal solution for those who still have any doubts about creating a Ubuntu bootable USB for their PC.
However, there are several reasons that lead us to prefer Ubuntu to the big giant, so let’s find out them together:
- The cost: An official copy of Windows can cost up to 500 euros unless you use a pirated copy which we should remind you is an illegal action! Ubuntu has no cost in fact it’s a free operating system because it was created by people who work for free for the common welfare.
- Security: An operating system that does not allow you to get any virus because every modification that you want to perform on a single file on your PC must include the password. So no password is the same as denied access.
- A great team that works together in harmony.
- A company behind it, a foundation, a team of developers and a community that works every day on the operating system to improve it constantly in order to make it work perfectly.
- Simple: Easy to use and even easier to install. The standard applications are already integrated into the system so we have a free operating system that thinks about its users, placing a product on the market that everyone can use with ease. Ubuntu on USB can therefore be the solution to your problems.
- High performance on your PC and no reboot needed for a simple installation, unless we are updating a large part of the operating system.
- If you have a problem, a malfunction or a bug you can ask for help and support from the community made up of programmers who will help you solve the problem for free. You can also contact them for questions like “how to create a Ubuntu bootable USB?”.
- It adapts to any device you have, it doesn’t matter if you have the latest generation PC or an old one, the whole software will work at its very best.
- Features: It already carries several pre-installed software, for example, it also includes the SSH client that allows you to establish an SSH connection

Why create a Ubuntu bootable USB?
We’ve seen why we should all have an Ubuntu system and now we’re going to see why we should create a Ubuntu bootable USB.
Making this unusual choice is definitely an advantage since, in this way, the installation of the operating system won’t affect the partitions of the main disk that we find inside the PC in any way.
Usually, the operating system already installed is stored inside them. In this way, we can occupy external space and still have high performance.
Ubuntu on USB to install on Mac PCs
As we have mentioned Ubuntu can be used on any type of PC even those produced by Apple. Here are all the steps you need to take to create a Ubuntu bootable USB for a Mac PC so you can use it wherever you are.
Requirements
Before discovering the steps to create a Ubuntu bootable USB we need to know the necessary requirements in order to get the job done with a perfectly working software.
To install Linux Ubuntu on USB you need to download:
- the software balenaetcher, in a few steps, this lets you create a disk image on the pen drive;
- a copy of the Ubuntu ISO available on the official website (you will have to choose the Ubuntu version since there are several linux distributions).
- Have a USB stick, pen drive or flash drive of at least 2GB.
- A PC or computer with 2.0 or 3.0 USB ports
Warning: you you have a mac after 2017/2018 check if it has the T2 chip. If present it won’t be possibile to boot ubuntu from USB, nor install ubuntu in another partition.
Check if you have a Mac with T2
Since 2017/2018 Apple has started using the T2 chip. According to them, this chip increases the security of the computer, among other things it makes it impossible to use an operating system other than Mac OSX.
You can check if your computer uses the T2 chip by following this guide.
Preparing your USB to install Linux on USB
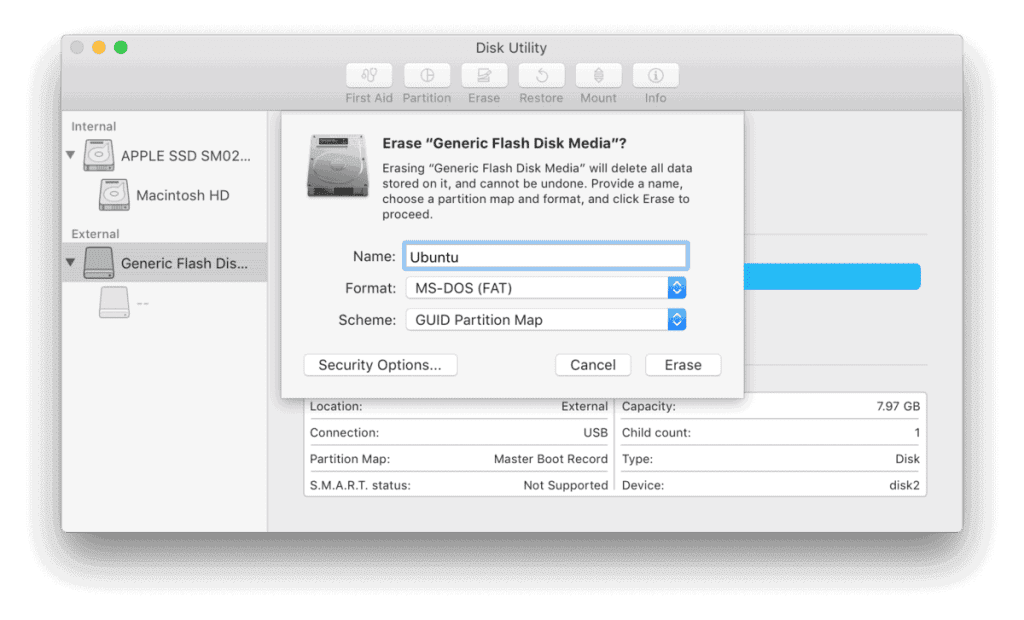
If we are performing the operation on an Apple laptop then to ensure maximum compatibility we will first have to format the USB stick.
To do this we can use a special tool provided by Apple called Disk Utility. However, if you want to use the drive as a generic hardware you can skip this step.
- Open Disk Utility, which you can find in your applications and under Utilities.
- Insert your USB flash drive and you will automatically be able to see it from the application we just opened.
- Select the flash drive and select Erase again on the toolbar.
- Set the format to MS- DOS (FAT) and the scheme to GUID Partition Map instead.
- Once you have verified the steps you can select Erase.
Etcher
Etcher is a free and open-source application that allows you to write the ISO file, which as you will see we will need to install Linux on USB later.
The process is very simple, from the official website you can download the application and run it, if you want you can put it in the application folder of your PC or leave it exactly where it is.
Note that Whale Etcher is also available for Windows and Linux.
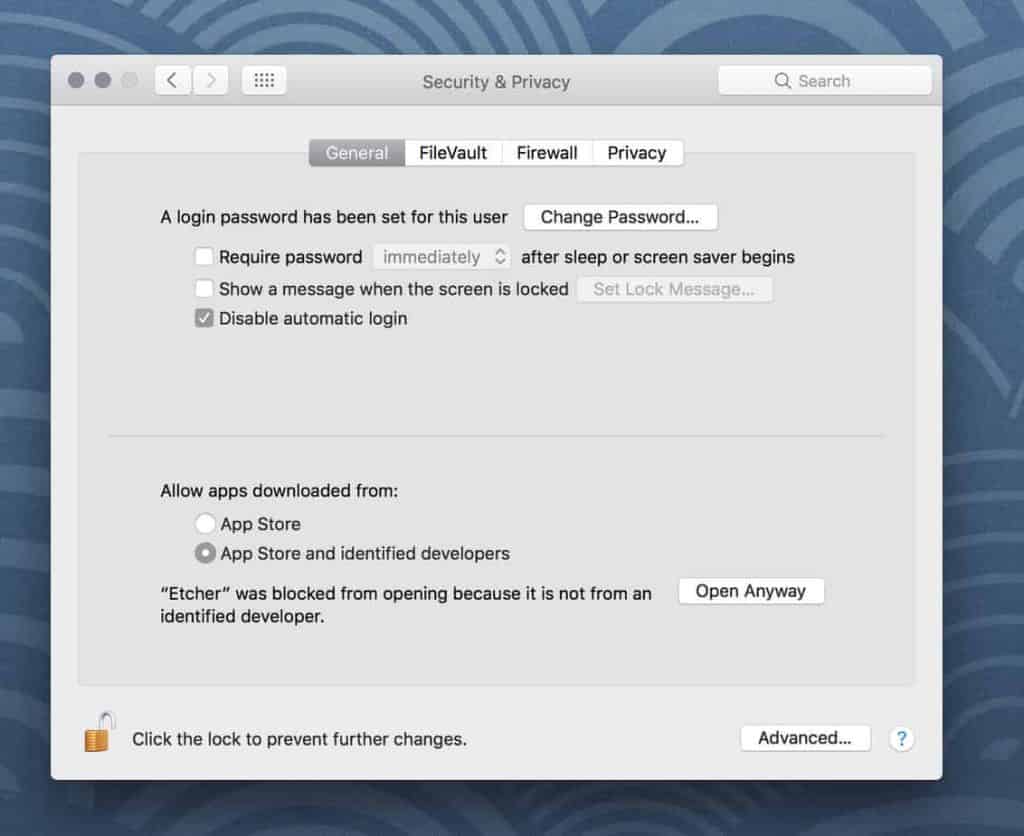
To avoid being blocked by the macOS operating system we can turn on “App Store and identified developers” through the control panel and then on “Security and privacy” which we find in the system preferences. In case a warning appears select the “Open anyway” button.
Now you’ll have to deal with its configuration. In fact, it will write to your USB device in three different steps that you’ll have to select when it’s time to do so.
- Select image, in this case you’ll have to select the ISO file you previously downloaded, which you’ll find in the Downloads folder.
- Select Drive, this allows you to select the destination file. At this point you must select your USB flash drive. In case it isn’t big enough, you’ll receive a warning.
- As soon as the image and the drive have been selected this step will start. You will be prompted for an Etcher password to enter to continue.
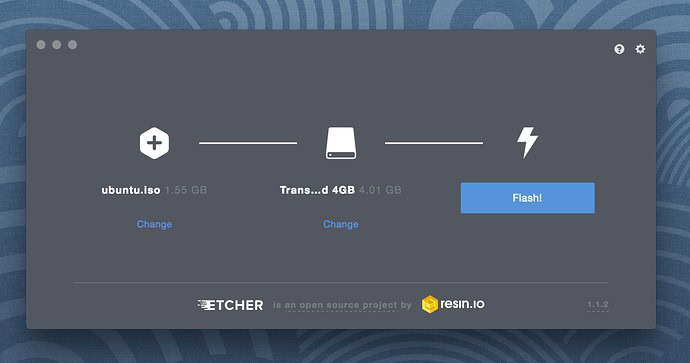
At this point, the writing of your device will start and you can always check and monitor it. After the writing process, there will be a validation phase of the various contents in your USB, after this step Etcher will declare that the process is completed successfully. After this step, you will have created your USB bootable Ubuntu to use on your Mac.
In case you want to use your USB stick with an Apple Mac, you will have to reboot or turn on the device keeping the USB stick inserted while pressing the Option/alt. This will initiate the Startup Manager and your USB flash drive will appear with the name EFI Boot, once selected the menu will boot with Ubuntu.
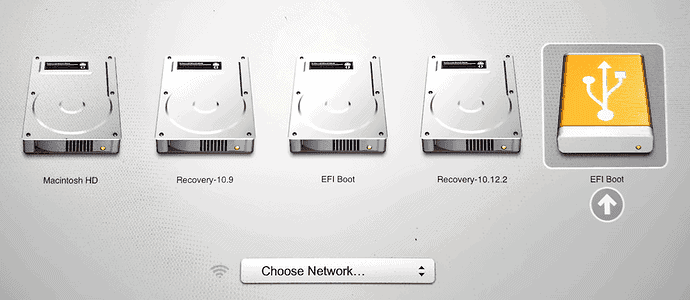
Now you can start (boot) your computer using the operating system you installed on the USB.
Ubuntu on USB: the second option
First of all you should remember that, to boot the operating system from the pendrive, you have to set the boot mode from the USB stick in the PC bios. Once upon a time you used cds and dvds but nowadays USB drives are more durable, they are smaller and have more memory.To install Linux Ubuntu on USB you need to download:
- the UNetbootIN software, which in a few steps allows you to create a disk image on the stick;
- a copy of the Ubuntu ISO available on the official website (you’ll have to choose the Ubuntu version since there are several linux distributions).
The first step is to start the UNetbootIN program and press YES to go to the main home page.
Here you have to select Disk Image and from the dropdown menu choose ISO.
On the right side, you will find a button with three dots.
Click on the button to select the ISO file that you should have downloaded shortly before from the Linux Ubuntu website.
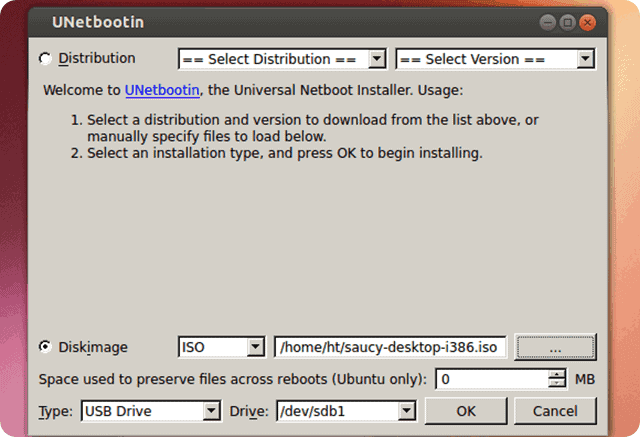
Once selected, go ahead and from the Type menu, select USB Drive, insert your flash drive into any of the USB ports on your computer, locate the device and press OK to start.
At this point you just have to wait for the process to complete, then you’ll just have to restart the computer with the USB flash drive inserted, to start Ubuntu.
Remember that if you have not set the flash drive in the bios as the primary boot, Ubuntu will not start. If you have not already done so, you must restart the PC, access the bios and, in the section relating to the operating system, select USB as the primary boot.
How to create a Ubuntu bootable USB for Windows and other operating systems.
If you want to create a Ubuntu bootable USB and you have a Windows computer the process is pretty much the same since the programs I mentioned above are also available for Windows.
This is the correct process to implement when we want to create a Ubuntu bootable USB, to use on devices that use the Windows operating system.
The first steps
The first step to take is to verify, as in this case, that you have all the necessary requirements to create a Ubuntu bootable USB.
So let’s go to:
- Verify that you have a USB flash drive with at least 2 Gb of free space.
- Have a PC with 2.0 or 3.0 USB ports.
Once we have verified these steps we can dive into creating a Ubuntu bootable USB.
The procedure
The procedure is quite simple, as we have already seen regarding Mac PCs, even Windows PCs do not require many steps, it is practically identical.
So the first step is to insert our USB flash drive into the USB port on our PC.
Once this is done by using our favorite search engine we’re going to look for the official website of Ubuntu and in the Downloads section, we’re going to select the version of Ubuntu USB that we want to download.
To select it and all we have to do is click on the download button. At this point, we will be directed to a new page where we can make a donation to the team or continue with the download.
Transfer the ISO file to the USB flash drive
The file that will be downloaded is an ISO file with our copy of Ubuntu, at this point all we have to do is move our file inside our USB key.
For this operation you can follow the steps outlined above for Whale Etcher, you don’t have to do anything else.
Be careful, however, because any file on the USB flash drive will be deleted, so make sure to do a backup before starting the installation.
The Final procedure
Once the installation is finished, all we have to do is eject the USB flash drive and check if everything is present and saved. If everything went well, we will have to proceed to the final step, which is to boot the operating system.
Let’s insert the USB flash drive into our PC and start the system. On the logo screen, we need to press F12 repeatedly, select our key and start the process.
The key to press may be different from computer to computer, if F12 does not work in your case Google what key to use for your computer model.
You’ll be asked if you want to install Ubuntu on your device, in this case since we want to keep it only on the USB we’re going to select “Try Ubuntu Without Installing”, which means: try Ubuntu without installing it.
You are now officially using your new Ubuntu operating system on USB.
Have you tried this operating system before?
How did you find it?
What do you think are its key strengths?
Let us know in the comments below.


Leave a Reply