
In this tutorial, we will learn how to use 30 indispensable Linux commands for those approaching shell and terminal interaction for the first time.
We’ll start with the basics to answer the most common questions: what is a shell, how do I enter commands, and what keyboard shortcuts can I use in the terminal?
We will therefore dive into the heart of this guide to find out how to issue Linux commands from the terminal. For each of the 30 commands that we will see there will be specific examples that will help you understand it better.
Let’s begin!
Table of Contents

The Linux shell
To execute Linux commands we must use the shell: a program that allows the user to communicate with the operating system.
Through the shell it is possible to perform various operations such as: interact with files, start programs, install and manage packages. Linux, in fact, allows us to perform the same actions that we perform through the graphical interface (GUI), directly from the command line.
There is no single shell, but most distributions use the bash shell by default.
All shells work as a terminal, so the first thing to do to enter commands is to start it.
When we start the terminal we will see a line like this:

We are shown:
- the user’s name (in our case “fabrizio”)
- followed by the name of the host (in this example “PortatileFabrizio”)
- the path we are on.
This line is the prompt which indicates that we can use the command line to issue instructions.
Its structure will be:
[user@host directory]$If we are inside the home directory, usually /home/username, then we will see the ~ (tilde) symbol instead of the directory name, as in the example above.
[user@host ~]$If, on the other hand, we are in another directory we will see the name, as in this example for the “test” folder:

The syntax of commands and options
To understand how to use Linux commands, we first need to know their syntax. What is the correct way to write them?
A command has the following syntax:
command [parameters]The command is always entered first, which can then be followed by one or more parameters. Among these parameters there may be:
- the path to the file or directory,
- text strings;
- of options.
As we will see in this guide through some examples, the options depend on the command we are using.
Usually the same option can have two versions: long (“help”) and short (“h”). When we add an option to a Linux command we follow this rule:
- if the option is entered in short form, for example “h” it must be preceded by a single dash: “-h“;
- if it is in full, “help”, we will have to write it like this: “–help“.
The options can be combined with each other so that instead of having to write -r -v, we can use -rv.
Basic operations to learn how to use the shell and keyboard shortcuts
Before starting to see what the main Linux commands are, it is good to explain how to modify the commands after having typed them, how to execute them and how to interrupt their execution.
Edit a command before running it
After typing a command if we have not sent it to run, we can make changes.
To move on the line we have written, we just need to use the arrow keys, using backspace and delete we can make the changes.
With the “up” arrow we can navigate between the previous commands. With the “down” arrow between the next ones (if we were already scrolling through the previously typed commands).
Using the key combination Ctrl+A we can move to the beginning of the command.
With Ctrl+E we can move to the end of the command.
Copy and paste into terminal
When we are in the Linux terminal there are keyboard shortcuts to copy and paste text.
- Ctrl + Shift + C: allows us to copy the selected text.
- Ctrl + Shift + V: Paste from clipboard.
Run and stop Linux commands
To execute a command, press Enter.
To interrupt the execution we use the Ctrl+C keys.
Stop scrolling the output
If after executing a command we want to stop displaying the output that is scrolling on the screen, we use Ctrl+S. This allows us to lock the output scrolling to a certain line.
To resume normal scrolling we use Ctrl+Q.
Note that Ctrl+S allows us to pause displaying the output, but it’s not interrupting the command execution.
Terminal shortcuts
Pro tip: As you start to get more familiar with the commands, you may want to use terminal shortcuts. These, also called aliases, allow you to enter commands more easily.
The biggest advantage of aliases is that you can use them not only on your local computer, but also remotely: using SSHRC as we have seen in our guide.
To do this you will need to connect to the server with SSH connection. If you have a hosting plan with SupportHost, you will be pleased to know that you have SSH and WP-CLI access with all plans: not only with unmanaged cloud VPS, but also with shared hosting and CMS hosting plans.
Table of essential Linux commands
In this table I show you some of the most used Linux commands. Each command is accompanied by a short description.
Command | Short Description |
|---|---|
man | Show the manual for a command |
ls | List the contents of a given directory |
pwd | Show current route |
cd | Allows navigation between folders |
mkdir | Create a directory |
cp | Copy folders and files |
mv | Move and/or rename folders and files |
rm | Delete folders and files |
cat | View the contents of a file |
zcat | Show the contents of a compressed file |
more | Show the contents of a file (split into screenshots) |
less | View the contents of a file (allows you to scroll through the contents) |
ln | Create links to files and folders |
chmod | Set or change permissions for files and folders |
echo | Output the given string |
find | Search for a file |
grep | Search within a text file |
tar | Create an archive |
adduser | Create a user |
groups | Displays the group a user belongs to |
deluser | Delete a user |
passwd | Set the password for a user |
du | Show occupied space |
df | Show free space |
free | Shows RAM usage |
top | View running processes |
kill | Stop processes (requires PID) |
pkill | Stop processes (requires keyword) |
killall | Stop processes (requires exact process name) |
lshw | Shows the hardware of the machine |
In the next chapters we will go to see these commands individually and for each one we will give specific examples that will allow you to understand how they work in practice.
Remember that you can use the index (found at the beginning of this article) to quickly go to the section that concerns the command you are interested in learning.
Linux commands for beginners: explanation and examples
Let’s see which Linux commands can be most useful to you if you’re starting to get familiar with the shell.
To make this guide easier to use, we have grouped the commands you find in the list above into categories:
- Info/help: are those Linux commands that allow us to find out how other commands work and which options are accepted.
- File and Folder Management: The most important commands you need to know to manage files and folders from terminal.
- User and group management.
- System management – let you know the running processes and other information about the machine you are using.
Commands for asking for help
You should know by now that there are hundreds of Linux commands and that each has as many options. For this reason, the first commands I want to tell you about are precisely those that allow you to obtain information on all the commands.
How do I know what a command is for?
There are several methods, which we will look at immediately.
Help option
The help option allows us to read a description of the command and the available options.
How to use:
Type the command followed by –help.
Here is an example:
ls --helpThis below is the output with the explanation of the command and some of the accepted options.

whatis Command
The whatis command shows us a short description of the commands.
How to use:
Type whatis followed by the command name.
Let’s see it with an example.
To get information about the ls command, do this:
whatis lsman Command
The man command allows us to view the manual page for a given command.
How to use:
Type man followed by the command name.
Example:
To see the manual for the ls command, do this:
man lsLinux: commands to manage files and folders
Among the main operations that can be performed from the terminal is the management of files and folders.
In this section of the tutorial we will learn how to view the contents of folders, move between them and make changes.
ls
We can use the ls command to get a list of all the contents of a directory.
Command syntax:
ls [-option1] [-option2] [path]By running the ls command without options we can get the list of all files and folders in the current directory.
To view the contents of a different directory, just enter the path.
For example to see all the files in the Documents directory we would write:
ls DocumentsAs we have just seen in the syntax, the ls command can be followed by one or more options. Let’s see the main ones.
- -l: Create a list of files and directories with details;
- -a: allows you to view hidden files as well;
- -s: show file sizes (you can also see them with the “-l” option, but in this case it only shows the size and not the other details)
--color: Show different colors to identify files.
In the screenshot above we can see how the option –colorallows us to distinguish files (in green) from folders (in purple)
Now let’s look specifically at the -l option.
ls -l
The option allows us to see more details about each file and directory.
Let’s see it with an example:
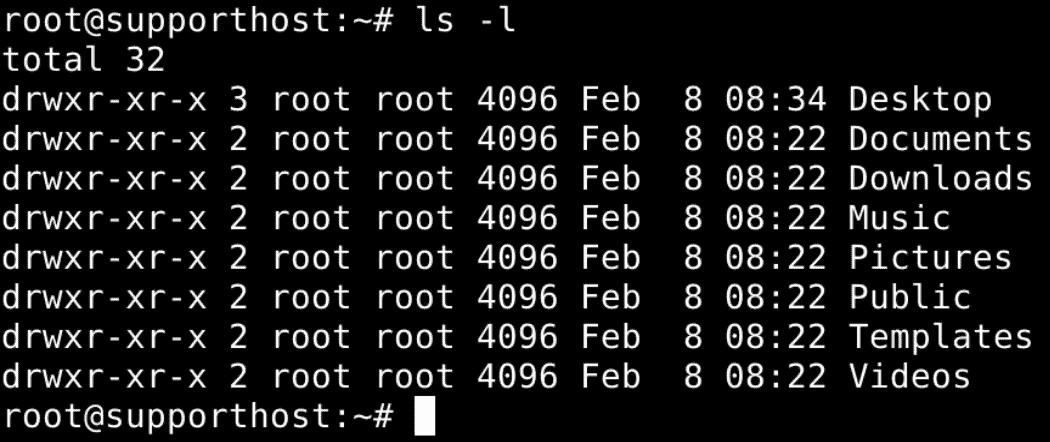
The output I showed you above gives us several pieces of information:
- The first character tells us whether the item is a file (-) or a directory (d).
- The following characters are the user’s access permissions.
- The owner of the file and the group are indicated.
- The size of the file in bytes.
- Date and time it was last modified.
- File or directory name.
Let’s take a practical example to understand even better. Reading the first line of the output of our example we can understand that:
- It is a folder (first character: d).
- We can view the read, write and execute permissions attributed to the user, in our example “supporthost”.
- The folder size in bytes is: 4096.
- The last change happened on February 8th at 08:22 am
- The folder is the main path.
Other uses of ls with wildcards
We can use the ls command to view only some files. To do this, we just need to use wildcards or metacharacters.
- *: to represent a string of characters, even no characters.
- ?: to represent any character (only one).
- [ ]: we can insert several characters inside, the presence of at least one character among those inserted will be searched.
- {}: we insert more strings, the strings we have listed will be searched.
Important Note: Wildcards can be used with all commands. We have reported them in this section to make practical examples.
Wildcard *
The “*” character is used to represent a string ranging from 0 to more characters.
Usage example
I have a folder with some files inside. If I want to show only files with pdf extension starting with “doc”, I will write:
ls doc*.pdfIn this screenshot you see the contents of the folder and the output that is returned to us by the command:

In fact, this command returns the list of all the elements that have the pdf extension and have a number between 0 and more characters after “doc”.
In our example the files that are shown to us are:
- doc.pdf
- doc1.pdf
- doc2.pdf
However, the following will not be shown:
Doc.pdf (remember that the commands are case sensitive)
file.pdf (does not start with “doc”).
Wildcard ?
The metacharacter “?” is used to represent a single character.
Usage example
I want to display the files and directories that have the name “card” followed by a single character, I will write the command:
ls doc?Here is the contents of the folder and the output of the command just seen:

As you can see, the command returns a single file that matches our criteria:
doc1In this case, in fact, the files followed by more than one character after the card string will not be shown:
- doc.txt
- doc.pdf
- doc12 (it is followed by two characters, to show it you had to use “card*”)
Combine wildcards
We can combine multiple wildcards with each other. In this example the files in the folder are those of the previous example (card12, card1.txt, card2.pdf, card5, new card).
If we want to show files that start with “card” are followed by a single character and have any extension, we use the command:
ls doc?.*Which will give us the following output:

pwd
If I want to know the absolute path of the directory I’m in, I just use the pwd command.
Command syntax:
pwdOutput example:

cd
The list of most used Linux commands must include cd. This command allows us to move from one directory to another.
Command syntax:
cd [path]For example we are in the home directory where the Documents folder is present, to move inside the latter we use the command:
cd DocumentsTo return to the home directory, just use the command without specifying any parameters, like this:
cdTo go back to the top level we use the command:
cd ..mkdir
With Linux we can create directories from the terminal using the mkdir command.
Command syntax:
mkdir [parameter] [path]If we want to create the directory in the current path, we just need to use the command followed by the name of the new directory. Let’s create a folder called “Documents”:
mkdir DocumentsThe above command will create the folder in the current path. If we are in home/user/Pictures then the Documents folder will be created there.
If, on the other hand, we want to create the folder in a specific path, without entering it first using the cd command, we type the entire path. Let’s create a folder “2023” inside the “Documents” directory, like this:
mkdir /home/user/Documents/2023mkdir -p
The -p option allows us to create the directory and create any intermediate folders. In the example above, if I have not yet created the “Documents” folder and I want to create the “2022” folder inside it, I will do this:
mkdir -p Documents/2023Also, using this option, no errors will be generated in case I’m trying to create an already existing folder.
cp
From the terminal we can copy files and folders with the Linux cp command.
Command syntax:
cp [-option] [source] [destination]Let’s quickly learn how it works with different use cases.
I want to copy the “document.txt” file into the “Templates” folder. So I go to the folder that contains the file and then I indicate the destination path:
cp document.txt /home/user/Archive/TemplatesIf the file is in a directory other than the one I’m in, I’ll have to enter the full path of the source and destination folders.
For instance:
cp /home/user/Documents/document.txt /home/user/Archive/TemplatesWith this Linux command we can also copy and rename the file in one step. We just need to specify the name of the new file. Let’s go back to the previous example, move the file and rename it to “fattura.txt”:
cp /home/user/Documents/document.txt /home/user/Archive/Templates/invoice.txtThis command creates a copy of “document.txt”: the copied file will be found in the Models directory and will be renamed to “invoice.txt”.
cp -r
To copy a folder we must add the “-r” option which allows us to recursively copy all the contents of the directory.
We are in the Documents folder where we have Folder1 and Folder2. To copy Folder1 and its contents inside Folder2 we will use the command:
cp -r Folder1 Folder2With this command we are creating a copy of “Folder1” and all its contents inside “Folder2”.
cp -i
When copying files, a check is made if there are files with the same name. Thanks to the -i and -f options we can establish the behavior to follow.
If we want the system to ask us for confirmation before overwriting files, we use the -i option, like this:
cp -i Documents/document.txt TemplatesIf a file with the same name already exists in the “Templates” folder, we will be asked for confirmation before overwriting it, like this:
cp: overwrite 'Templates/document.txt'?At this point we type s to confirm, n to cancel.
cp -f
When we want to overwrite files, without having to confirm the operation each time, we can use the -f option.
In this way the files with the same name will be overwritten automatically.
mv
We have just seen how to copy files and folders from the terminal. The Linux mv command allows us, instead, to move files and directories and/or to rename them.
Command syntax:
mv [-option] [source] [destination]Exactly as we have just seen for copying we just need to use this command to move files and directories.
We then use the mv command followed by:
- Source: i.e. the file or directory we want to move.
- Destination: the destination path.
For example, if I want to move the “document.txt” file to the Templates folder, I will write:
mv Documents/document.txt TemplatesIf in addition to moving it I also wanted to rename the file to “new.txt”, I would use the command:
mv Documents/document.txt Templates/new.txtThe mv command also allows us to rename files without moving them. The same goes for directories. Let’s see a practical example of the mv command used to rename a file.
mv invoice.pdf invoice01.pdfWith the above command I renamed the file, without moving it.
rm
To delete files and/or folders we can use the rm command.
Command syntax:
rm [-option] [path]We are going to indicate after the command the file or directory to be deleted.
We can use the -i option if we want the system to ask us for confirmation for each individual file. Using the -f option we can proceed to delete all the elements, without asking for any confirmation.
When we want to delete a directory and all its contents (files or other subfolders), we use the -r option to run the command recursively. For example, to delete the “Templates” folder, we will use the command like this:
rm -r Templates/cat, zcat, less and more (view file contents)
There are several Linux commands that allow us to view the contents of files directly from the terminal.
Use the cat and zcat commands
For simple content display we can use cat.
cat command syntax:
cat [path]Example: to view the file “document.txt”, we will write its path as follows:
cat Documents/document.txtIf it’s compressed files, we can use the zcat command.
What is the more command for?
The more command allows us to view the contents of the file and stop displaying it from screen to screen. It is useful when content cannot be shown in one screen.
More command syntax:
more [path]In the previous example it becomes:
more Documents/document.txtHow to use less
The less command is similar to the more command, but in addition to dividing the content into screens, it allows us to scroll the file going up and down.
Less command syntax:
less [path]ln
The ln command allows us to create links for files and directories.
Command syntax:
ln [-option] [source] [link name]We use the ln command followed by the file we want to link to and the name of the link. There are two types of links:
- symbolic links
- hard links.
In most cases you work with symbolic links. To create a symbolic link, we use the -s parameter.
We create a symbolic link associated with the “document.txt” file like this:
ln -s Documents/document.txt docWe have created a symbolic link “doc” connected to the specified file.
chmod
Through the Linux chmod command we can change the permissions of files and folders.
Command syntax
chmod [subject=typeofpermission symbol] [file]We can set the permissions on different subjects, specifying the corresponding letter:
- user (u) – owner of the file;
- group (g) – group of users to which the owner of the file belongs;
- others (o) – other users.
In the Linux ecosystem we talk about three types of permissions, each represented by a letter:
- reading – indicated with r
- writing – w
- execution – x.
Let’s see an example that allows us to understand how to issue the command:
chmod u=rwx document.pdfIn this case we have assigned read (r), write (w) and execute (x) permissions to the user who owns the file, for the document.pdf file.
We can add new permissions while leaving the ones already assigned unchanged as follows:
chmod u=+w document.pdfIn the example above we added write permission, leaving the others unchanged.
Similarly we can remove some permissions leaving the others as they were:
chmod u=-w document.pdfWith the command above, we removed the write permission for that particular file.
echo
The echo command allows us to output the string we passed to the command as a parameter.
Command syntax:
echo [option] [string]find
The find command allows us to search through files based on the conditions we want.
Syntax:
find [path] [rules] [action]We can specify what path to search, what conditions to use to select files, and then what action to take after the file is found.
grep
With the grep command we can search for a pattern, for example a string, within a file. The command will return the position of the pattern.
Syntax:
grep [-option1] [-option2] pattern [file]Instead of using a simple string as a pattern, we can also use a regular expression.
Among the options that we can use are:
- -i: allows us to not distinguish between lowercase and uppercase.
- -l: show us the list of files where the pattern was found.
In this example we search for the string “250” in the test.txt file and we are shown the line where the string was found:

tar
With Linux we can create archives of files and folders using the tar command.
Syntax:
tar [-options] [-f archive] [file]The tar command accepts several options:
- -c: allows us to create the archive
- -x: extract the archive
- -z: Create a gzipped archive
- -j: Create a bzip2 compressed archive
- -f: followed by the archive name we need to specify the archive name.
Here is an example of the tar command in action:
tar -cf archive.tar document.pdf invoice.pdfWith the command above we are creating an archive called “archive.tar” containing the two pdf files: document and invoice.
If I wanted to create a gzipped archive, I just need to add the -z option, the command would then become:
tar -czf archive.tar.gz document.pdf invoice.pdfLinux command list for managing users and groups
From the terminal, with root permissions, we can create new user accounts and manage the ones we have created.
Let’s see the main commands that allow us to perform these operations.
adduser
The adduser command allows us to create a new user account.
Syntax:
adduser [-options] usernameThis command automatically creates a home folder for the user and a group that will have the same name as the user.
If we want to create a new user and insert it in a specific group, we just need to type the name of the group after that of the user, like this:
adduser username usergroupgroups
We can see which group a specific user belongs to using the groups command.
Syntax:
groups [username]deluser
With the deluser command we can delete one or more users that we have created.
Syntax:
deluser [username]password
The passwd command allows us to change a user’s password.
Syntax:
passwd [username]After that we will be asked to enter the new password.
If we want to change the password of the user we are using, just use the command without specifying the user name, like this:
passwdSystem Linux command list
There are some specific terminal commands to check disk space, memory, running processes and hardware. Let’s see them together.
du
The du command allows us to know the occupied space on the disk. We can also specify a folder name if we want to know the space occupied by a specific folder.
Usage example:
du -hIt allows us to view the occupied space on the disk, the “-h” option allows us to see the result in a readable format.

df
Like the du command, but in this case it allows us to view the free space. Again we can use the -h option to see the result in human readable format.
Usage example:
df -hfree
The linux free command shows us the use of RAM, allowing us to distinguish between RAM memory and the amount of data stored on the hard disk (swap).
Usage example:
free -htop
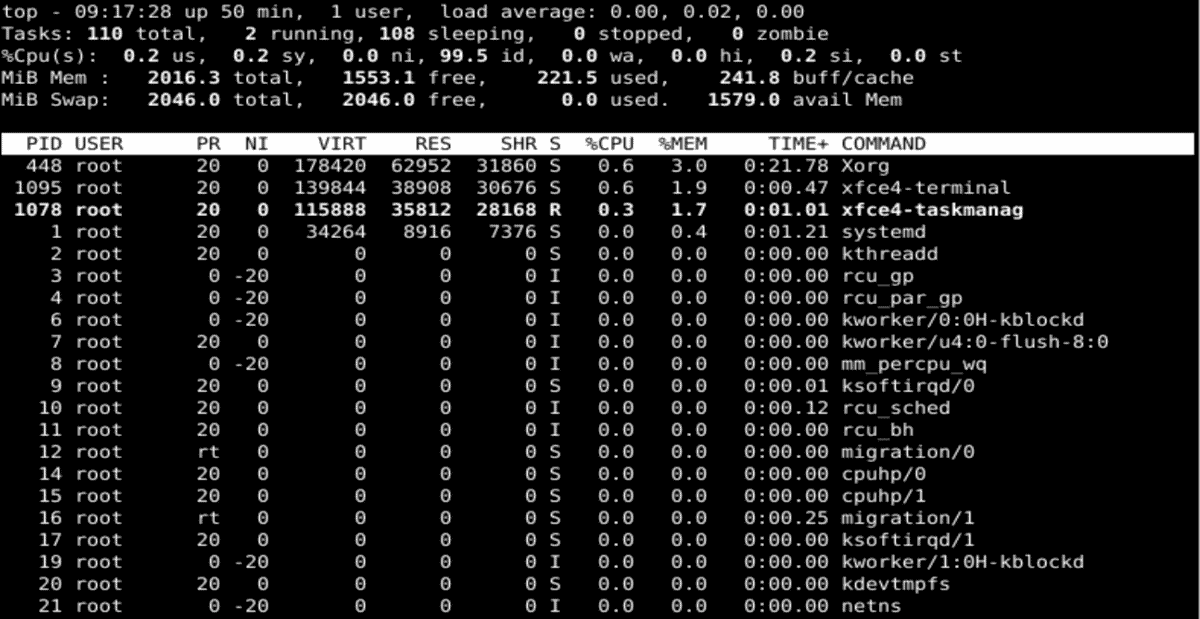
To view the processes in progress we can use the top command.
Syntax:
top [options]After giving the command we can use the following keys to order the processes:
- M: Sort processes based on memory used.
- P: Sort by CPU used.
- T: sort by time.
Using “k” followed by the PID of the process we can terminate that specific process.
To close top we can press “q”.
Here is an example of top command output:
kill, pkill, and killall: Commands for killing processes
The commands kill, pkill and killall allow us to kill processes. Let’s see how to use them.
Syntax of the kill command:
kill [PID]To use the kill command we need to know the PID, i.e. the ID of the process we want to kill. We can know the PID using the top command we just saw.
pkill command syntax:
pkill [word contained in the process name]If we don’t know the PID of the process, we can use the pkill command and pass it a term that the command will look for in the process name.
Knowing the exact name of the process we can use the killall command instead.
Killall command syntax:
killall [process name]lshw
Using the lshw command, we can learn all the details about the hardware of the machine we are using.
The -short option allows us to display a shortened list, like this:
lshw -shortConclusion
In this guide, we have gone through some of the main Linux commands that you can use from the terminal. Keep in mind that these are just a few commands, and there are so many more features you can learn.
To extend your knowledge you can:
- Use the command man to bring up the manual where you can find out all the details about a command.
- See the online manual pages here.
Was this guide helpful to you? Have you learned how to use commands that you didn’t know yet? Leave a comment and let us know.
Ready to build your WordPress site?
Try our service free for 14 days. No obligation, no credit card required.


