Every website needs a way for visitors to get in touch. Whether someone has a question about your services or needs support, a contact form gives them a direct line to you without ever leaving your site.
Joomla comes with a built-in way to create a basic contact form. For a lot of site owners, that’s enough. But if you need custom fields, form validation, multiple email recipients, or the ability to store submissions in a database, you’ll want to use a third-party extension.
Below, you’ll learn why contact forms matter, how to create a Joomla contact form using native features, and how to build a more advanced form using ChronoForms. We’ll also cover how to add a captcha to protect your forms from spam.
Table of Contents
Why Add a Contact Form to Your Joomla Site?
The moment you publish your email address on your Joomla site, spam bots will find it. A contact form keeps your email address hidden while still giving visitors an easy way to reach you.
Beyond spam protection, contact forms let you control the information you collect. You can require a name, email, subject line, and message, so you’re not chasing down missing details later. If you’re running a business, this saves time and keeps your inbox organized.
Contact forms also look more professional. A clean form on a dedicated page tells visitors you take communication seriously and makes it easy for them to reach out, whether that’s for a question or a quote.
Here’s a quick look at why a contact form is worth adding:
- Privacy protection. Your email address stays hidden from bots and scrapers.
- Structured information. You decide what fields visitors need to fill in.
- Spam reduction. Pair your form with a captcha, and you’ll filter out most junk submissions.
- Professional appearance. A clean contact form builds trust with your audience.
- Centralized communication. All inquiries come through one channel, making them easier to manage.
Now that you understand the benefits, let’s look at the two main ways to create a contact form in Joomla.
Method 1: Create a Joomla Contact Form with Built-in Contacts Component
Joomla includes a Contacts component right out of the box. You don’t need to install anything extra to use it, which makes this the quickest way to get a contact form on your site.
That said, the built-in option is fairly basic. You won’t find custom fields, conditional logic, or form submission storage. But if all you need is a simple form that sends an email when someone fills it out, this method works well.
This walkthrough uses Joomla 5, but the process is nearly identical on Joomla 6. If you’re still running an older version of Joomla, then you can always update your Joomla site.
Step 1: Create a Contact
First, log in to your Joomla site. In the sidebar, navigate to Components > Contacts > Contacts.
If this is your first time here, you’ll see a button to add your first contact. If you’ve created contacts before, click the New button.

On the next screen, fill in the Name field with the person or department you want the form tied to, something like “Support Team” or your own name. The Alias field controls the slug that appears in the URL. You can leave it blank, and Joomla will generate one from the name automatically.

The most important field here is Email. Enter the email address where you want form submissions sent. If you skip this, the contact form won’t appear on the front end of your site.
Below that, you’ll find the Category field, which defaults to Uncategorized. If you manage multiple contacts, you can create categories to keep things organized. You can also add optional details like a phone number, address, and an image. These will display alongside the contact form on the page.
Once you’re finished, set the Status to Published and click Save & Close.
Step 2: Create a Menu Item for the Contact Form
Your contact form won’t be accessible to visitors until you link it to a menu item. Without a menu item, the form exists in the backend but has no URL on the front end.
To create the menu item, click on Menus in the sidebar, then click the + button next to the menu where you want the link to appear (usually the Main Menu).

On the next screen, give the menu item a Title, like “Contact Us.” Then, under the Details tab, click the Select button next to Menu Item Type.

A pop-up window will appear showing the available types. Click Contacts, then select Single Contact.

After that, a new field will appear called Select Contact. Click the Select button and choose the contact you created in Step 1. If you need to create a new contact without leaving this screen, you can use the Create button instead.

Choose which menu to place the item in and set the Status to Published. Click Save & Close.
Step 3: Test Your Contact Form
Now, visit the front end of your site and click the new menu link. You should see a page that displays the contact information you entered, along with a contact form.
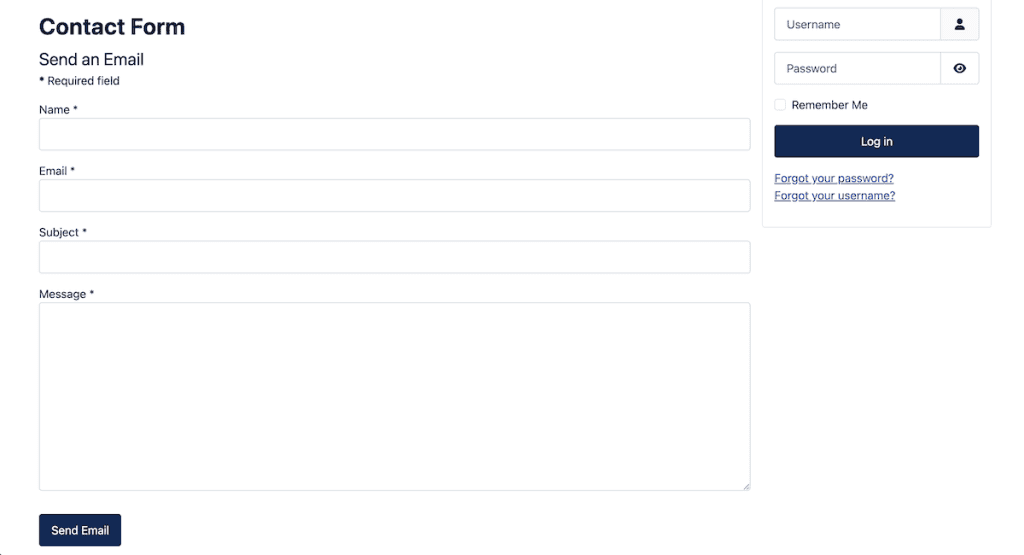
Fill out the form and click Send Email to test it.
If the email doesn’t arrive, check your spam folder first. If it’s not there, the issue may be related to your email server configuration. You can check these settings under System > Global Configuration > Server in the Joomla admin panel.
The native contact form doesn’t save submissions anywhere. Once the email is sent, that’s it. If you need a record of form submissions, or if you want more control over the form’s fields and layout, the next method is a better fit.
Method 2: Create a Contact Form with ChronoForms
If the built-in Contacts component feels too limited, a third-party extension gives you much more flexibility. ChronoForms v8 is one of the most established form-building extensions in the Joomla ecosystem.
It currently has over 371 reviews on the Joomla Extensions Directory with a 4.5 out of 5 average rating. The extension has been around since 2006, and version 8 was rewritten from scratch for modern Joomla and PHP environments.
Here’s what makes ChronoForms a strong choice over the native option:
- Drag-and-drop form builder with custom field types
- Field validation to make sure visitors enter information in the correct format
- Email notifications to multiple recipients
- Database storage so you can save and review submissions later
- Conditional logic to show or hide fields based on user input
- Captcha support for spam protection
The free version is quite capable for most contact form needs. Keep in mind that it adds a small “This form was created by ChronoForms” link below your form. Upgrading to the paid version removes this.
Note: ChronoForms v8 is compatible with Joomla 3, 4, 5, and 6, and it requires PHP 8 or higher.
Let’s walk through the full setup.
Step 1: Install ChronoForms v8
You can install ChronoForms directly from the Joomla admin panel. Navigate to System > Install > Extensions.

Click Install from Web, then search for “ChronoForms” and select it from the results. Click Install, then click the second Install button that appears at the bottom of the page.

Once the installation is complete, you’re ready to start building your form.
Step 2: Create Your Contact Form
In the sidebar, go to Components > ChronoForms 8 and click New to create a new form.

You’ll land on the form builder screen. Before adding any fields, type a name for your form at the top, something like “Contact Form.” You can also set a custom slug if you want. Click Save to enable auto-save and the preview feature.

Now it’s time to build the form using the drag-and-drop interface. On the right side of the screen, you’ll see a Views panel with blocks organized into four groups:
- Fields includes text inputs, text areas, dropdowns, checkboxes, file uploads, and more.
- Security contains captcha options.
- Areas provides container elements for structuring complex forms
- Content allows you to add custom HTML, CSS, JavaScript, and headers.
For a basic contact form, start by dragging two Text blocks into the central work area. These will serve as your Name and Email fields. Then drag in a Textarea block for the message and a Button block for the submit button.
To customize each field, click the wrench icon on the block. For the first text block, set the Label to “Name” and the Field Name to something like “username.” Under the Behaviors menu, select Required to make the field mandatory.

For the second text block, set the Label to “Email” and the Field Name to “user_email.” In the Behaviors menu, enable both Valid email (which checks the format) and Required.
For the Textarea block, set the Label to “Message.” And for the Button block, set the Label to “Send Message.”
You can rearrange blocks at any time by clicking the yellow Move button and dragging the item to a new position.
Step 3: Set Up Email Notifications
With the form fields in place, you need to tell ChronoForms where to send submissions.
Click the Submit tab at the top of the form builder. On the right side, you’ll see an Actions panel. Drag an Email action into the workspace.

Click the wrench icon on the Email block to configure it. Here you can set the recipient email address where submissions should be sent, the email subject line, and the reply-to settings so you can respond directly to the person who submitted the form.
ChronoForms supports several shortcodes that let you pull form data into your emails. For example, {data:username} inserts the name the visitor entered, and {data:user_email} inserts their email address. You can also use {email:data_table} to include a summary table of all submitted values in the email body.

To pre-fill the reply-to fields, use {data:username} in the Reply name field and {data:user_email} in the Reply email field. This way, you can hit Reply in your inbox and respond directly to the person who contacted you.
Step 4: Add a Confirmation Message
After a visitor submits the form, they should see a message confirming their submission went through. To set this up, stay in the Submit tab.
In the Views section on the right, open the Content group and drag a Message block into the workspace. Click the wrench icon and add your preferred confirmation text, something like “Thank you for getting in touch. We’ll get back to you as soon as possible.”

From this point on, anyone who submits the form will see that message after clicking the send button.
Step 5: Add the Form to a Page
Just like with the native Contacts component, your ChronoForms form needs a menu item to be accessible on the front end.
Go to Menus in the sidebar and click the + button to add a new menu item. Give it a title like “Contact Us.” Then, click the Select button next to Menu Item Type.

This time, instead of choosing Contacts, select Chronoforms8 > Display a Form.

After that, click on Options, then add your form alias. Then, click Save & Close and your new form will now be live.

Visit the front end of your site, and you should see the link in your menu. Click it to view and test your new contact form.

How to Add a Captcha to Your Contact Form
A contact form without spam protection is an open invitation for bots. Adding a captcha is one of the easiest ways to filter out automated submissions and keep your inbox clean.
A great alternative free extension hCaptcha. It’s free, privacy-friendly, and works with both the native Joomla contact form and ChronoForms.
Install the hCaptcha Plugin
Unlike ChronoForms, hCaptcha can’t be reliably installed using Joomla’s Install from Web feature. Instead, you’ll need to download the plugin file first, then upload it manually.
Head to the developer’s download page at data2site.com/download/hcaptcha. You’ll see versions listed for different Joomla releases. Download the version that matches your Joomla installation.
Once you have the zip file, go to System > Install > Extensions in your Joomla admin panel. Click Upload Package File, select the zip file you downloaded, and Joomla will handle the rest.

Get Your Security Keys
The hCaptcha plugin needs two keys to work: a Site Key and a Secret Key.
To get these, create a free account at hcaptcha.com. The free plan supports one site and will be enough for most site owners.
During setup, you’ll be asked to add your domain and configure the captcha mode. Once you’re done, copy both the Site Key and Secret Key.
Configure the Plugin in Joomla
Then, go back to the Joomla admin panel, go to System > Manage > Plugins and search for “hCaptcha.” Click on the plugin to open its settings.
Paste the Site Key and Secret Key into the corresponding fields. Make sure the plugin status is set to Enabled, then save.

Enable Captcha in the Native Contact Form
If you’re using the built-in Contacts component, you can activate hCaptcha site-wide with one setting change.
Go to System > Global Configuration > Site. Find the Default Captcha dropdown and select Captcha – hCaptcha. Save your changes.

Now, every contact form created with the native Contacts component will display the hCaptcha challenge.
Add Captcha to a ChronoForms Form
If you’re using ChronoForms, the process is a little different. Open your form in the ChronoForms editor by going to Components > ChronoForms 8 and selecting the form you want to edit.
In the Views panel on the right, look under the Security section. You’ll find an hCaptcha block. Drag it into your form where you want the captcha to appear, usually just above the submit button.

If you’ve already entered the hCaptcha keys in the plugin’s global settings, the block should work automatically. Otherwise, you can enter the keys directly in the block’s settings.
Joomla Contact Form FAQs
Does Joomla have a built-in contact form?
Yes, Joomla includes a native Contacts component that lets you create a basic contact form without installing any extensions. You create a contact, link it to a menu item, and visitors can send you emails directly from your site. However, it doesn’t support custom fields, conditional logic, or form submission storage.
Can you create a contact form in Joomla without an extension?
You can. The built-in Contacts component handles simple contact forms. You’ll need to create a contact with a valid email address and then create a menu item that links to it. For anything beyond a name, email, subject, and message field, you’ll want to use a third-party extension like ChronoForms.
What’s the best Joomla contact form extension?
It depends on what you need. ChronoForms v8 is one of the most popular and well-reviewed options. It offers a drag-and-drop builder, email notifications, database storage, and conditional logic in the free version.
How do I protect my Joomla contact form from spam?
The most effective approach is adding a captcha. hCaptcha is a free, privacy-friendly option that works with both the native Contacts component and extensions like ChronoForms. Install the plugin, add your security keys, and set it as your default captcha in Global Configuration.
Closing Thoughts: Creating a Joomla Contact Form
Adding a contact form to your Joomla site doesn’t have to be complicated. If you need something quick and simple, the native Contacts component gets the job done without installing a single extension. Create a contact, add a menu item, and you’re set.
If you want more control over your form’s design, fields, and functionality, then ChronoForms v8 is worth a look. The drag-and-drop builder makes it beginner-friendly, and the free version covers email notifications, field validation, conditional logic, and database storage.
Whichever method you choose, don’t skip the captcha. It only takes a few minutes to set up, and it’ll save you from a flood of spam submissions down the line.
Now over to you. Have you set up a contact form on your Joomla site? Which method did you use? Share your experience in the comments below.
Ready to build your WordPress site?
Try our service free for 14 days. No obligation, no credit card required.