
cURL is a free, open source tool that you can use from the command line. In this tutorial we will see how to use the cURL command on Linux to transmit data without using the browser.
Note that although it is a terminal command, cURL can also be used on macOS and Windows and in many cases it is already present and does not require installation.
Let’s start with what cURL is and then learn its syntax and see practical examples of use.
Table of Contents

What is cURL?
cURL is a command line tool with which you can communicate with the server without having to use a browser.
The most common uses of this tool are:
- test the functioning of the API;
- display HTTP headers;
- send HTTP requests;
- transfer data to or from a server.
The name “cURL” invokes exactly its function.
The “c” represents that it is a client-side program, while the “URL” just indicates that it works with URLs by sending and downloading data from URLs.
On Linux the cURL command is used to call this tool which is used exclusively from the command line and does not have a graphical interface (GUI). If you want to integrate the tool into another program you can use the libcurl libraries.
Here is the complete list of protocols currently supported by cURL:
- DICT
- FILE
- ftp
- ftp extension
- GOPHER
- GOPHERS
- HTTP
- HTTPS
- IMAP
- IMAPS extension
- LDAP extension
- LDAPS extension
- MQTT
- POP3
- POP3S
- RTMP extension
- RTSP extension
- SCP
- SFTP
- SMB extension
- SMB extension
- smtp
- SMTPS
- TELNET
- TFTP extension
- WS extension
- WSS.
Linux cURL command syntax
Before we go into examples of using cURL, let’s start at the beginning and begin to understand how to use this command.
The basic syntax of the command is as follows:
curl [parameters] [URL]Parameters can be an option, such as “-h” to show help. Or combinations of several options.
If you are not very familiar with the terminal, we suggest you read our Linux commands guide first so that you get the basic knowledge.
As with other terminal commands, options can be used in two ways with cURL.
- Abbreviated version of options: for example “-v“. Remember that it is always preceded by a single dash (“-“).
- Extended version of options: such as “–verbose“. In this case the option must be preceded by two dashes (“–“).
Remember that the options are case sensitive, try using “-V” instead of “-v” and you will get two different outputs. In the case of cURL “-v” is the abbreviation of “--verbose” and will give us more information on the operations performed, while “-V” indicates “--version” and will show us which version of the tool is installed on our system.
Thanks to the examples that we will see in this article, you will learn how to use some of the cURL options. Note that this command has more than 200 options, so we won’t be able to go through them all.
To see a list of the most common options you can use the “--help” option, like this:
curl --helpThe result will be like this.
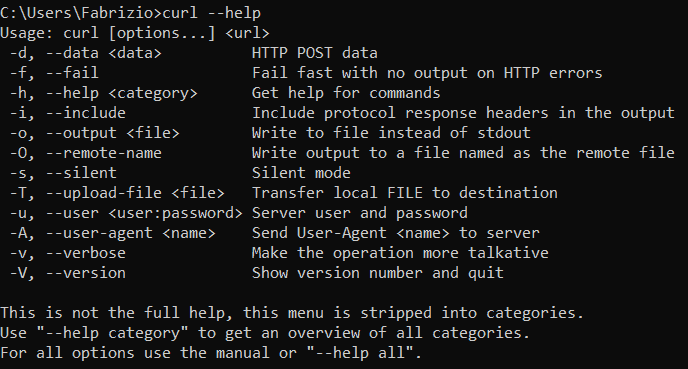
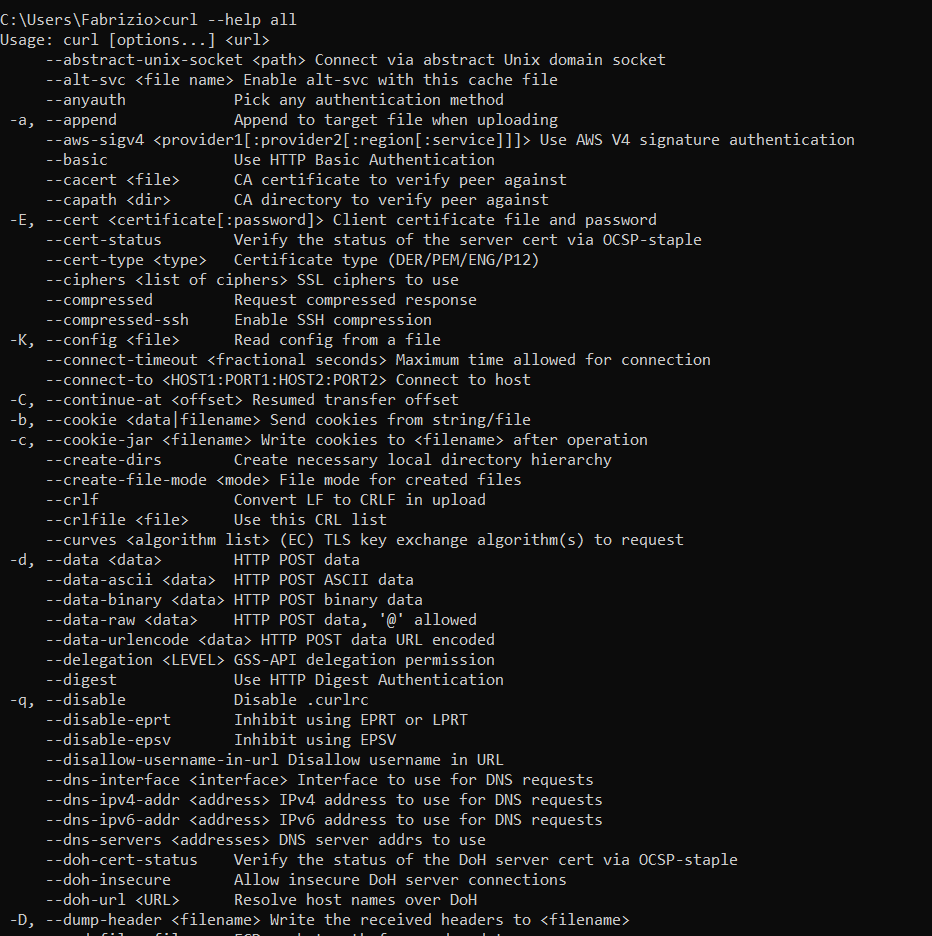
These are only the most common options, while if you want to have a complete list just give this command:
curl --help allIn this case you will see all the options always accompanied by a brief explanation.
How to use cURL (with examples)
In this section of our tutorial on using cURL we will learn the basic syntax of options and see how to perform some useful operations.
After you learn how to use the cURL command with these practical examples, you can take advantage of the options for your own tests.
Specifically we will look at:
- web pages: how to display them in HTML and save the content;
- files: how to download them and resume interrupted downloads;
- user agent: how to emulate a different user agent;
- HTTP headers: how to show them from the command line;
- redirects: how to make cURL follow redirects;
- password protected pages: how to use HTTP authentication;
- POST requests: how to make a request with the tool;
- FTP: how to see the list of files in directories, upload and download files via FTP.
It is a very useful tool to use on virtual machines and servers. With SupportHost you will find cURL already installed if you choose any hosting plan or a dedicated solution like a dedicated server or a VPS cloud hosting plan.
Verify that cURL is installed
In most Linux distributions, macOS and Windows 10 cURL is already installed.
Before starting to use it, we can make sure in a very quick way that it is installed. To do this, just open the terminal (or even the command prompt in the case of Windows) and write:
curlIf the tool is present, the output we will see will be the following:
curl: try 'curl --help' for more information
If the program is not present, just install it. The command to use for the installation depends on the operating system and distribution you are using.
If you don’t know how to do it, at the end of this guide you will find links to the manual which also include specific installation instructions.
Show the content of a page with cURL
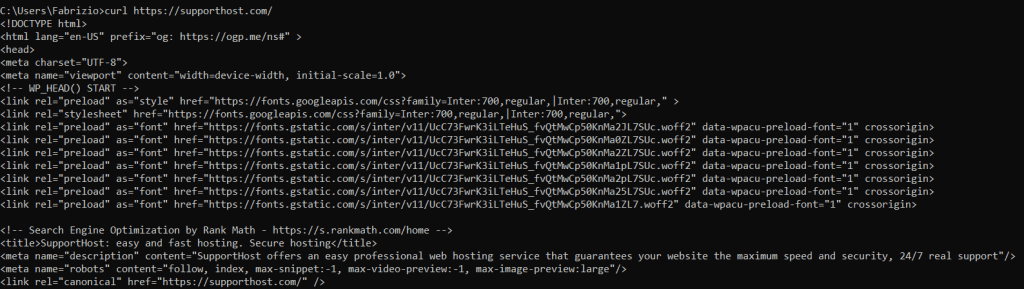
The basic use of cURL is to fetch data from the URL we give it.
We issue the command followed by the URL, like this:
curl https://supporthost.com/The source code of the requested page will be shown on the terminal, in the example above of the home page of our site.
Saving the contents of a page
We can use an option of the cURL command to save the content of a URL, for example a web page in a file.
Syntax:
curl -O [URL]Example:
curl -O https://supporthost.com/The “-O” option allows us to use the filename that is used on the server. In the case of a web page, like the example we just saw, the program will return an error like this “Remote file name has no length”:

In this case, in fact, we must specify the name of the file. To do this, just use this command:
curl -o homepage-supporthost.html https://supporthost.com/The syntax of the command to use is this:
curl -o file-name.html https://website.com/This will be the result we are shown.

Note: in this case the file is saved in the path we are in, in our example “C:\Users\Fabrizio\”
Using cURL to download a file
In the example we just saw, we used cURL to download the content of a page to our computer.
Knowing the URL, we can use the same command to download a.
We just proceed exactly as we saw before, let’s see it again with an example.
Being a file, in this case we don’t have the problem we saw before because the file will already have a name on the server. In this case, therefore, we can use one of two options:
- -Oif we want the file we download to have the same name as the one on the server;
- -oif we want to specify a different name.
Here are the two examples.
We want to download the cPanel logo from Wikipedia and save it with the same name it has on the server “Cpanel_logo.svg”. We use the following command with the “-O” option:

Let’s download the same logo, but this time give it the name “cpanel.svg”, using this command with the “-o” option followed by the name:

Restart an interrupted download
If we started downloading a file with cURL and the download was interrupted, we can resume downloading it using the “-C” option like this:
curl -C - -O [filePath]This option is useful for large downloads because it allows us to pick up where we left off rather than having to start from scratch.
It can also be used to resume a download using the FTP protocol. In the latter case, the syntax to use will be the following:
curl -C - -O ftp://[filePath]Specify a different User Agent with cURL
By default cURL will use its User Agent i.e.:
User-Agent: curl/[version]For example with the version we used for our examples, 7.83.1, the User agent will be:
User-Agent: curl/7.83.1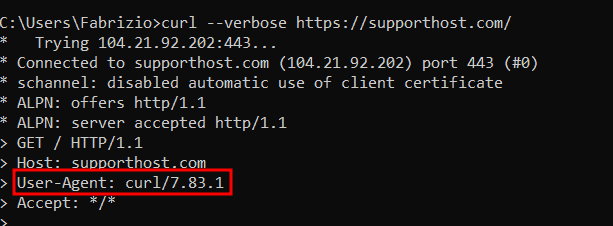
To set a different User Agent we can use the “-A” option followed by the string that identifies the User Agent we want to use, with this syntax:
curl -A ["User Agent"] [URL]Here is an example:
curl -A "Mozilla/5.0 (Windows NT 10.0; Win64; x64) AppleWebKit/537.36 (KHTML, like Gecko) Chrome/108.0.0.0 Safari/537.36" https://google.com/Show HTTP headers
As we saw in the first example, when we use the cURL command followed by the URL we are shown the HTML version of the page.
In this case, however, we are not shown the HTTP headers of the page.
To display only the headers (without the page content), we can use this command:
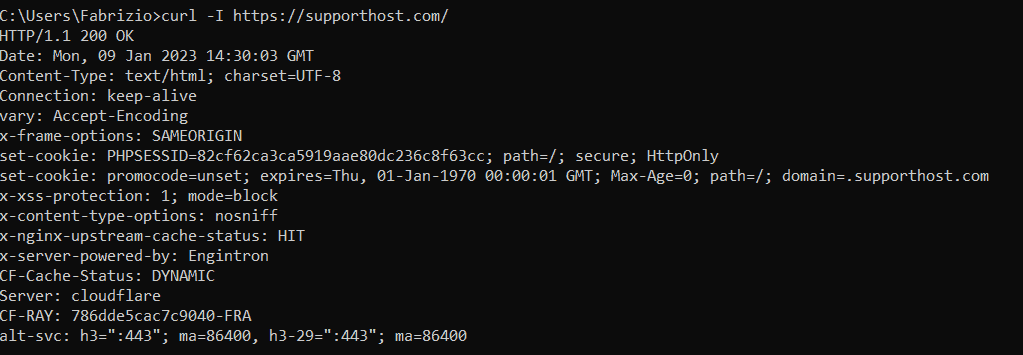
curl -I [URL]For example:
curl -I https://supporthost.com/It will show us the HTTP header of our site’s home page.
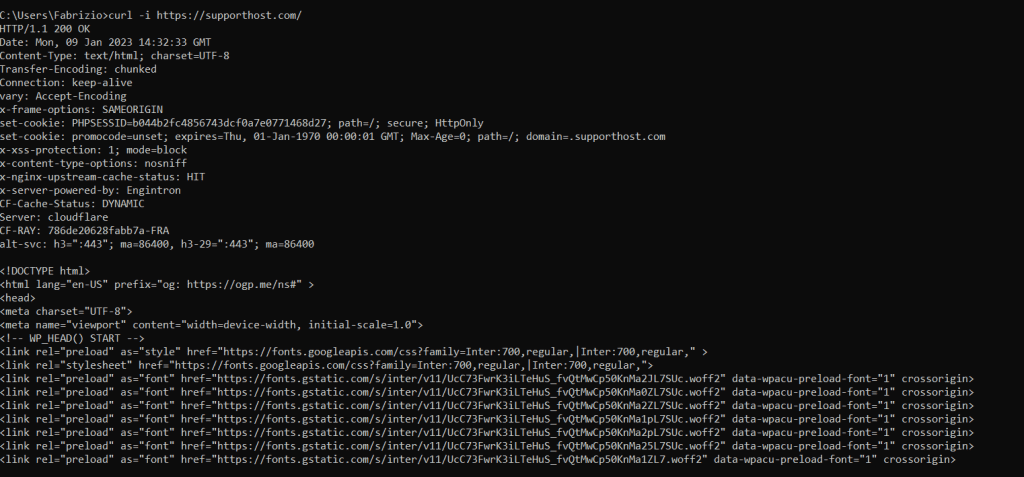
If, on the other hand, we wanted to view both the HTML version of the page and the HTTP header, we could use this command:
curl -i https://supporthost.com/In this way we will be shown the HTTP header followed by the source code of the page.
Follow the redirects
If we try to issue the cURL command followed by a URL that is redirected to another address, the tool will not return any results.
By default, cURL does not automatically follow redirects.
To understand if that URL is actually redirected elsewhere, we can view the HTTP header (with the option -Ias we saw before). Here is the output:
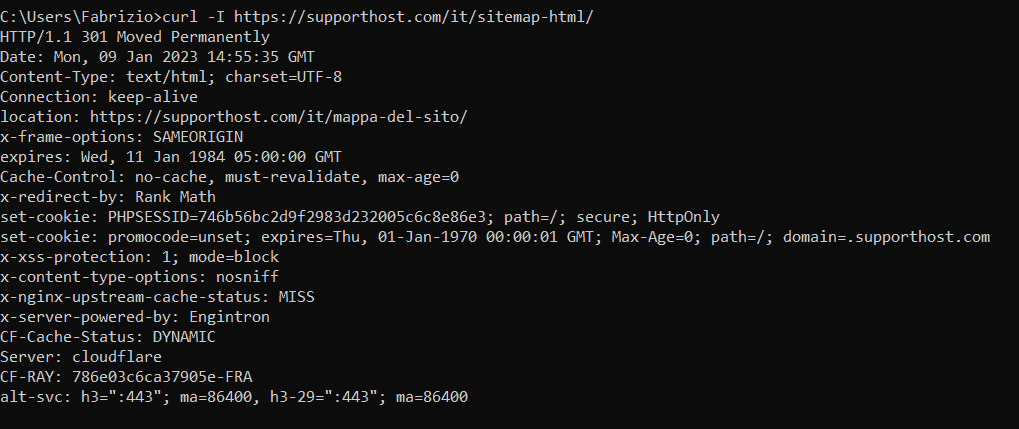
As you can see in this example, the “location” value indicates the page to which the 301 redirect points.
At this point, if we want cURL to follow the redirect we have to use the “–location” option.
In our example we also used the -I option to see only the HTTP headers instead of showing the source code as well. This is the output:
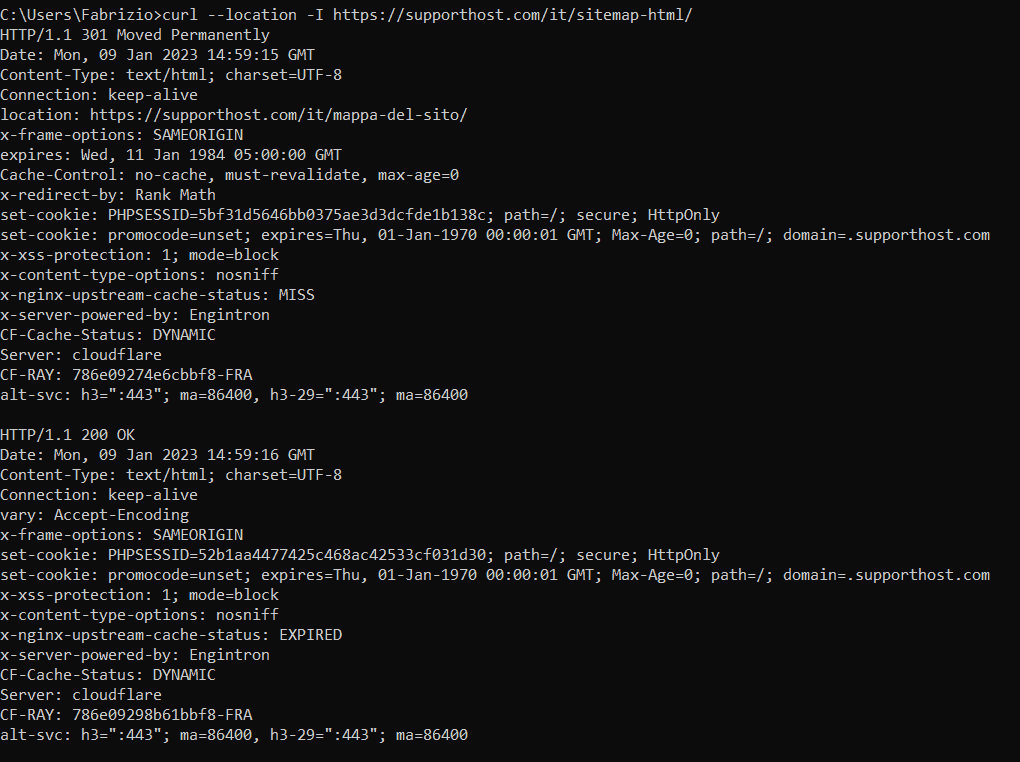
As you can see the first HTTP response code is “301 Moved Permanently” which tells us that the resource has been moved. In “location” we can see the destination address.
The second HTTP code is “200 OK“, this tells us that the second URL visited returned a 200 code.
Use HTTP authentication with cURL
When you need to access URLs protected by credentials (username and password), you can send the access data with the cURL command.
If the authentication system used is basic access authentication, just indicate the credentials in this way:
curl --user user:password https://website.comThis can be useful, for example, to access pages protected with htaccess protection from the command line.
If a page is password protected and we try to access it without having used the “–user” option for the login credentials, we will be able to see for example a 401 error page, like in this example:

Send a POST request with cURL
A note on using HTTP methods with cURL: Note that with this tool, you don’t always need to tell which HTTP method to use.
Based on the option you are using, the default method will be used. For example when we use “-d” the POST method will be used, when no method is specified the default one, ie GET, will be used.
With cURL we can send a POST request, passing data to send to a URL. The “-d” or “–data” option allows us to send the data with a POST request.
Syntax:
curl -d ["field=value"] [URL]Let’s take an example with a hypothetical contact form with two fields “name” and “text”.
Using the command:
curl -d "name=joseph&text=example" https://website.com/contactsWe are sending this data: “name=john” and “text=test” to the page specified in the URL. As you can see in the example, to concatenate the data one with the other, we just need to use “&”.
The format to be used will therefore be the following:
[field1]=[value1]&[field2]=[value2]Just like in the example we just saw.
See the list of files on the server (FTP)
Among the protocols supported by cURL we also find FTP. Together with SFTP it is a standard protocol for transferring files to and from a server.
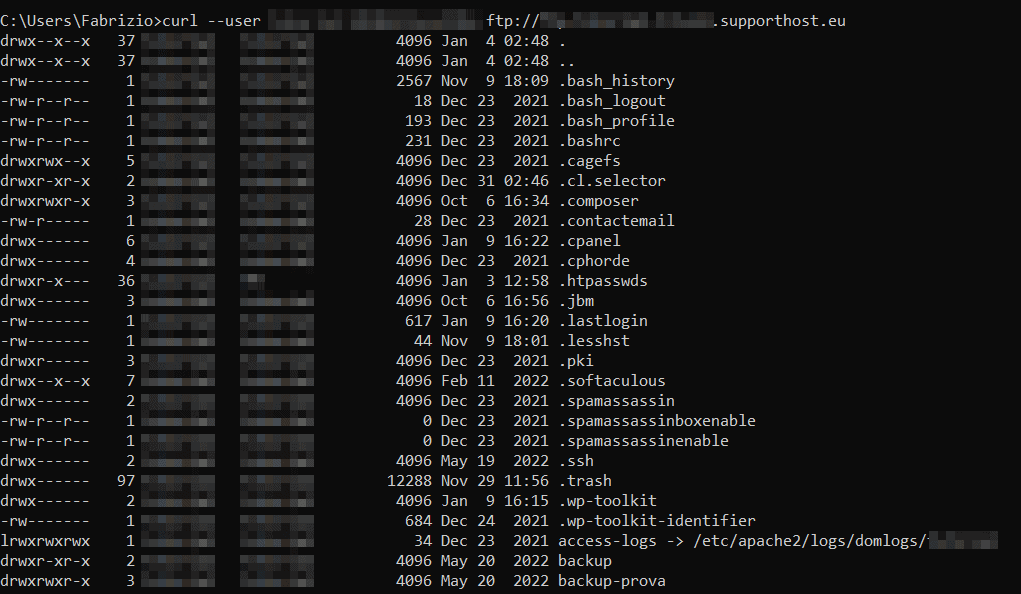
Before seeing how to transfer files to and from the server with the FTP protocol with cURL, let’s see a simple command that allows us to view the list of files on the server.
curl --user name:password ftp://[servername]This command will give output similar to the following:
We can view the contents of a specific folder by entering the folder path for example:
curl --user name:password ftp://ftp.website.com/folder-name/Download a file via FTP
We can use cURL to connect via FTP to the server and download a file locally.
The command you use has this syntax:
curl --user name:password -O ftp://[filePath]We’re using a combination of the two options we saw in the previous examples:
- the “–user” option allows us to enter the login credentials;
- the “-O” option indicates to download the file keeping the same name it has on the server.
Here is an example where we downloaded a jpg file:

Remember to enter the FTP server name followed by the full path to the file.
From cPanel you can retrieve your FTP account information by going to FTP Accounts > Configure FTP Client and looking in the “Manual Settings” section, as I show you here:

If the download of the file is interrupted and you want to resume it from the point where it stopped, just use the command we saw before and which I reproduce again here for greater clarity:
curl -C - -O ftp://[filePath]Upload a file via FTP
As we mentioned at the beginning of this guide, cURL allows us to transfer data. Using the FTP protocol, we can also upload files to the server.
To do this you will need to use the “-T” option like this:
curl --user name:password -T [file] ftp://[filePath]Here’s an example where we upload an image:

In this example the file that will be uploaded to the server will have the same name as the local file “image.jpg”.
If, on the other hand, we want to change the name only on the server, we will have to indicate it after the path, like this:

The syntax to use will be this:
curl --user name:password -T [file] ftp://[filePath/new-file-name]In the example just seen, the command becomes:
curl --user user:password -T image.jpg ftp://ftp.website.com/backup/image2.jpgConclusions and other resources
In this tutorial on cURL, we have seen some of the most common uses. The tool can be useful on several occasions for transferring data, sending HTTP requests and for testing.
Thanks to the practical examples we’ve seen, you now have all the basics to start using the cURL command. To dig deeper and discover other use cases, you can rely on the quick start guide and detailed documentation “Everything curl“.
Have you tried using cURL following our guide? Let us know with a comment.
Ready to build your WordPress site?
Try our service free for 14 days. No obligation, no credit card required.