

Sometimes you want a block to appear in one situation but not another. For example, a banner that only displays on phones, a promotion that you want to disappear after a weekend, or a members-only notice that’s hidden from regular visitors. The block editor can’t manage this natively, so until recently, custom CSS, page builders, or a plugin, were the main options.
However, all of that changed with WordPress 7.0, which added block visibility controls in the editor. This works for most use cases, but for a higher level of control you can use a plugin that adds even more show/hide options.
Below we’ll go into WordPress block visibility in-depth, how it works natively, and how to use a plugin for more block visibility control.
Table of Contents
What WordPress Block Visibility Means
WordPress block visibility lets you set when and where a block appears. Instead of always showing for every visitor, you add a rule for when you want it to display. This rule may reveal or hide the block based on device, user role, date, or page.
There are a lot of reasons to use this functionality. For example, you can show a wide table on desktop, but a summary of the table on phones. You can have a sale banner live only between certain dates. You can keep a members-only section for logged-in users. Or, you can hide a call to action from visitors from a specific site.
There are two main approaches to WordPress block visibility that you can use on your WordPress site. First, you can use the built-in visibility controls in WordPress 7.0, which focus on device-based display. Second, for more advanced conditions, block display plugins offer expanded options. We’ll start by looking at what’s included in WordPress core before going into these advanced plugin solutions.
Using the Native WordPress Block Visibility Feature in WordPress 7.0
WordPress 7.0 introduced viewport-based visibility. This means you can now show or hide any supported block by device type like desktop, tablet, or mobile, without writing code or installing anything extra.
This builds on a smaller feature from WordPress 6.9. In that version, you could hide a block completely so it never appeared on the front end. WordPress 7.0 keeps that option and adds a more practical one that hides a block on some devices while keeping it visible on others.
There’s an important difference between these two behaviors, and it affects your site enough that it’s worth understanding before you use either one.
Hiding a block by device keeps it in the HTML and hides it with CSS. Using Omit from published content removes it from the page entirely.
This can have an impact on your SEO, since search engines read your page source. A block hidden by the device remains in the markup and can still be crawled. While, a block that’s fully omitted is gone, like it doesn’t even exist on the page. Make sure to keep this in mind when the content you’re hiding has any search weight.
How to Hide a Block on a Specific Device
Start by opening your page or post in the block editor and select the block you want to control.
Then, click the Options icon, the three dots in the block toolbar, and choose Hide. A pop-up opens where you can hide the block completely or hide it only on desktop, tablet, or mobile. Check the devices you want, then click Apply and update the page.

Use List View (top left icon) to check your blocks. Blocks that are hidden will show a device icon. When you’re finished, save or update the page.

There’s also a second way to reach these controls if you prefer the keyboard. Press the command palette shortcut (Cmd+K on Mac or Ctrl+K on Windows), then search for the show or hide command.

There’s one important thing to keep in mind. The block settings sidebar on the right doesn’t include the hide/show toggle. If a block is fully hidden, the sidebar shows a small grey notice at the top. For per-device hiding, you’ll find the controls in the toolbar, List View, and the command palette instead.
The Limits of the Built-In Feature
The built-in feature only hides based on device type, not user role, date, URL, or referrer. To do all of that, you’ll need to use a WordPress plugin.
The device sizes are fixed in WordPress 7.0 as well. Mobile covers screens up to 480 pixels wide, tablet goes from 480 to 782 pixels, and desktop is anything wider than 782 pixels. You can’t change these breakpoints yet. The ability to define your own through your theme is planned for WordPress 7.1, but it isn’t here at the time of writing.
However, one block doesn’t have visibility controls enabled. The Custom HTML block’s visibility support is deliberately switched off, so you won’t see these controls on it.
For most responsive needs, the built-in option works well since it keeps your site streamlined. However, if your rules go beyond device types, this is where plugins become essential. With that in mind, let’s explore how plugins give you more control over block visibility.
Using the Block Visibility Plugin for Real Conditions
When you need conditions that go beyond device type, the plugin to look at is Block Visibility. It’s free, actively maintained, and last updated in early 2026. It used to have a paid Pro version, but the developer folded all of those features into the free plugin back in 2023, so nothing is locked behind a paywall now.
The plugin adds a visibility panel to each block, making it easy to display blocks to certain users, schedule content, or apply conditions based on device, URL, referrer, browser, location, cookies, or ecommerce rules. This allows for precise control over who sees specific content, when, and under which circumstances.
Most plugin conditions are processed on the server, so hidden blocks aren’t sent to the browser. Only the screen size control uses CSS like the native feature.
How to Install Block Visibility
Installing it works the same as any other plugin. Go to Plugins > Add Plugin in your WordPress dashboard, then search for Block Visibility. Find the plugin by Nick Diego, click Install Now, then click Activate. Once it’s active, it works with core blocks, blocks added by other plugins, and block-based widgets.

Setting Up the Plugin Settings
After activating, head to Settings and then Block Visibility, where you’ll find three tabs worth a quick look before you start.
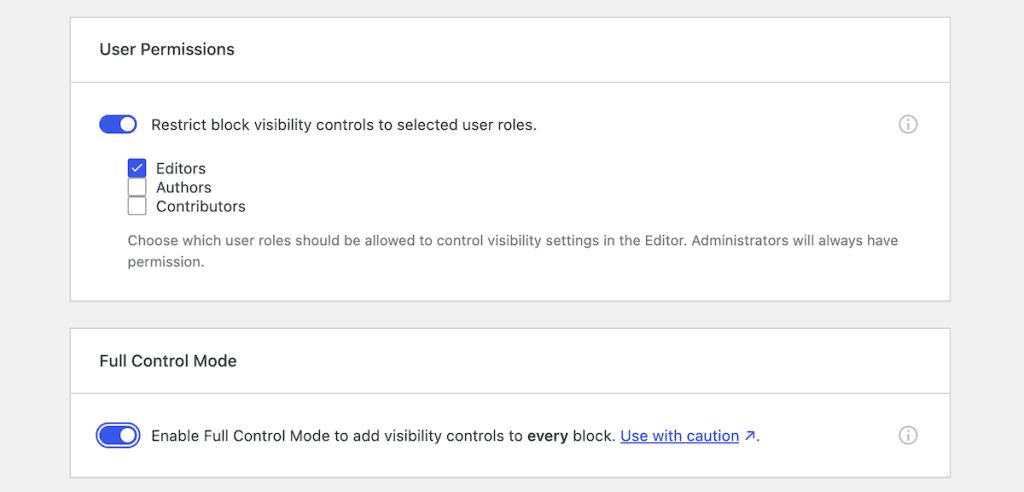
The General Settings tab controls who can use the plugin and includes a few global options.

There’s a user permissions setting that lets you limit visibility controls to certain user roles, so you could allow only editors and administrators to change them.
This tab also holds a Full Control Mode option. Turning it on makes the visibility controls available on every block, including ones like the Button block where they aren’t shown by default. If a block seems to be missing the controls, this setting is usually the reason.
The Visibility Controls tab lists every condition the plugin offers, such as Date and Time, User Role, and Screen Size, each with its own toggle. Switching off the ones you won’t use keeps the list short when you go to add a rule to a block.

The Block Manager tab works the other way around, letting you choose which block types get visibility controls at all. If you only apply rules to a few kinds of blocks, you can turn the rest off so the controls don’t show up where you’ll never need them.

Applying a Condition to a Block
With the plugin active, the controls appear in the block settings sidebar. Click the block you want to control, find the Visibility section in the sidebar on the right, and add the control you want, such as Date and Time or User Role. Then set the rule.

For a user role rule, you might choose to show the block only to logged-in visitors. For a date-and-time rule, you set the window during which the block should appear, then update the page.
Here’s an example. Say you run a weekend promotion and want a banner to appear automatically on Friday morning and disappear on Monday. You create a banner with the cover block, give it a Date and Time control, and set the start and end dates to match the weekend.

The main strength of this plugin is combining conditions into a single block. For example, show a banner only to logged-in users on a phone. Add a user role control set to logged-in and a device control set to mobile. Both rules must be true for the block to appear.
If you keep applying the same rules repeatedly, the plugin offers visibility presets. Save a group of conditions as a preset, then apply the group to other blocks with a single click. For sites with repeating patterns, like a seasonal promo layout used across pages, this saves a lot of clicks.

Other WordPress Block Visibility Plugins Worth Knowing About
Block Visibility is a pretty great free plugin, but still some other plugin options exist. They do the same job, while offering different pros and cons. Here are some of the other options to look at.
Conditional Blocks offers a free version with a smaller set of conditions, mainly lockdown, responsive visibility, and logged-in or logged-out states. To unlock the full set of conditions and presets, you need the Pro version, which starts at around $ 49 per year for a single site. Its free tier is more limited than Block Visibility’s, so it’s mainly worth it if you specifically want the Pro feature set.
Otter Blocks takes the WordPress block visibility approach from a different angle. It’s primarily a block library that adds around 20 new blocks, with visibility conditions included as one of its features.
Because visibility is bundled into a larger block library, Otter Blocks makes the most sense when you want those extra blocks too. If you do, the visibility rules come along at no cost. The free version covers logged-in and logged-out users, user roles, post-type conditions, and screen size, while more advanced conditions sit in the paid Otter Pro tier.
Kadence Blocks also includes visibility settings, though they’re limited to device type, with options to hide on desktop, tablet, or mobile. Two things are worth noting. These settings only apply to Kadence’s own blocks, not core blocks, and hide content with CSS rather than at the server level. If you’ve already built with Kadence, it’s handy, but it won’t cover core blocks.
Content Control keeps things simple with two rule types, device rules and user rules. It’s a reasonable pick if those two cover everything you need and you’d rather not work through a longer list of options.
Should You Use the Native Functionality or a Plugin?
The short answer is that the native WordPress 7.0 feature is the right choice when your only need is hiding blocks by device, and a plugin is the right choice when you need anything more specific. Here’s how the two main options compare side by side.
Feature | WordPress 7.0 Native | BloCk Visibility Plugin |
|---|---|---|
Cost | Free, built in | Free |
Device-based hiding | Yes | Yes |
User role conditions | No | Yes |
Date and time scheduling | No | Yes |
URL, query string, referral rules | No | Yes |
WooCommerce rules | No | Yes |
Combine multiple conditions | No | Yes |
How it hides | CSS, stays in page source | Server level for most rules, CSS for screen size |
Custom breakpoints | Not until 7.1 | Yes |
If you run a simple site and just want a cleaner layout on phones, use the built-in controls and skip the plugin. There’s no reason to add weight to your site for a job that core already does well.
If you schedule content, run promotions, gate sections by role, or build anything that depends on conditions other than screen size, install Block Visibility. The fact that most of its rules run on the server, keeping hidden content out of the page entirely, is a genuine advantage for both website speed and search.
You can also run both together on the same site. Let the native feature handle your everyday responsive tweaks, and let the plugin handle the few blocks that need real logic.
WordPress Block Visibility FAQs
Does WordPress have block visibility built in?
Yes, as of WordPress 7.0. You can hide any supported block on desktop, tablet, or mobile using controls in the block toolbar, the List View, or the command palette. WordPress 6.9 added the ability to hide a block completely. For conditions beyond device type, like user roles or dates, you still need a plugin.
Will hidden blocks hurt my SEO?
It depends on how they’re hidden. Blocks hidden by the device’s native feature or a plugin’s screen size control remain in your page source and can still be crawled, since the hiding is done with CSS. Blocks hidden with most of Block Visibility’s other rules, or fully omitted with the core option, are removed from the page before it ever reaches the browser. If you’re hiding content that matters for search, lean toward the methods that keep it on the page, and avoid hiding large amounts of meaningful content from real visitors.
Is the Block Visibility plugin really free?
Yes. It had a paid Pro add-on years ago, but the developer merged all of those features into the free plugin in 2023. Everything, including scheduling, user roles, presets, and WooCommerce rules, is available at no cost from the WordPress plugin directory.
Can I show a block only to logged-in users?
Yes, though not with the native WordPress feature, which only handles device type. Install the Block Visibility plugin, add a user role control to the block, and set it to show only for logged-in users. You can stack this with other conditions if you want to narrow it down further.
Can I schedule a block to appear on certain dates?
The built-in feature can’t do this, but the Block Visibility plugin can. Add a date and time control to the block, and set start and end dates. The block then appears and disappears on its own, so you don’t have to log back in to remove it when the promotion ends.
Final Thoughts on WordPress Block Visibility
WordPress finally has block visibility in core, and for the common job of hiding blocks by device, it’s almost all people will need. Use it, keep your site light, and don’t install anything extra for work that the editor already handles.
The moment your rules get more specific, reach for Block Visibility. Scheduling, user roles, URL targeting, and the ability to combine conditions cover almost anything a normal site runs into, and because most of its rules run on the server, you aren’t paying for them in page speed.
If you’re testing visibility rules on a live site, it’s worth trying them on a staging site first so you don’t accidentally hide something important from the people who need to see it. A quality WordPress host makes that easy, and our plans at SupportHost include staging environments alongside free migration and backups, so you can experiment without putting your live site at risk.
Now over to you. Are you planning to use the new built-in controls, or do you need the extra conditions a plugin gives you? Let us know in the comments what you’re trying to show or hide.
Ready to build your WordPress site?
Try our service free for 14 days. No obligation, no credit card required.


