
Ever wish you had a copy of your website that you could work on without affecting the original? You can do exactly that with website cloning. It’s quick, easy, and doesn’t take special tech skills.
In this guide, you’ll find out exactly what cloning is, why it’s useful, and how to clone a WordPress website using two simple methods.
Table of Contents
What is WordPress Cloning?
WordPress cloning means making an exact copy of your entire WordPress website. It’s like creating a perfect twin of your site with all the same pages, posts, images, and settings.
When you clone a WordPress site, you get a backup that’s ready to use right away. You don’t need to rebuild pages or upload images again. Everything stays exactly the way you set it up.
A cloned website includes all your plugins, themes, and even the smallest details like widgets or menus. You won’t notice a difference between the original and the cloned version. It’s a complete copy, ready to go immediately.
Why Would You Clone a WordPress Website?
Cloning your WordPress website is useful for several reasons.
First, cloning makes it simple to switch hosting providers. You can just copy your site exactly as it is and move it to the new host without rebuilding anything.
Second, cloning is great for building a site on your local computer (called “localhost”). This lets you work without publishing your site. Or you could copy a live website to your local device in order to experiment with new designs or plugins without hurting your live site.
Third, you can clone a WordPress website to create a staging site. A staging site is a clone of your live website that’s kept online. It lets you test updates or changes before visitors see them. When everything looks good, you push those changes live.
Basically, cloning gives you freedom to preserve your site or test changes without directly affecting your main site.
How to Clone a WordPress Website (2 Methods)
Cloning a WordPress website is easier than it sounds. With the right tools, you can do it in just a few moments. Let’s look at two simple methods.
Method 1: Clone a WordPress Site with Softaculous
Softaculous is an automatic installer used on cPanel and other hosting control panels. It simplifies the installation and configuration process of hundreds of scripts, including the installation of major content management systems like WordPress.
Softaculous is included for free on our WordPress hosting plans, shared hosting, dedicated server and VPS cloud hosting.
If your host offers Softaculous, it’s the easiest way to clone a WordPress website because it only requires a few clicks.
If you’re a SupportHost user, start by logging into cPanel from your Client Area.

On the cPanel home page, scroll down and click the Softaculous Apps Installer link. This will take you to the main page of Softaculous.

At the top of the page, click Installations to access all of your existing WordPress sites.

On the next page, you’ll see a list of your websites. Click the Clone button to start the cloning process.

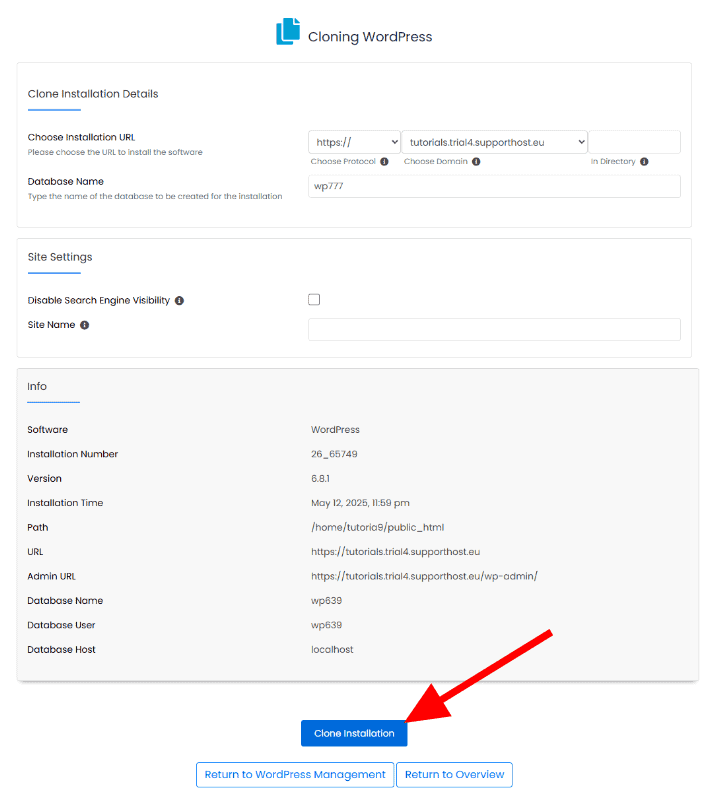
Next, you’ll have to make a few decisions about the cloned version of your site. Choose an installation URL, give the database a name (or keep the generated name), and give the site a name. When you’re finished, click Clone Installation.
When the cloning process completes, you’ll see a link to your WordPress dashboard. Check the site to verify that all of your themes, plugins, and settings are intact.

Method 2: Clone a WordPress Site with Duplicator
If you don’t have access to Softaculous, you’ll need to use a cloning plugin. Duplicator is the best plugin to clone a WordPress site because it’s fast and easy to use. It packages your site into a single file for you to move to a new location.

You’ll first need to install the plugin to the website you want to clone. If you’ve never installed a plugin before, read our guide on installing WordPress plugins.
Please note that there is a pro version of the Duplicator plugin that includes additional features like multisite migration, scheduled backups, and more. You may find these teachers valuable, but the free version is all you need to clone a WordPress website.
For a deeper look into this plugin, including how to resolve common errors, see our Duplicator guide.
Step 1: Create a Duplicator Package of Your WordPress Site
Navigate to Duplicator > Backups and click the Create New button at the top of the page.

On the next page, give your backup a name. This name is for your reference, so give it something descriptive that makes sense to you. It’s always smart to include a date.
Click the Next button to move on.

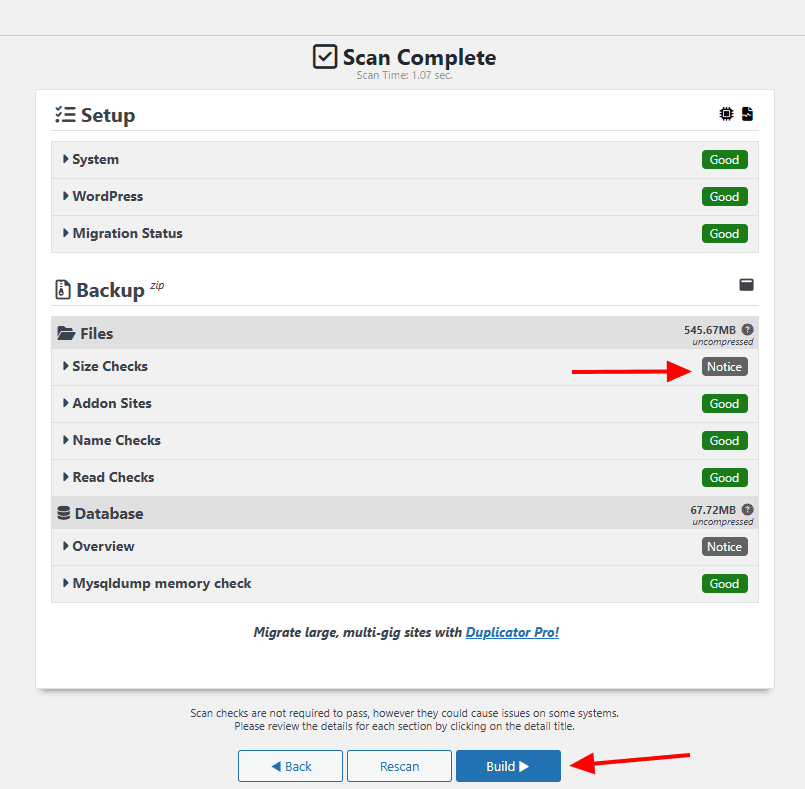
Duplicator will scan your site for potential issues. If it finds any problems, they will be labeled with a Notice warning. Expand the tab to learn more about the issue and how to fix it.
You aren’t required to address the issues to clone a WordPress website, but unresolved problems could affect the clone.
When you’re finished resolving problems, click Build to create the backup file.
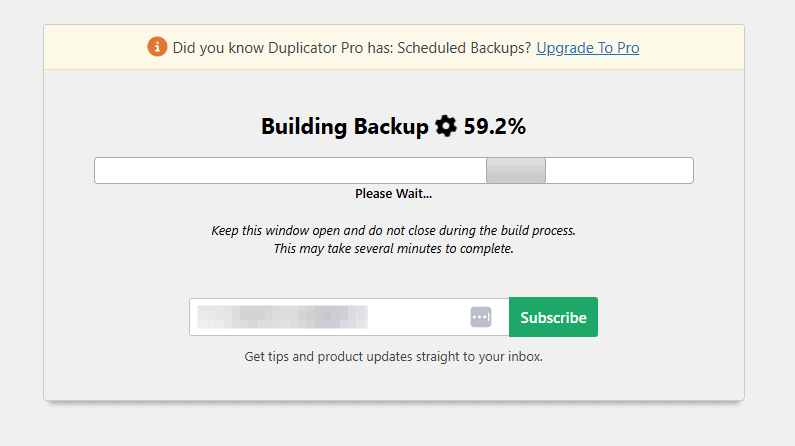
The plugin will now save your WordPress database, plugins, templates, images, and all other files in a single downloadable file. This may take a few minutes depending on the size of your site.
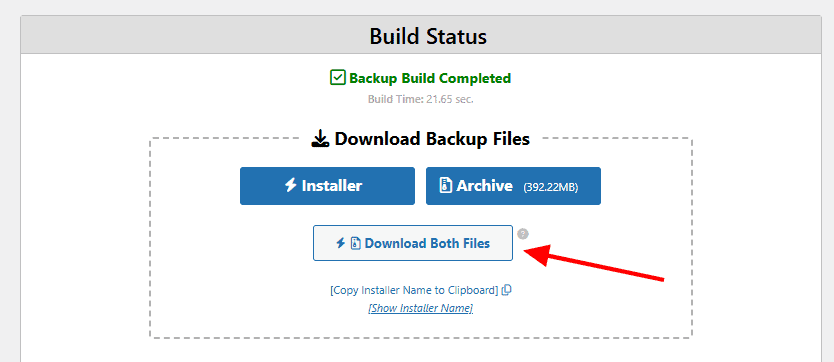
Once the backup process is complete, click the Download Both Files buttons. This will download both the archive file (which contains your backup) and the installer that will unpack the archive.
Step 2: Upload Your Clone to a New Location
Now that you have a backup of your website and the installer file, your next step to clone a WordPress website is to upload them to a new location. The new location can be a live WordPress website or a local server.
If you want to put your clone on a local server, you will need to create a new folder in your local server’s root folder. Then copy both the archive file and installer into the new folder.
To clone your website to a different WordPress hosting platform, you must create an empty website and upload the files to it using the provider’s file manager.
If you’re a SupportHost user, log into cPanel using the link in your Client Area.
On the cPanel home page, click into the File Manager.

In the File Manager, navigate to the public_html folder. Click the Upload button and choose the backup file and installer file that you download from Duplicator.

If you prefer to put this site in a subfolder, simply create a folder inside public_html and upload the files there.
Step 3: Create a New WordPress Database and User
Each WordPress installation requires its own database, so you’ll need to create one before you unpack your cloned website.
We’ll show you how to create a database on SupportHost. The steps may be slightly different if you use a different host, but the overall process is the same: You’ll need to create a new database as well as a user account for it.
If you’re a SupportHost user, return to the cPanel home page and click the Manage My Databases link.

Enter a name for a new database and click Create Database.

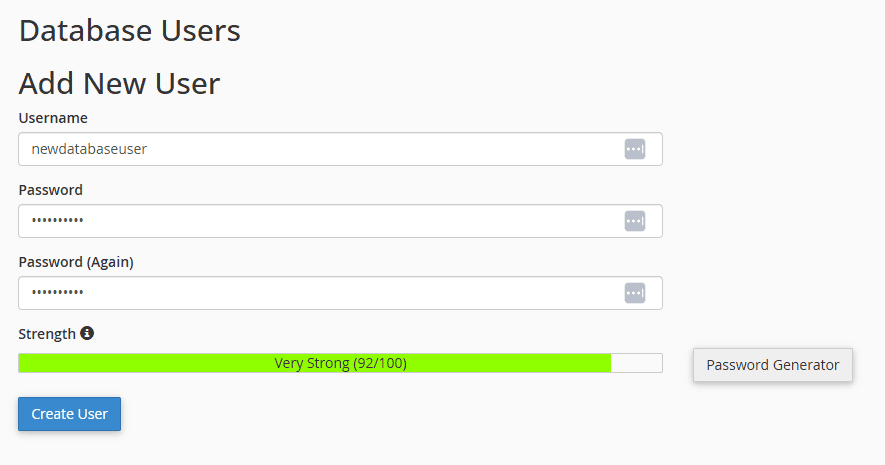
After creating the database, return to the Manage My Databases page and scroll down to the “Database Users” section. Enter a new username and password, then click Create User.
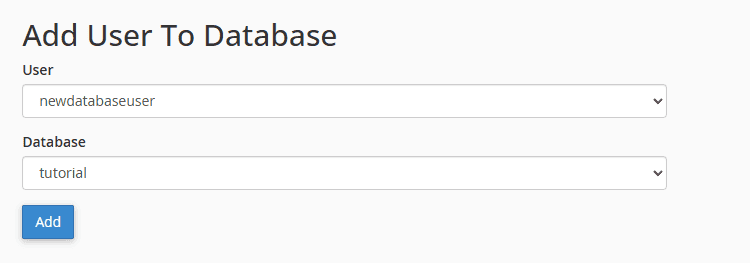
Next, attach the user you just created to the database. Select the username and database name from the drops, then click Add.
Keep the database name and user account login nearby. You’ll need it later.
If you are using a localhost installation, visit http://localhost/phpmyadmin/ or http://localhost:8080/phpmyadmin/ in your web browser. This will launch phpMyAdmin.
Select Databases from the menu. Under Create database, enter the name of a new database and click the Create button.

For most localhost installations, your host will be “localhost,” the username will be “root,” and the password will be empty.
Step 4: Run the WordPress Website Importer Script
Now that your files are in place and your database is set up, it’s time to run the Duplicator installer script. This script unpacks your archive file and puts your cloned site in place.
Open your browser and enter the following URL. Replace “yourdomain” with your domain or your site’s localhost address.
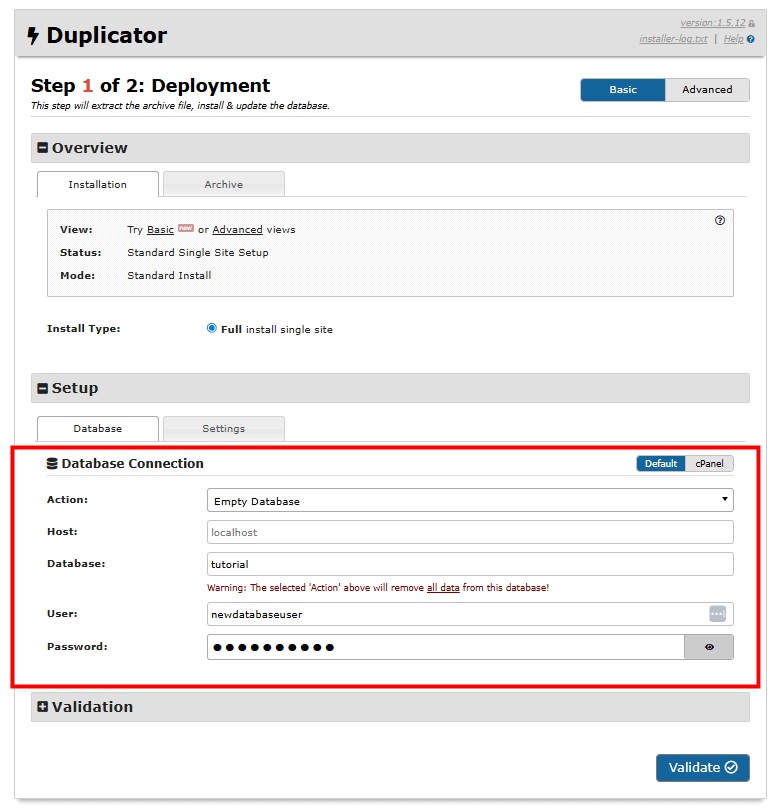
https://www.yourdomain/installer.phpThe Duplicator script will appear on screen. Enter the information of the new database you just created in the Database Connection section, then click Validate.
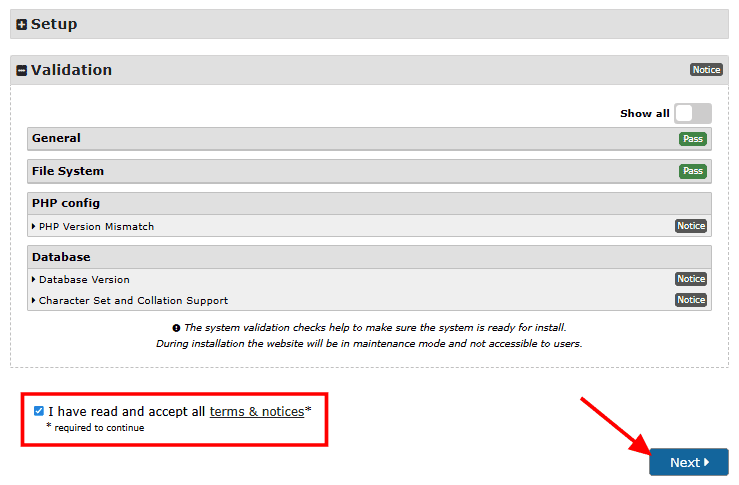
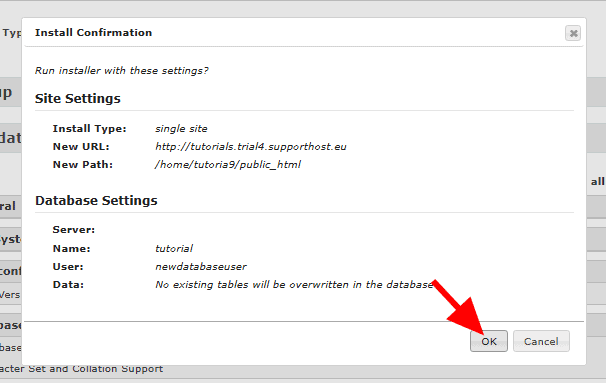
If there are errors, you’ll need to address them before re-trying. If there aren’t any errors, check the “I have read and accept all terms & notices” box and click Next.
A popup will appear to confirm your installation settings. Click OK to move forward.
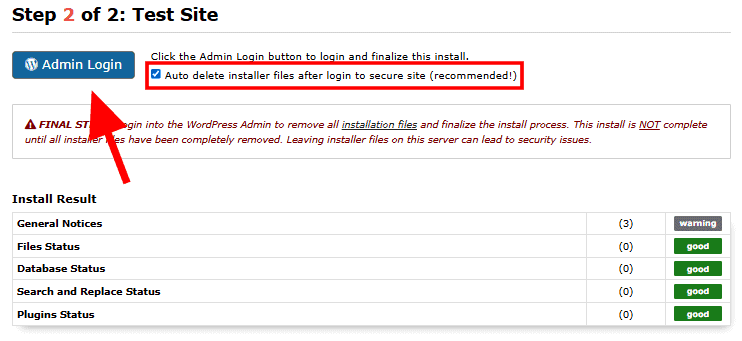
If the installation is successful, you’ll need to log into your new WordPress site. This is an important part of the step because it deletes the installer files and secures the site.
Make sure to check the Auto delete installer files after login to secure site (recommended!) and then click Admin Login.
Step 5: Test Your Cloned WordPress Website
The last step to clone a WordPress website is to make sure everything works properly. Log into your site and you should see all of your posts, categories, tags, plugins, themes, and customizations just like they appear on the original site.
It’s worth verifying that all of the installer files were removed. Navigate to Duplicator > Tools and click the Remove Installation Files button.

And with that, you have successfully completed the process to clone a WordPress website!
How to Clone a WordPress Website FAQs
Here are a few common questions people ask about how to clone a WordPress website.
Can you duplicate a WordPress website?
Yes, you can duplicate a WordPress site easily. Use cloning plugins like Duplicator or WP Staging. These tools copy your entire website exactly as it is so you can move or test it somewhere else without starting over from scratch.
Is it possible to clone an entire website?
Yes, you can clone the entire website including posts, images, plugins, themes, and all settings. A good cloning plugin will package every part of your WordPress site into one neat copy that you can use anywhere you want.
Is cloning websites illegal?
Cloning your own website is completely legal. It becomes illegal only if you copy someone else’s website without permission. Only duplicate websites that you own or have clear permission to copy.
Why would someone clone a website?
People clone websites to back up their site, safely test changes, move to a new web host, or set up a staging area. It’s faster and simpler than building the site again.
How do I download a copy of a WordPress website?
To download a copy of your WordPress site, use a plugin like Duplicator. These plugins package your entire site into one easy file. Then you can download that file directly to your computer.
Can cloning a WordPress site break the original website?
No, cloning won’t break your original website. Cloning creates a separate copy. Any changes made to the clone won’t affect your live site. You can test and experiment freely without worrying about your original content.
Do I need technical skills to clone my WordPress website?
No, you don’t need advanced skills to clone a WordPress website. Cloning plugins are easy to use and come with clear instructions. Most are as simple as clicking a few buttons. Even beginners can create a copy without any problems.
How long does it take to clone a WordPress website?
It usually takes just a few minutes to clone a WordPress site. Small websites copy faster. Bigger sites with more content and large images may take longer. But even big sites rarely take more than half an hour
Wrap Up
Whether you use Softaculous or a plugin like Duplicator, the process to clone a WordPress website is fast, safe, and beginner-friendly. Once you’ve got a clone, you can experiment freely, move hosts with confidence, or build out changes in a risk-free environment.
Need more help cloning your site? Drop your questions in the comments!
Ready to build your WordPress site?
Try our service free for 14 days. No obligation, no credit card required.


