
Wondering if Gravity Forms is the right plugin for your needs? In this overview, we’ll explore its features, show you how to create a basic Gravity Forms contact form, configure its confirmations and notifications, make it GDPR compliant, and review submissions.
Table of Contents
What is Gravity Forms?
Gravity Forms is a plugin for a WordPress website that lets you create forms without coding. You can use it to build contact forms, surveys, quizzes, order forms, and more. It has a simple drag-and-drop editor, so you don’t have to mess with code to get things working.
Once you install the plugin, you can create a form by adding fields like name, email, dropdowns, and checkboxes. You can also set up rules to show or hide questions based on user input. Forms can be placed anywhere on your site using a shortcode or block.
Gravity Forms Features
Let’s take a look at all of the features available with Gravity Forms.
Form Building
- Drag-and-Drop Builder – Easily design forms with an intuitive drag-and-drop interface.
- Turnkey & Custom Templates – Use pre-built templates or create custom forms.
- Multi-Column Layouts – Customize column numbers and drag fields into new layouts.
- Save & Continue – Let users save form progress and continue later.
- Paginated Forms – Break long forms into multiple pages for better usability.
- Responsive Forms – Forms adapt to any device and screen size.
- Conditional Logic – Show/hide fields, sections, and pages based on user selections.
- Custom Form CSS – Apply custom styling for a seamless site design.
- Language Support – Inherits WordPress language settings.
- 30+ Form Fields – A wide variety of field options for customized forms.
- Merge Tags – Dynamically populate field values and user data.
Data Collection
- Email Logic – Route email notifications based on user selections.
- Field Validation – Ensure data accuracy with validation settings.
- API & Webhooks – Connect forms to external apps and workflows.
- Partial Entries – Capture abandoned form data for analysis.
- Data Routing – Direct form data to CRMs, Zapier, or email.
- Import & Export – Move forms and data between sites.
- File Uploads – Allow users to attach files to form submissions.
- Dynamic Field Values – Auto-populate form fields based on user input or query strings.
- Calculations – Perform real-time calculations within form fields.
- Quizzes & Polls – Add quizzes with automatic scoring and polling.
- Surveys – Collect and analyze user feedback.
- Digital Signatures – Capture electronic signatures.
Ecommerce
- Discount Codes – Create custom discount codes for forms.
- Automated Payments – Manage recurring payments and subscriptions.
- Payment Processor Integration – Works with Stripe, Square, Mollie, and more.
- PCI Compliance – Meets necessary security requirements for transactions.
Security
- GDPR Compliance – Tools for managing personal data and user consent.
- Google reCAPTCHA v2 & v3 – Protects against bots and spam.
- Anti-Spam Protection – Includes honeypot filtering and Akismet integration.
- Security Audits – Routine security reviews of all code.
Developer Tools
- 500+ Actions & Filters – Highly customizable with extensive hooks.
- Well-Documented Code – Clear variable names and function explanations.
- Extensive API – Easily push and pull data as needed.
- Custom Add-Ons (BYOA) – Build custom form integrations and features.
Dev Features
- Display Entries on the Front End – Show form submissions on site pages.
- Convert to PDFs – Auto-generate and send PDFs from form data.
- Conditional Pricing – Adjust product prices dynamically based on user input.
- Generate Charts – Create charts from form entries.
- Nested Forms – Use sub-forms for complex form structures.
- Image Enhancements – Use images as form choices or improve image uploads.
- Automate Entry Exports – Export form entries automatically with conditional logic.
- Preview Submissions – Allow users to review forms before submission.
Gravity Forms Pricing
Unlike other contact form plugins that are completely free (such as Contact Form 7), Gravity Forms is a paid plugin. Here are pricing tiers:
Gravity Forms offers three annual plans to suit different needs:
- Basic License: $59 per year. Use on one site with standard support. Includes add-ons like HubSpot, Mailchimp, ActiveCampaign, and Campaign Monitor.
- Pro License: $159 per year. Use on up to three sites with standard support. Adds integrations such as Stripe, Dropbox, Square, Zapier, Trello, and PayPal.
- Elite License: $259 per year. Use on unlimited sites with priority customer support and WordPress Multisite support. Access all available add-ons, including User Registration, Conversational Forms, Coupons, Partial Entries, Polls, Signature, and Survey.
For more details, visit the Gravity Forms Pricing Page.
Who is Gravity Forms for?
Not every form builder is right for every website. Here’s who will get the most out of Gravity Forms and who might want to look elsewhere.
Who Should Use Gravity Forms
Gravity Forms is a good choice if you need more than a basic contact form. It’s great for businesses, nonprofits, and bloggers who want to create complex forms without hiring a developer.
If you need payment forms, surveys, quizzes, or forms that connect to email marketing tools, Gravity Forms makes things easy. It’s also useful for sites that need advanced features like conditional logic, file uploads, or user registration.
Who Shouldn’t Use Gravity Forms
If you just need a simple contact form, Gravity Forms might be more than you need. There are free plugins that can handle basic forms without extra features.
Also, if you don’t use WordPress, Gravity Forms won’t work for you. It’s only available as a WordPress plugin.
And if you’re looking for a free option, Gravity Forms isn’t it. There’s no free version, so you’ll need to pay for a license.
How to Install Gravity Forms
Since Gravity Forms is a paid WordPress plugin, your first step is to purchase a plug-in license from the website. You’ll find a link to download the plugin .zip file in the Licenses & Downloads section of your Gravity Forms account.
From your WordPress dashboard, navigate to Plugins > Add New Plugin. Then click Upload Plugin at the top.
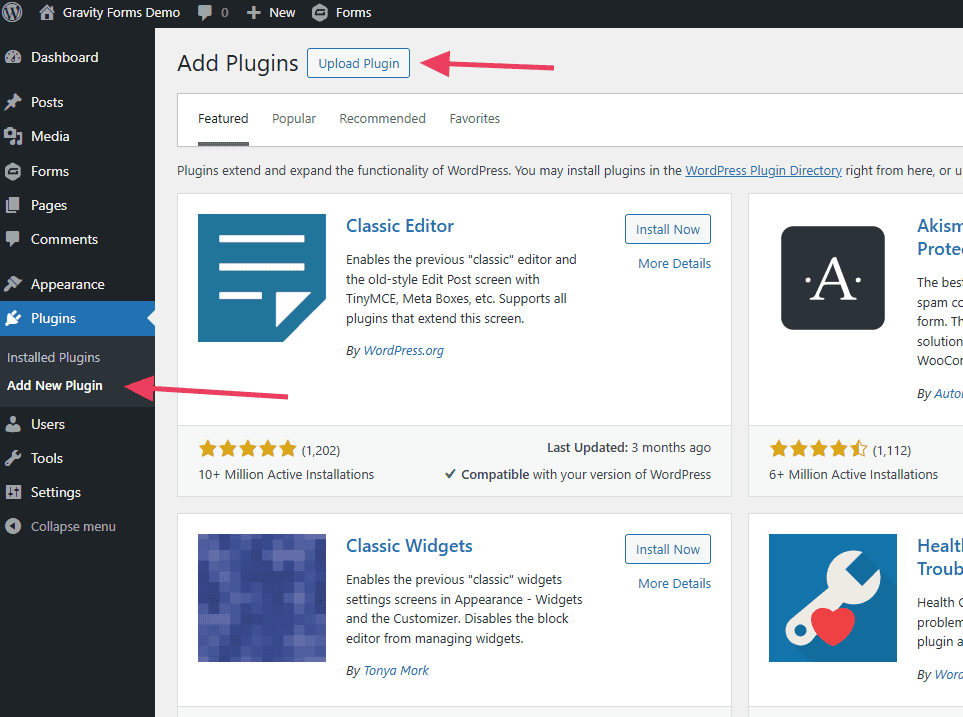
Click Choose File and select the Gravity Forms .zip file on your computer. Then click Install Now.

Once the plugin finishes installing, be sure to click the Activate button.
You’ll also need to enter the license key that tells Gravity Forms you have a valid license. You’ll find this in the Licenses & Downloads section of your Gravity Forms account.
Navigate to Forms > Settings. Under General Settings, paste your license key into the Support License Key field, then click Save Settings.
Once activated, your license status will change to Active.

How to Try Gravity Forms for Free
Want to try Gravity Forms for free before you buy? You can try the demo version of the plugin for free for 14 days. This is the Elite license that includes ALL of the add-ons.

To explore in the demo version, you’ll just need to register with your email address. You’ll be sent to a temporary WordPress installation with Gravity Forms already installed and activated. The installation will delete itself in two weeks.
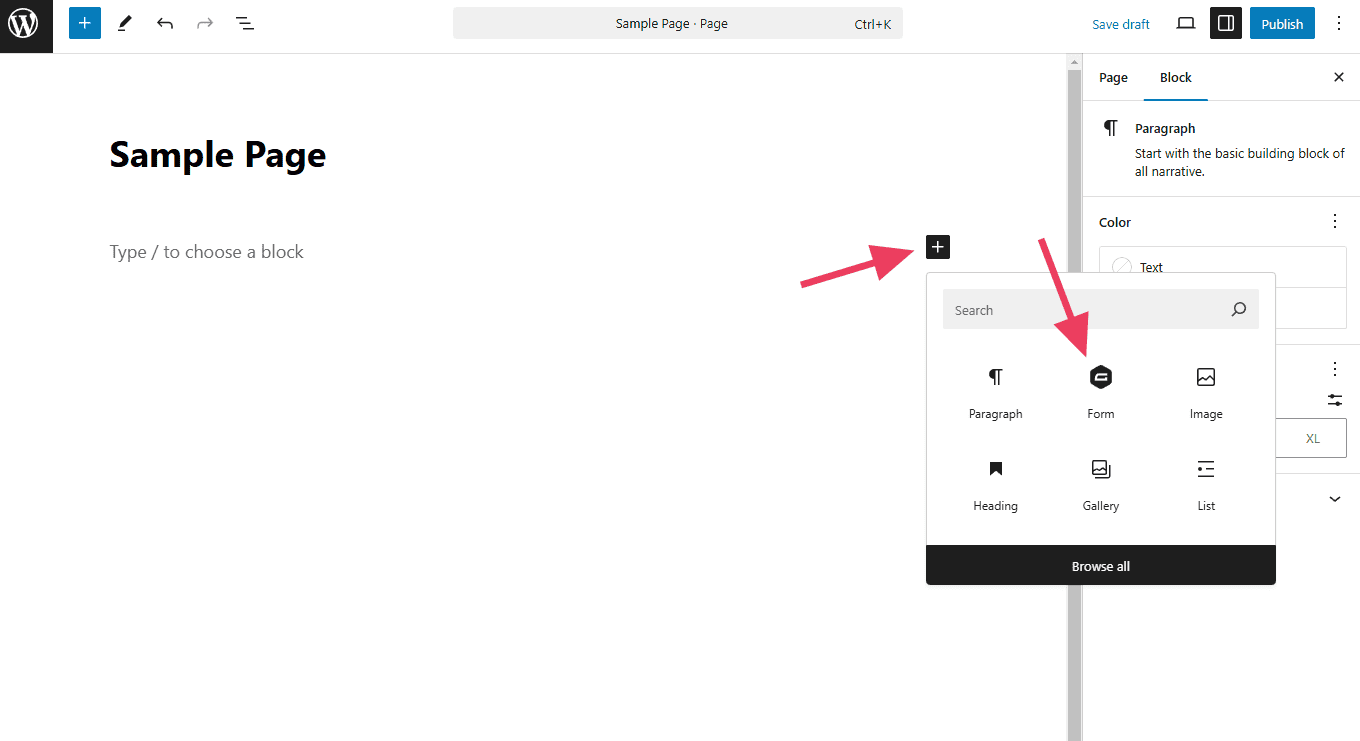
How to Create a Form with Gravity Forms
Let’s walk through the process of creating a basic contact form with Gravity Forms.
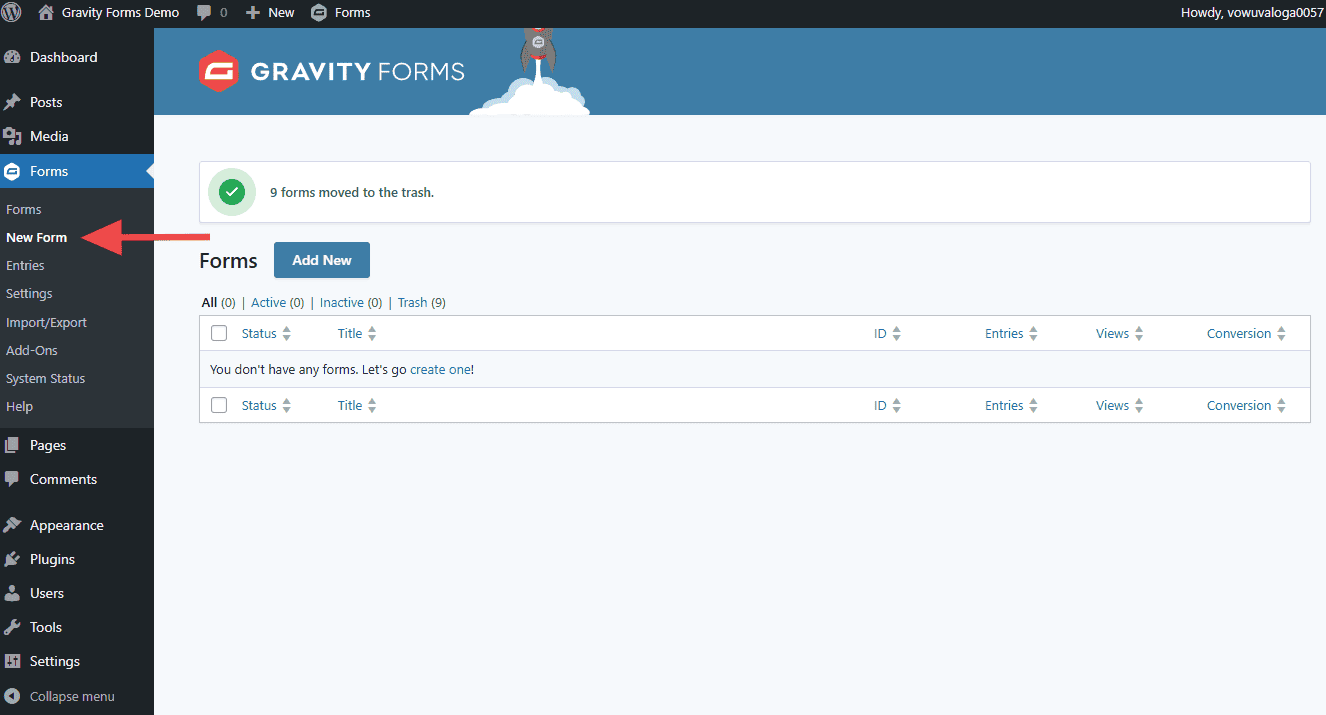
Step 1: Open a New Form
Click Forms > New Forms in the WordPress sidebar.
You can use a template to speed up the creation process if you like. Gravity Forms offers many options that you can customize.

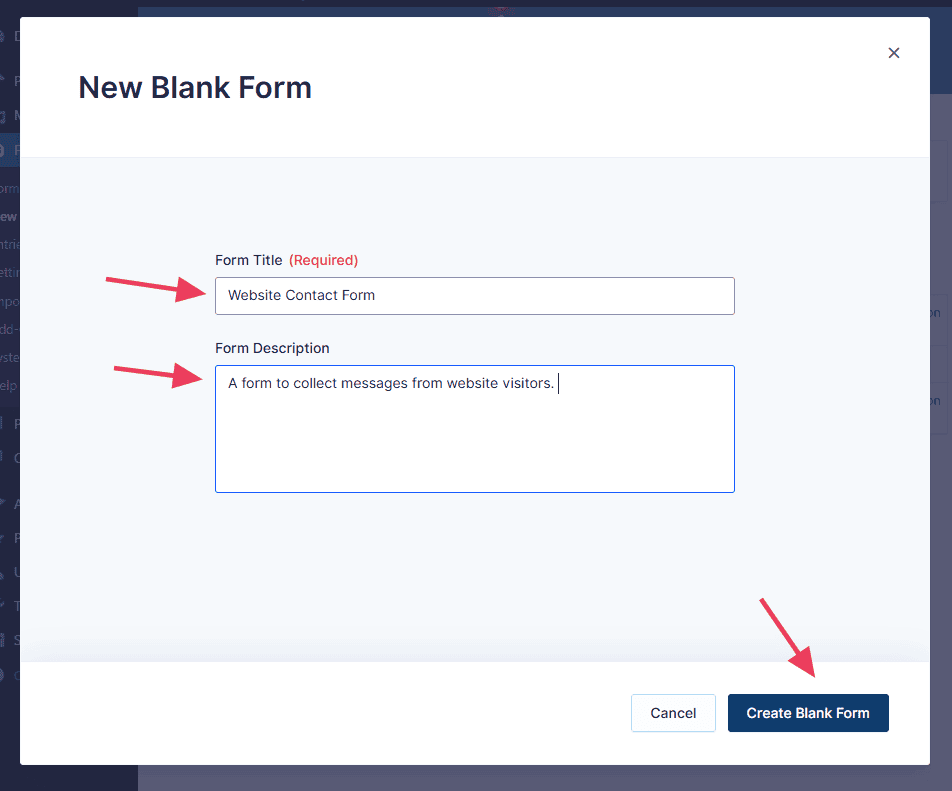
For the purposes of this tutorial, let’s create a form from scratch. Click Blank Form and give it a name. You can also add a description if you like. Then click Create Blank Form.
You will be redirected to the form editor. As you can see, it’s blank. Here’s a breakdown of all of the tools you can access.

- The name of the form.
- Settings, notifications, confirmations, and add-ons
- Entries (people who submitted the form)
- Options to embed the form on pages and posts
- Preview the form in a new window
- Save the form
- Options to change the form editor itself
- The workspace for your form
- Fields you can add to the form
- Settings for individual fields.
Step 2: Add Form Fields
To insert a new field, simply click on a field from the right Add Fields section and it will appear in the workspace. You can also search for fields using the search bar.
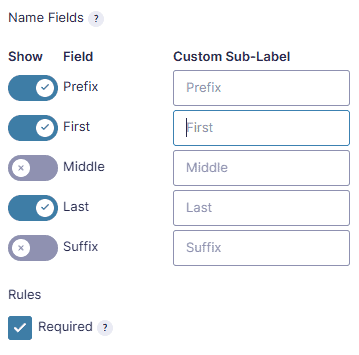
In this example, I added a Name field.

Field Settings > General
Click the field in the workspace to open its settings. New options will appear on the right. These settings are specific to the field. They might look different for other fields.

Adjust any of the settings that make sense for your form. In this example, I added a prefix and marked the field as “required” (which means the user has to provide an answer in order to submit the form).
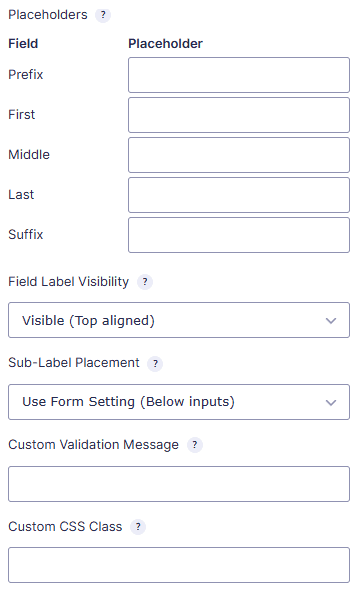
Field Settings > Appearance
Under appearance, you can make changes to the field’s structure.
- Placeholder: Add placeholder text to each field
- Field label visibility: Choose whether to show or hide the main label.
- Sub-label placement: Choose whether to show the sub-label and where.
- Custom validation message: Customize the error message that will be shown if the required field has not been filled.
- Custom CSS Class: Enter a custom CSS class to style the field.
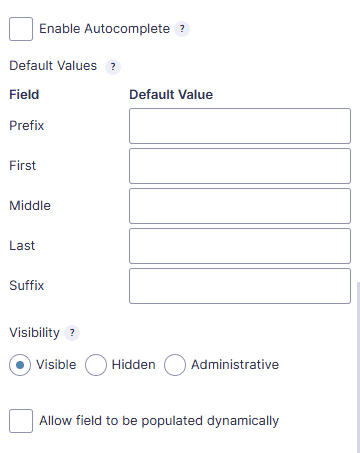
Field Settings > Advanced
You have some more options in the advanced tab.
- Autocomplete: Choose whether to let the browser autocomplete the field if possible.
- Default values: Choose a default value to pre-populate the field.
- Visibility: Adjust the visibility of the field. For example, you might hide the field from users, but pass its value to the submission (useful for calculation fields).
- Dynamic population: This lets you pre-fill/pre-select fields in your form. It’s a complex tool, so read Gravity Forms’ tutorial on dynamic population.
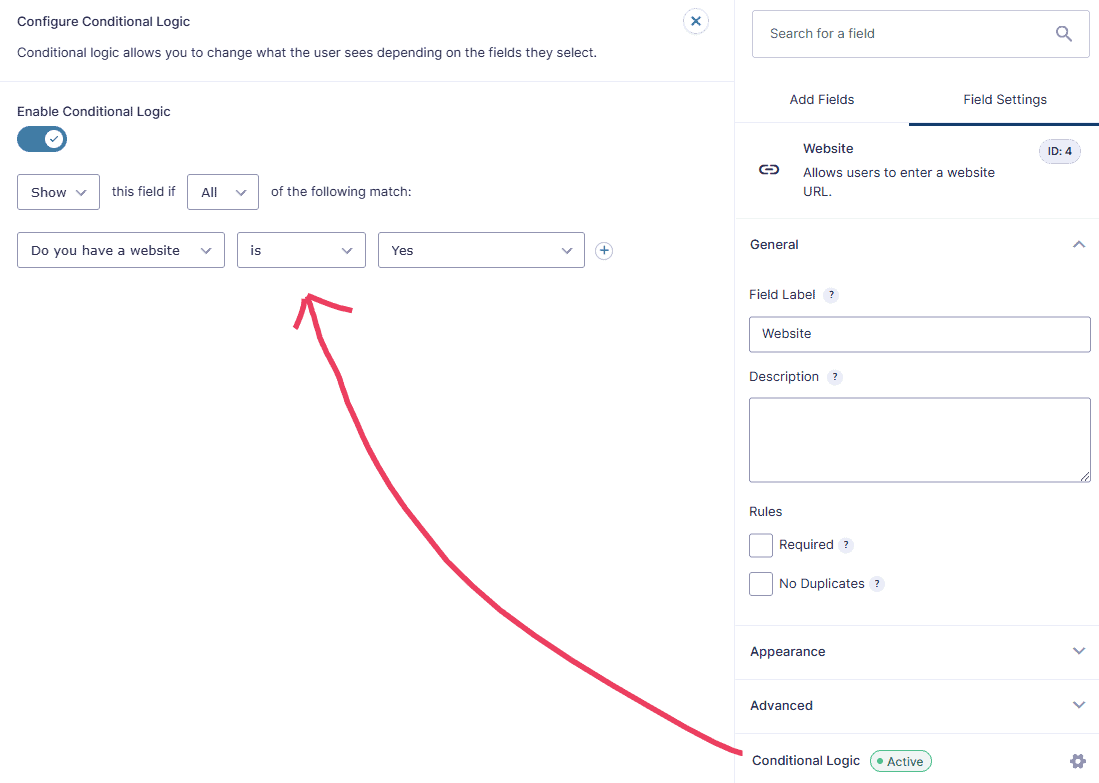
Field Settings > Conditional Logic
Conditional logic allows us to show or hide fields based on other fields that have been previously selected. It’s a great way to hide fields until they are relevant so that your forms look shorter and less intimidating to users.
In the below example, a Website URL field is given some conditional logic so that it only appears if the user previously answered Yes to the Do you have a website? field.
Step 3: Adjust Form Settings
Once you’re happy with your fields, move on to Settings at the top of the form editor.

Here you can make some basic changes to the appearance of the form:
- The title and description
- The placement of various elements
- Whether to display a validation summary
- The symbol for required fields
- CSS class (if any)
- Restrictions (number of entries, a time period, or whether the use is logged in)
- Honey-pot spam protection
- Animated transitions

Step 4: Configure Confirmations
Confirmations are on-screen messages that tell the user whether their submission is accepted or invalid. They can also be used to redirect the user to a new page.
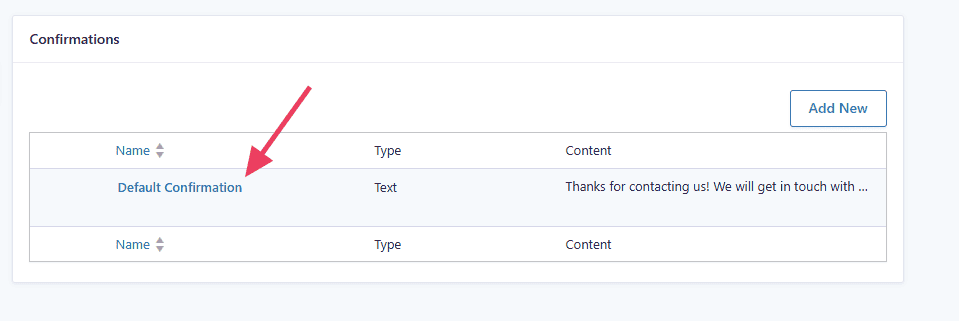
From the form editor, visit Settings > Confirmations.

You can also get to the notifications by clicking the link under the form’s name on the form list.

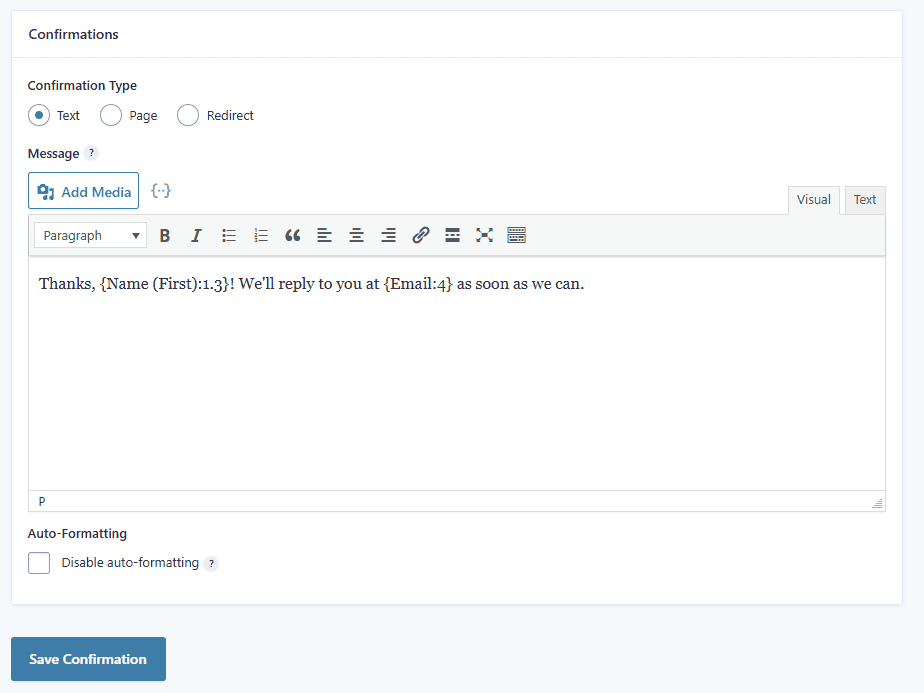
By default, Gravity Forms come with one confirmation: a simple on-screen message that says, “Thanks for contacting us! We will get in touch with you shortly.” Click Default Confirmation to edit this message.
In the confirmation editor, you can make changes to the message. You can use HTML and merge tags. In the following example, the message is different from the default.
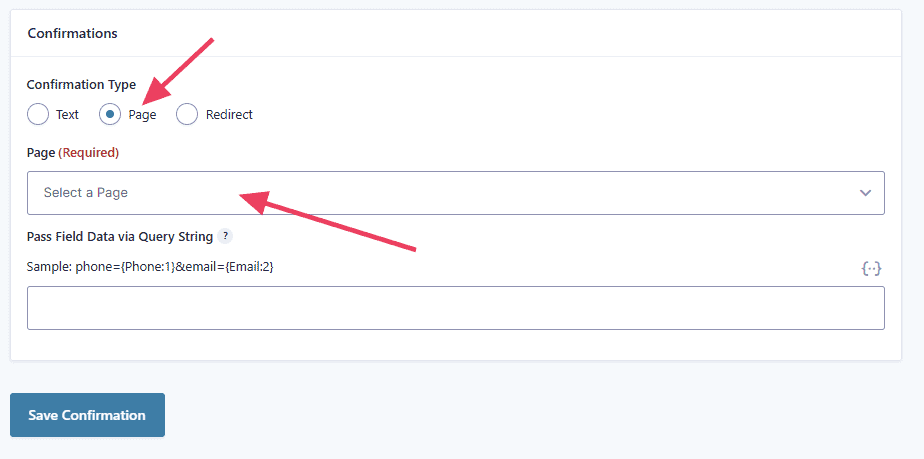
Instead of a message, you might prefer to send the user to a specific page on your WordPress, such as a thank you page. Select the Page confirmation type and select a page from the drop down list.
Sometimes, you may want to redirect the user to a page on another site. If so, select the Redirect confirmation type and insert a URL into the field.
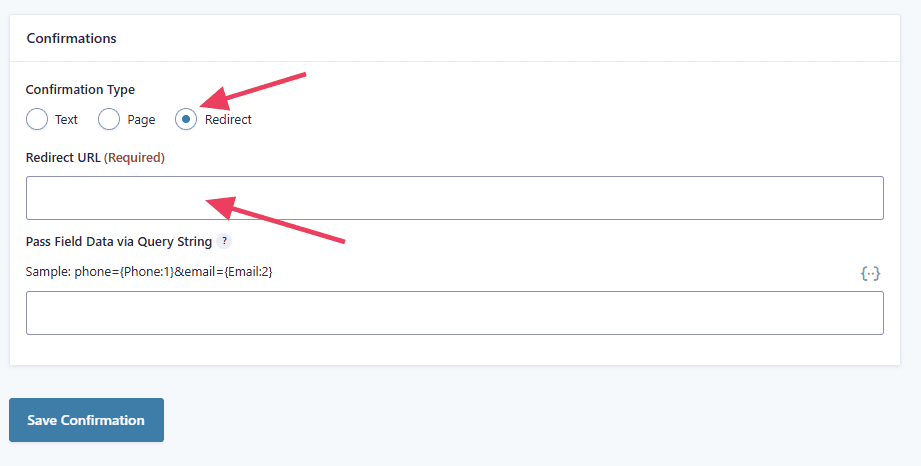
In either case, you may want to pass data from the form to the new URL. This is useful when you use an external system on the new page or site to read the URL parameters in order to perform another action. Use the Pass Field Data Via Query String option for this by typing your own parameters or using merge tags.
Step 5. Configure Notifications
Notifications are email messages that notify different parties about a successful form submission. You can notify any email address, such as someperson your team. You can also send a message to the person who filled out the form.
From the form editor, visit Settings > Notifications.
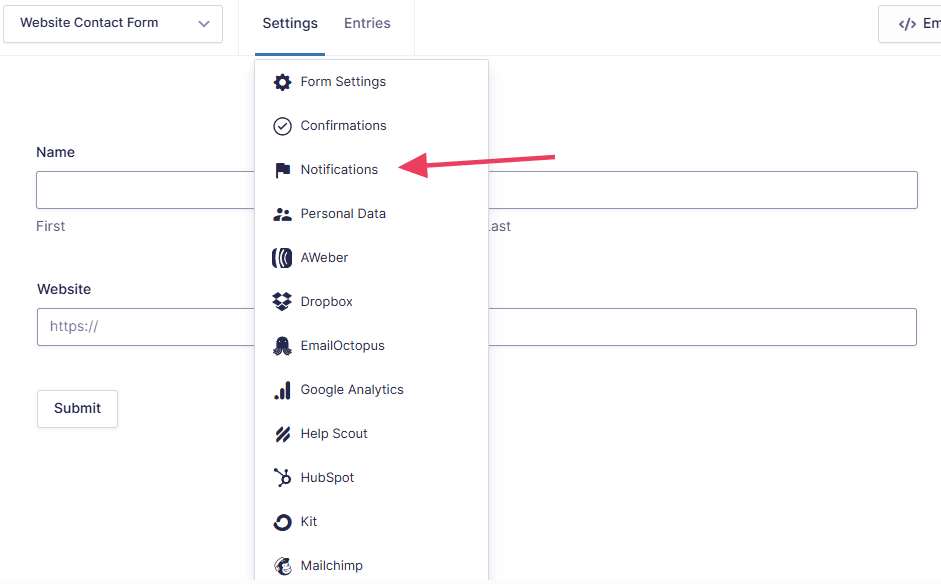
You can also get to notifications by clicking the link under the form name on the form list.

By default, Gravity Forms come with one notification: An email to the WordPress administrator. Click Admin Notification to edit the email.
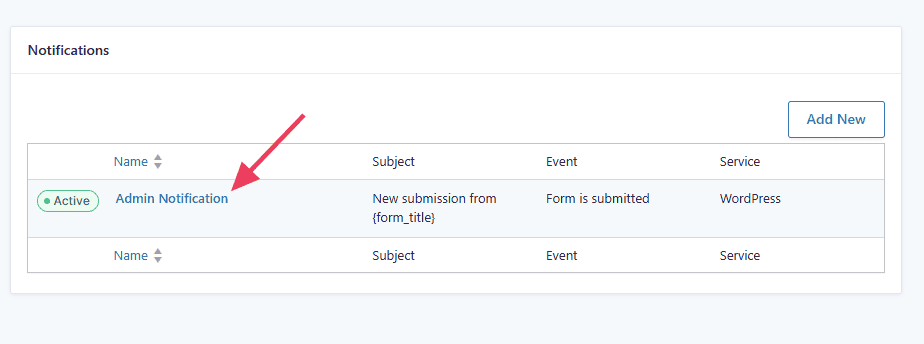
The next screen is where you can modify the notification. Change its name if you like and choose an email service.
The default email service is WordPress, though WordPress’ php mail function can sometimes cause errors, so you should consider using SMTP. Alternatively, you can also use third-party services via Gravity Forms add-ons, such as Mailgun, Postmark, and SendGrid.
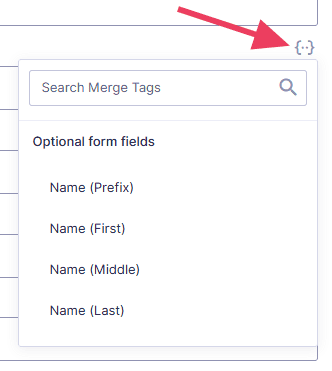
The next fields allow you to customize the content of the email. All fields allow you to use merge tags. These are variables of data from the form. For instance, the Name (First) merge tag will use the first name field’s data in that space.
Let’s walk through each component of the notification.

- Send To: Enter the address of the inbox that should receive this notification. {admin_email} will use the WordPress administrator’s email, or you can type a custom address in this box.
- From Name: Enter the name you would like the notification email sent from.
- From Email: Enter an email address you would like the notification email sent from. To avoid deliverability issues, use your site domain in this space.
- Reply To: Enter the email address you would like to be used as the “reply to” address. This can be different from the “from” address.
- BCC:Enter a list of email addresses you would like to receive a BCC, separated by commas.
- Subject: Enter the subject line for the email. Gravity Forms defaults to “New submission from {form_title},” but you can change it to anything you like.
- Message: Enter the body of the email. You can include any information you like. You can even use HTML. The {all_fields} merge tag will put all of the form data in a concise list, but you might prefer to craft your own message and use merge tags as needed.
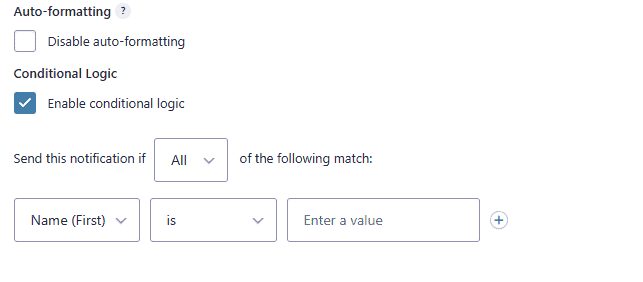
Before saving, decide if you want to disable auto-formatting. Auto-formatting will insert paragraph breaks automatically, so click this box if you’re using HTML content.
Finally, consider if you need to use conditional logic. This gives you the ability to send based on specific criteria. For instance, if the user uploads a file with their form, you want a specific team member to have that document, so you only send a notification if a file is attached.
When you’re happy with the notification, click Update Notification at the bottom.
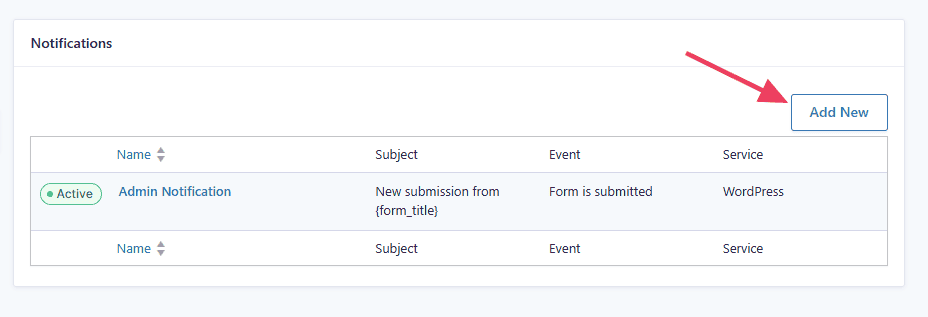
If you want to add multiple notifications to the same form (usually to different recipients), return to the notifications page and click Add New, then customize the notification email in the same way.
Step 6: Display the Form on Your Site
Now that your form is complete, you’ll need to embed it somewhere on your site so people can actually use it. There are a few ways to insert a Gravity Form on a page or post.
Embed from the Form Editor
Click the Embed button on the form editor screen. This gives you three options:

- Add to Existing Content: Select the Page or Post toggle, choose the page or post from the drop down menu, and click Insert Form. You will be redirected to the page or post with the Gravity Forms block already set up for you.
- Create New: Select the Page or Post toggle, enter a name for your new page or post, and click Create. You will be redirected to the new page or post with the Gravity Forms block set up for you.
- Shortcode: Click the Copy Shortcode button to copy the shortcode to your clipboard. Paste this shortcode anywhere on your site to display the form in that space. This is helpful if you use a page builder like Elementor or Oxygen.
Add the Form with the Block Editor
You can also add the form from a page or post editor. First, add the Gravity Forms block to a page or post.
Then select the appropriate form form from the drop down menu that appears.
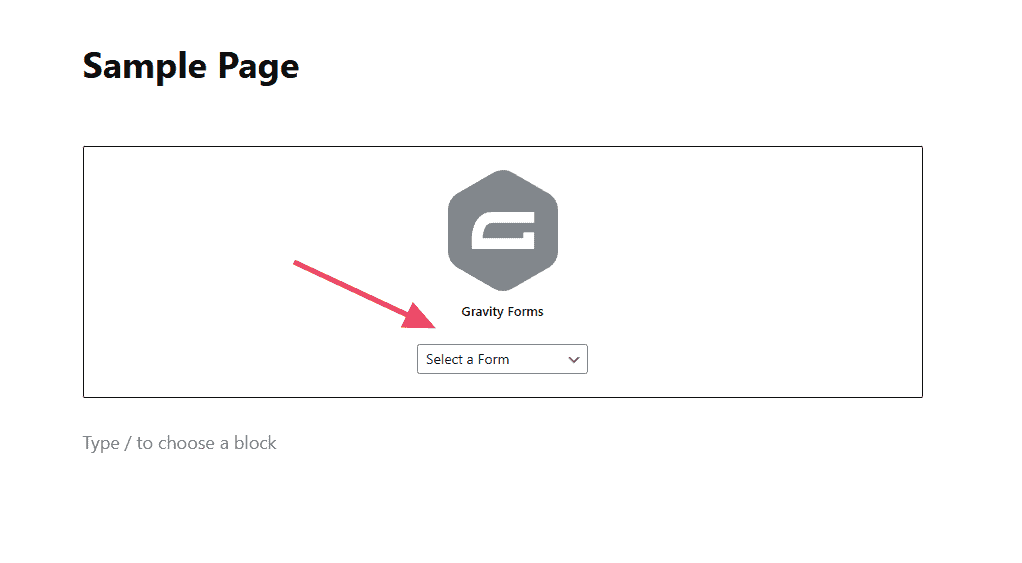
Click Publish to make your page or post live. Now users can submit your form!
How to Review Gravity Forms Submissions
Now that you’ve built a form and embedded it to your site, visitors will start to fill it out. The notifications are one way to track submissions, but Gravity Forms also stores these in the WordPress database so you can see them any time.
You can access the entries for each form by clicking Entries on the form editor.

You can also reach the entries by clicking the Entries link under the form’s name on the form list.

The entries list shows each form submission. Click View beneath each entry to open it.

Inside the entry shows the submission data in more detail. Each field will be listed on the left (1). On this page, you can also write your own notes (2), resend any notifications attached to the form (3), trash or spam the response (4), or print the entry (5).

Gravity Forms Advanced Options
Now that you know how to use Gravity Forms, let’s look at a few more powerful ways to get the most from this plugin.
Make the Form GDPR Compliant
An important part of GDPR is consent. To stay compliant, it’s important to gather clear consent from your users for anything you intend to do with their information, such as send them marketing emails. It’s also a good idea to have them acknowledge that they’ve read your privacy policy and terms of service.
Fortunately, Gravity Forms makes this easy with the Consent field.
In the example below, you’ll notice two Consent fields. The first is required because the user must acknowledge the privacy policy in order to submit the form. The label is linked to the privacy policy page so the user can find more information.
The second field isn’t required because the user can opt in or out to marketing messages.

Furthermore, we can stay compliant with GDPR by limiting the personal information that’s collected. Navigate to Settings > Personal Data.

On this page, you can disable the storage of IP addresses when sending the form, which helps anonymize the user. You can decide how long to keep your entries, by either:
- Retaining them forever
- Send entries to the trash folder after a number of days
- Delete entries entirely after a number of days
You can also enable integration with the WordPress tool that manages the export and deletion of personal data. You can find this tool on Tools > Export/Delete Personal Data. Learn more in our WordPress guide on how to use it.

Protect from Spam with Akismet
If your form is available to the public, it will inevitably capture some spam. You can eliminate spam using the Akismet add-on. This will automatically filter out spam submissions.
First, visit Forms > Add-Ons. Find the Akismet Add-On and click Activate.

Next, install and activate the Akismet plugin. Visit Plugins > Add New, search for Akismet, click Install, and then Activate. If you’re using a SupportHost WordPress hosting package, you will already have Akismet installed. You just need to hit the Activate button

If this is your first time installing a plugin, read our guide on installing WordPress plugins.
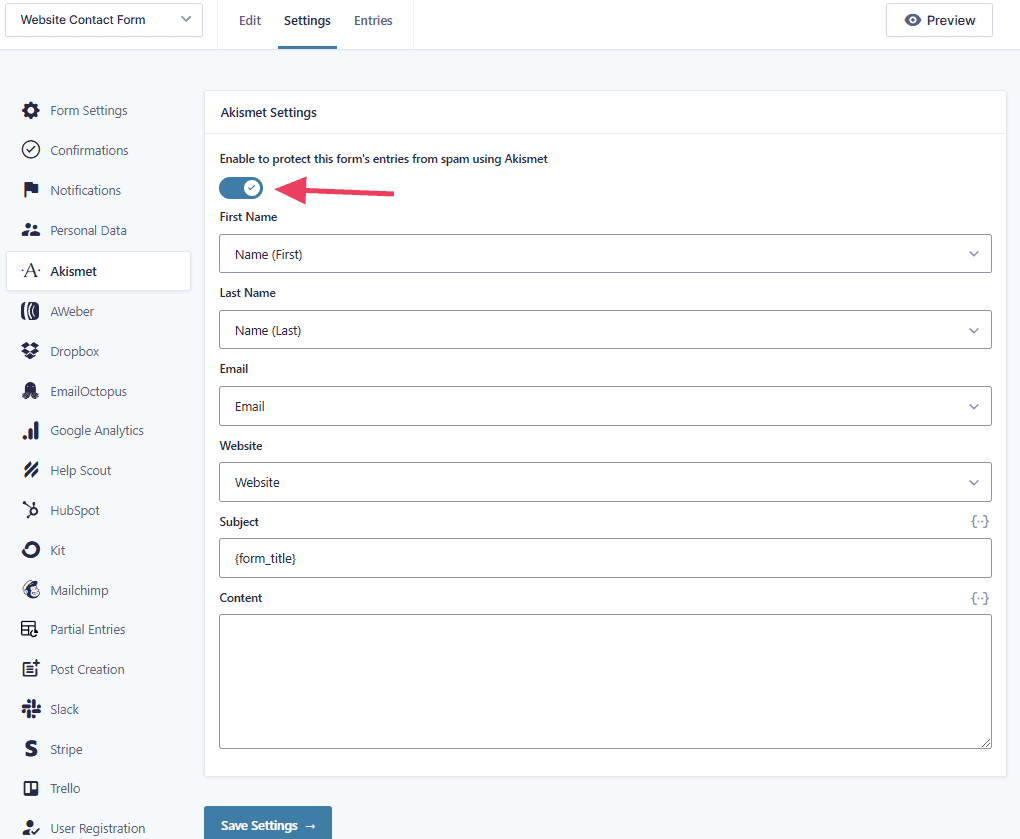
Now return to the form editor for the form that needs spam protection. Open the Settings menu and click Akismet.

Make sure there is a blue check mark next to Enable to protect this form’s entries from spam using Akismet. Then verify that the fields are mapped correctly. This helps Akismet understand what’s supposed to be passed through each field.
For instance, the Akismet “First Name” field should be mapped to the Gravity Forms “Name (First)” field.
Export and Import Form Data
If you have forms data from another source, you may want to import that data to Gravity Forms. Or you might need to export your Gravity Forms entries to use in another place. Fortunately, Gravity Forms comes with a convenient tool to import and export data.
To use this feature, navigate to Forms > Import/Export.
Click the Export Entries button to export data from a form. Then select the appropriate form from the drop down menu. Then select the fields you want included on the report, or click Select All to include them all.

When you click Download Export File, Gravity Forms will produce a CSV file with all of the form data.
If you click the Export Forms tab, you can export a JSON file for the entire form. This file can be imported to another site. If you have another site with Gravity Forms, this is a great way to move that data over seamlessly.

Finally, you can click the Import Forms tab to import a JSON file that you previously exported. You’ll also need to check whether you want any images attached to the form to be saved to your WordPress media library.

Create Advanced Forms with Gravity Forms
Gravity Forms is a powerful form builder for WordPress that makes it easy to create custom forms without coding. Whether you need a simple contact form or something more advanced, it has the tools to get the job done. While it’s not free, the features and flexibility make it worth considering. If you want a reliable way to collect and manage form submissions on your site, Gravity Forms is a solid choice.
If Gravity Forms isn’t the right plugin for you, check out our guide on WPForms, another popular option.
Ready to build your WordPress site?
Try our service free for 14 days. No obligation, no credit card required.


