
The standard WooCommerce page offers most store owners a decent login and signup experience for their customers. However, some store owners might want to customize the WooCommerce login page to match their brand and offer a better customer experience.
You can even do things like add social logins and add additional login security features to make your WooCommerce login form more secure.
Below, you’ll learn how the WooCommerce login page works, how to create a custom WooCommerce login page, and how to add a social login and 2FA to your WooCommerce login forms.
Table of Contents
Why You Need to Have a WooCommerce Login Page
When you sign up for WooCommerce hosting and install WooCommerce a My Account page will automatically be created for customers, which acts as a login page. However, there’s a lot you can do to customize this page to make it more valuable to your business.
Here are some of the reasons you should consider customizing and improving your WooCommerce login page:
- Improve your user experience
- Elevate WordPress security
- Offer additional login and registration fields
- Streamline the login and registration process
By improving your customer login and registration experience, you ensure that more customers actually sign in and create an account during checkout. This helps to avoid guest checkouts and lets you gain more valuable data on your customers while offering them an improved experience.
With an improved WooCommerce experience, you make it easier for your customers to view their order history and save payment and shipping details, which makes it faster for them to order again in the future. Plus, it lets you track customer behavior and buying preferences more easily to improve your marketing across the board.
How the Standard WooCommerce Login Page Works
When you install WooCommerce, it’ll automatically create a lot of pages for your eCommerce store, including a “My Account” page. This page acts as the main login page for your customers. You can change the name of the page, add it to your navigation menu, and customize it as you would any other page.
If your customer isn’t logged into their account, they’ll see a login page that looks like the following:

Once they’re logged in, they’ll be able to see all their account details, including order history, downloads, addresses, account details, and more.

Adding the Login Widget to Your Site
If you want to add the WooCommerce login widget to any other area of your site, you can add the login widget as you would any other widget. Simply navigate to “Appearance>Widgets” and then click the “Plus” button inside the widget area and search for the “Login/Out” block.

Then, make sure the “Display login as form” option is turned on.

Some of the most common areas include your website sidebar or your footer area. The widget adds a simple login form with username and password fields.

How to Customize the WooCommerce Login Page
You have a lot of different options for customizing your WooCommerce login page, and there are all kinds of free and premium plugins you can use, depending on your goals.
Here are some of the main options you have:
- Replace the WooCommerce login page and My Account page with a WordPress plugin
- Customize the default WooCommerce login page with a premium WooCommerce plugin
- Use a page builder with WooCommerce login to create a completely custom WooCommerce login page
To simplify things, we’ll show you how to customize your login page using a free WordPress plugin called Login/Signup Popup. This plugin will replace the existing WooCommerce login page and give you more customization options.
The first thing you need to do is navigate to “Plugins>Add New Plugin”, and then search for “Login/Signup Popup,” and then click the “Install Now” button. After that, click “Activate” to make the plugin live on your site.

Once the plugin is active on your site go to “Login/Signup Popup” in your WordPress dashboard. Then click the “General” tab to go to the general settings page. You’ll want to make sure the “Enable Registration”, “Auto Login User on Sign up”, and “Handle Reset Password” options are enabled.

You can also control the user role after a user registers and the login redirect on this page.
Once you’ve done that, scroll down to the “WooCommerce Settings” section and make sure the “Replace myaccount form” and “Replace checkout login form” options are enabled.
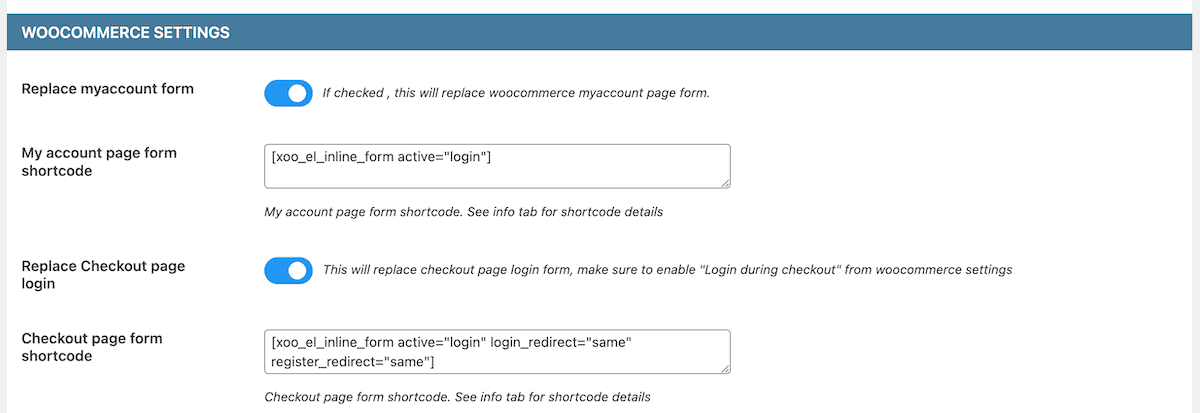
This will swap out the default WooCommerce registration pages with the new pages you’re going to customize below.
Customize WooCommerce Login and Registration Pages
On the same screen, scroll back to the top and click the “Manage” link in the Fields section. This will take you to your WooCommerce login and registration forms. This plugin will give you additional fields you can add to your forms, like first name, last name, username, password, and more.
All you need to do is click on a field to display the field options, then click the “Active” toggle to make the field active on your form.
You can change the label, placeholder, autofill form information, and more for each form element.

Once you’re happy with your form fields, click the “Settings” tab to open up your style customization options.
Here, you can change things like:
- Display icons and change the icon size
- Change icon color and background
- Adjust container width and form margins
- Choose a background color
- And more

Display Your WooCommerce Login Form Across Your Site
So far, this plugin has allowed you to replace and customize your existing WooCommerce login and registration pages. But you can also add the login form to other areas of your WooCommerce site.
To do this, make sure you’re back on the “Login/Signup Form” signup page. Then, click the “Shortcodes” tab. Here, you can select the shortcode for the login popup or for the inline form. Click on your preferred option, then copy the shortcode at the top.

Then, you can add this shortcode to any page, post, or widget area. For this example, we’ll add the shortcode to the top of our website sidebar.

This shortcode adds a login link to your site. Whenever a user clicks the link it’ll display a login/signup popup form that’s more appealing than the standard login and registration forms.

Note that this plugin will automatically replace the default WooCommerce My Account login page with the form that you created above.
How to Add a Social Login to Your WooCommerce Site
Adding a social login to your WooCommerce store speeds up the login process for your visitors. Instead of filling out their email address and password, all they need to do is click a button that’s connected to their social media profiles.
An easy way to do this is using the Super Socializer plugin. First, navigate to “Plugins>Add New Plugin” and search for “Super Socializer”. Then, click “Install” and “Activate”.

After that, a new “Super Socializer” tab will be inside your WordPress dashboard. Click this, then click “Social Login” from the drop-down menu.
This will take you to the plugin settings screen, where you can choose the social media networks you want to allow users to use to log in.
Before adding social media networks, ensure that the “Enable Social Login” box is checked in the “Master Control” section of this page.

For every social media network you want to add, you’ll need to add the app ID/Key and App/API secret.
Every social media network has different methods for finding this information. If you can’t find it on your own, then click the question mark icon to see the steps for finding each one. There are detailed step-by-step tutorials to help you configure the logins for each social media network.

For example, to add Facebook login you’ll need to follow the steps to create an app and it will generate an app ID and app secret key.

Once you’re finished adding the authentication information for each of the apps, make sure you click the “Save” button.
The final step you need to take to add a social login to your WooCommerce logins is choosing which forms you want the social login to be active.
To do this, click the “Advanced Configuration” tab and make sure the following pages are checked to enable social login across every WooCommerce form.
- Enable before WooCommerce Customer Login Form
- Enable at WooCommerce Customer Login Form
- Enable at WooCommerce Customer Register Form
- Enable at WooCommerce Checkout Page

After that, you can view your live WooCommerce login page to see your social login forms in action. Now, when someone clicks the social button, they’ll be able to quickly log in or create an account by using the credentials from that active account.
Here is how the social login looks with the default WooCommerce login form active.

Here is how the social login looks with the Login/Signup Popup plugin active. To customize how the social login looks, you may want to add some custom CSS to your site.

How to Add Secure Login to Your WooCommerce Site
Another feature you may want to add to your WooCommerce store is a two-factor authentication. When you enable this feature, a user must provide two forms of identification to log in. Here’s the easiest way to add 2FA to your WooCommerce login forms.
First is to use the 2FA feature inside the Wordfence Login Security plugin. To do this, go to “Plugins>Add New Plugin” and then search for “Wordfence Login Security”, and then click the “Install Now” button. After that, click “Activate”.

Then, go to “Login Security” and click on the “Settings” tab.

Next, in the “2FA” box you can choose the user roles where you want to enable two-factor authentication. You can choose to make it optional or required. You can also set the grace period for setting up two-factor authentication and let user’s remember this device for 30 days.

After that, scroll down to the “WooCommerce & Custom Integrations” section and check the “WooCommerce integration” box. Then, check the following “Show Wordfence 2FA menu on WooCommerce Account page” checkbox, if you want to enable two-factor during account page setup.

Now, you can enable two-factor authentication for your current account by following the steps on the main plugin screen.

With this plugin active, user’s can enable two-factor authentication from their account page. After this is enabled, they’ll be prompted to enter a code from their preferred authenticator app during login.

Additional WooCommerce Login Customization Options
Above, you learned how to make your default WooCommerce login page more visible, customize the WooCommerce login and registration pages with a plugin, add social media login, and enable 2FA for a more secure login.
Beyond that, there are a lot of other options for customizing your WooCommerce login and registration pages. Although not covered in this article, they might be worth exploring.
- Create an entirely custom WooCommerce login page using a WordPress page builder like Elementor
- Add a reCAPTCHA box to further improve your WooCommerce login page security
- Add an opt-in form checkbox to sign up for your email list during account creation
- Create a private WooCommerce store where users must log in to view your products or specific product categories
- Create a login URL to let users log in to WordPress using a login link.
WooCommerce Login FAQs
Does WooCommerce have a login page?
Yes, when you install WooCommerce a login page will automatically be created for your customers. When they use this page, or the login widget, they’ll be taken to their WooCommerce account page.
How do I change the default login page in WooCommerce?
You can change the default WooCommerce page by using a WordPress page builder that has WooCommerce support, or a WordPress plugin that modifies the WooCommerce login page.
How to create a customer account in WooCommerce?
Customers can create an account during checkout, or create an account by visiting the “My Account” page when they’re not logged in. Typically, most new customers will create an account during the checkout process. This is a built-in feature of WooCommerce.
How to make a WooCommerce login page?
WooCommerce has a default login page that’s available when you install WooCoomerce. However, to further customize this page you’ll want to use a WordPress page builder plugin to create a completely custom page, or a WordPress plugin that adds more functionality to the login and account creation page.
Closing Thoughts: Setting Up Your WooCommerce Login Page
As you can see, there are a lot of different options for setting up and customizing your WooCommerce login page. Ultimately, most store owners can get away with using the standard WooCommerce login page and making it more accessible to visitors.
However, to provide an improved login and registration experience, you may want to customize your WooCommerce page, add social logins, or enable secure login features with the help of a WordPress plugin.
Have you created a custom WooCommerce login page? What tools and plugins did you use? Please share your experience in the comments below.
Ready to build your WordPress site?
Try our service free for 14 days. No obligation, no credit card required.


