The 403 error is used to identify web pages or resources that cannot be accessed. However, it may happen that the 403 Forbidden error pops up when it shouldn’t and this can be frustrating regardless of whether the error is occurring on your site, or if it happens on the page you are trying to visit.
In this article, the 403 error: how to solve it, we are going to look at the reason for the 403 error and the various ways it can occur. We will then see how to get around the error if you are a user trying to browse a page or if the problem is occurring on your site.
Table of Contents
The 403 error: how to solve it – what does it mean?
Error 403 is part of the HTTP 4XX status codes, also referred to as client-side errors. This category also includes one of the most common errors you may come across while browsing: the 404 error. The 404 error or 404 not found is used to indicate that the requested page or resource could not be found. As opposed to client errors there are server errors such as the error 500, 502 bad gateway and 504 gateway time-out.
The 403 Forbidden error occurs when you do not have permission to access the page or resource you are trying to open. There are two main instances where the 403 error can occur.
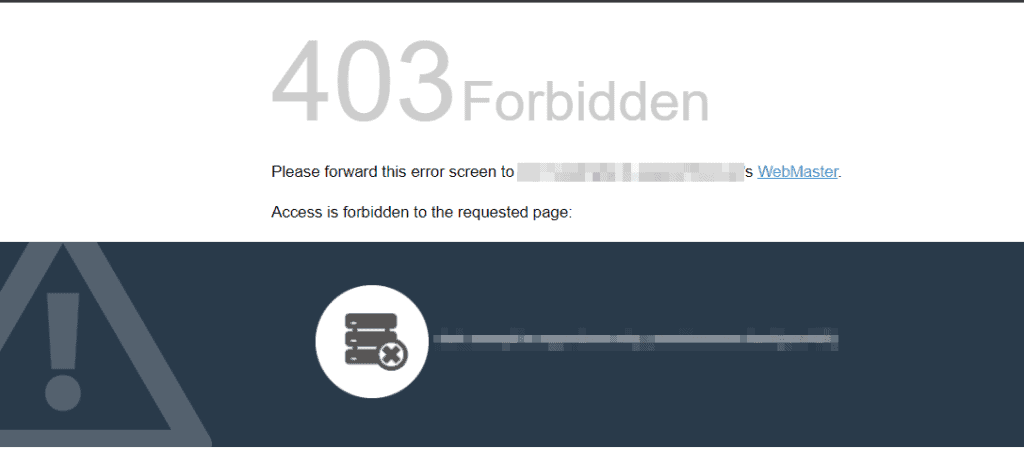
In the first case, you are trying to access a resource for which you don’t really have permission, for example, a section of the site accessible only to registered users.
In the second case, instead, you are trying to reach a page that should be accessible, but the website owner has not correctly configured the permissions, so you get a 403 error.
Besides these two cases, there are other causes that can lead to a 403 error, which we will see in the following paragraphs.
As it happens with other error pages (for example the error 500 or 404), error 403 can be customized. Moreover, it is possible that the 403 error presents itself in different variations, let’s see which are the main ones.
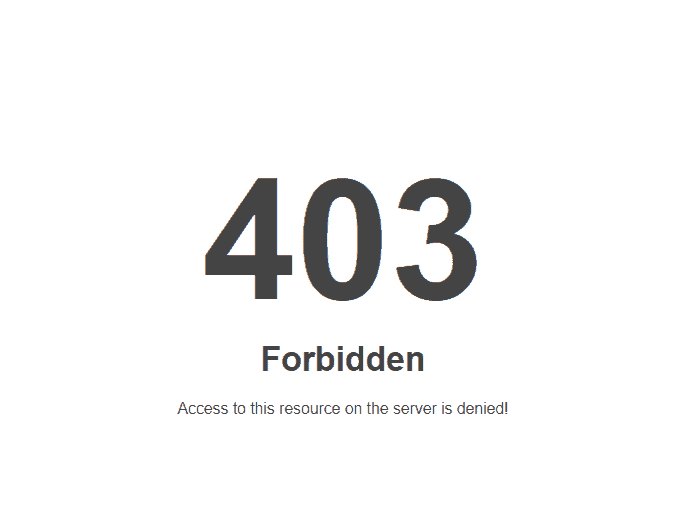
Variations of error 403
Error 403 can be found in different forms, the most common ones are:
- Error 403 can be found in different forms, the most common ones are:
- Error 403
- Error 403 Forbidden
- Error 403 Access Denied
- HTTP ERROR 403
- HTTP Error 403 Forbidden
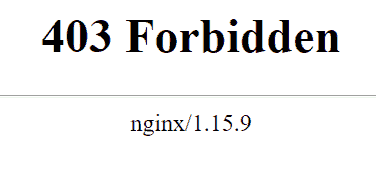
- 403 Forbidden – nginx
- Forbidden
- You are not authorized to view this page
- Forbidden: You don’t have permission to access [directory/file] on this server
- It appears you don’t have permission to access this page
- HTTP Error 403 – Forbidden – You do not have permission to access the document or program you requested
- Access Denied – You don’t have permission to access
- Access to [domain name] was denied. You don’t have the authorization to view this page.
What causes error code 403
In this section, we will see what are all the possible causes of error 403. In the next paragraphs, instead, we are going to see how to solve error 403 from site visitors and how to remove the error 403 on your site.
Directory listing denied
When you try to access a folder on your site from your browser that does not contain a default document, the web server may return a 403 Forbidden error. In particular, this occurs when there is no default document (such as index.php or index.html) and at the same time Directory listings have been blocked.
Directory listing (or directory index) is deactivated precisely to avoid that trying to reach an address for which there is no default file is displayed. This option is disabled for security reasons, if you have a site with SupportHost the option is already deactivated. Alternatively, to understand how to disable it, you can follow the steps outlined in our WordPress security guide.
File or folder permissions configuration error
Error 403 can also be caused if the site’s file and folder permissions settings are not set correctly. File and folder permissions allow you to specify which users can interact with files and how.
Permissions pertain to the ability to read, write, and execute files and are indicated by a 3-digit number, each for each action (read, write, and execute). When we talk about how to get rid of the 403 error, we’ll see how to go about changing the permissions of files and folders.
Corrupt .htaccess file
In Apache servers, the 403 Forbidden error can be due to an error in the .htaccess file. The .htaccess file is used for several reasons including protecting access to files and folders and creating redirects (such as 301 redirects).
In the section on how to fix the 403 Forbidden error, we will see how to regenerate the .htaccess file with WordPress.
Unauthorized user
Sites that require an authentication typically display a 401 Unauthorized error warning. However, in some cases, it is possible for the webserver to show a 403 error.
Plugin incompatibility
Another cause of the 403 error can be a problem with a plugin or lack of compatibility between different plugins on your WordPress site.
In this case, you should disable all plugins and check if the error persists. If the 403 error does not appear after deactivating the plugins, you’ll have to reactivate them one by one to figure out which one is causing the problem.
In the next paragraphs, we will see how to identify the problematic plugins.
CDN problems
Some CDNs like CloudFlare allow you to set up a firewall and block traffic based on location, IP address or other parameters. If the request sent to the server is not within the rules set in the firewall you may receive a 403 error in response.
To check if the error is caused by the CDN itself, try disabling it temporarily and see if the 403 error continues to appear.
In the paragraph on troubleshooting we will see how to disable the CDN to see if it is causing the problem.
Hotlink Protection
Hotlink protection is a measure to prevent hotlinking. Hotlinking occurs when someone places an image on your site using the address of an image hosted on another site. In this way, the image will be displayed on the target site, but it will use the resources of the site that is hosting it.
To avoid this situation you can enable hotlink protection. When the hotlink protection is enabled, if it is not set correctly it can lead to the appearance of a 403 Forbidden error. In this case, you should check that the hotlink protection is configured correctly.
Cause of Error 403 on IIS
On Microsoft IIS (Internet Information Services) servers, HTTP error codes are accompanied by additional numeric codes that allow you to get more details about the causes of the error. You can find the complete list in the Microsoft documentation.
For example, in the case of errors on file and/or folder permissions you may encounter one of these three errors depending on the type of problem (read, write or execute):
- 403.1 – Execute access forbidden
- 403.2 – Read access forbidden
- 403.3 – Write access forbidden.
On ISS servers you may also get a 403 error if there are too many simultaneous connections (403.9 – Too many users).
Troubleshooting 403 error: how to fix it as a user
If the error code 403 occurs on the site you are visiting you can try different ways.
Update the page
It may seem like the most trivial thing, but if you haven’t already, the first thing you should do is try to refresh the page. You can click on the reload page button in your browser or press the F5 key on your keyboard.

Sometimes the 403 error may occur due to a technical problem and be only temporary, so you may hope to resolve it by simply reloading the page.
In addition to simply refreshing the page, you can also have the browser reload the page ignoring the cache. To do this, just press Ctrl+F5 on Windows or Shift+CMD+R on Mac.
Check the address
Another thing to do is to make sure that the address you are trying to visit does not contain any errors. Make sure you typed it correctly or that there are no errors, for example, you may have followed a link with an error in the address.
In this case, try to reach the destination page in another way. For example, you could link to the site’s homepage and use the site’s search function to find the content you were interested in reaching.
Clear cache and cookies
Clearing the cache and cookies of the browser you are using can help you in case the error is occurring on only one device or browser.
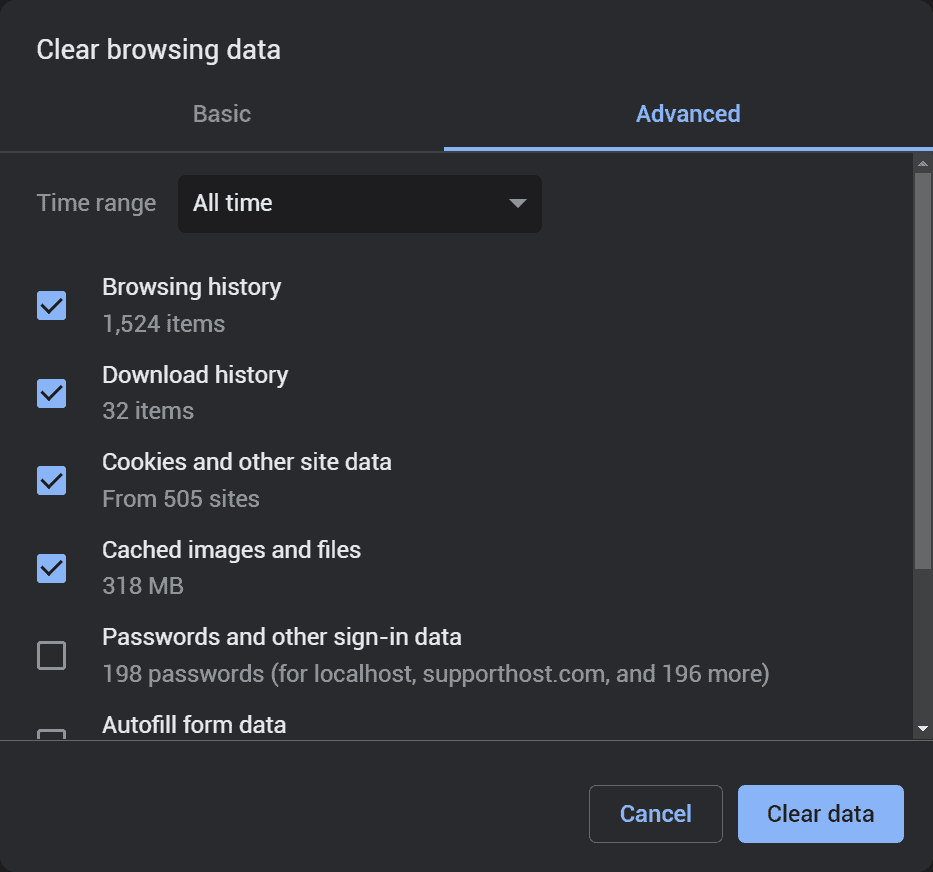
If you’ve tried to reach the address from another device or with a different browser and only encounter the 403 error with a particular browser you can follow our guide to figuring out how to clear cache and cookies on major browsers.
Disable VPN
VPNs are used to ensure privacy and mask IP addresses. However, not all sites allow access using a VPN. In this case, if you are getting a 403 error and you are using a VPN you can try disabling it and see if it resolves the error.
Contact the site owner
Another thing you can do is try to contact the site owners directly. In this way you can report the 403 error and check if your IP address has been blocked.
See the cache copy of the site
If none of the previous methods helped you to solve the 403 error, there is still another solution you can try to be able to see the page on which the error occurs.
Search engines like Google or Bing allow you to access the cache copy of web pages. To view the Google cache of a page you just need to do a search on Google and then click on the down arrow you see next to the address. Here’s how to do that using the example you see in this screenshot.
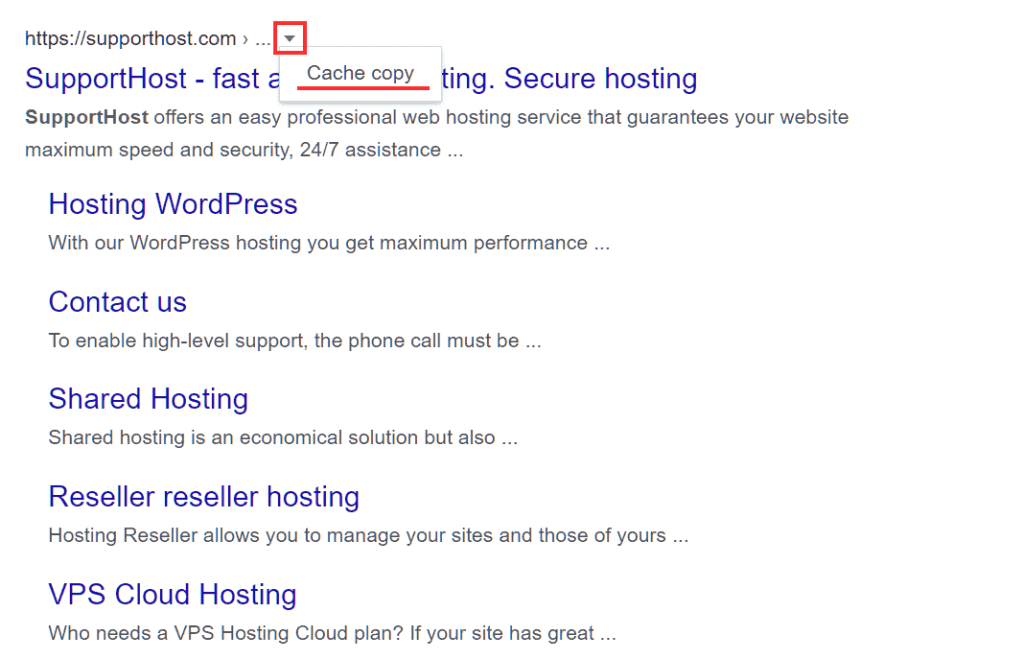
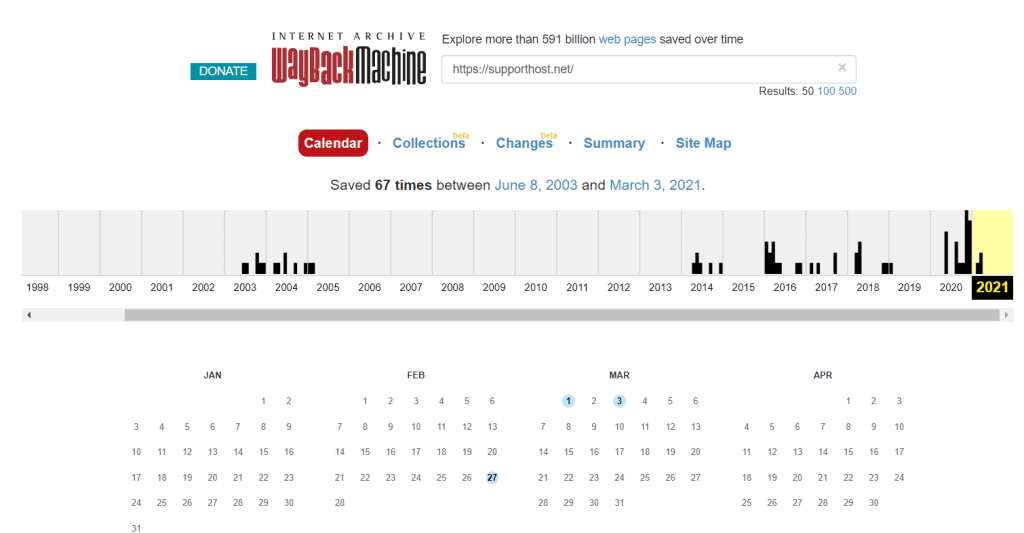
Alternatively, if you can’t see the cached copy of the site this way, you can also use the Wayback Machine.
Just connect to the site and type in the address of the page you want to view. After that, check if there are any copies of the page stored and click on one of the available dates to see the cached version stored on that date.
The 403 error: how to solve it and fix it on your site
In this section, we will see what you can do to fix the 403 Forbidden error, on your site based on the causes we listed earlier.
We will then see how to:
- modify the file and folder permissions
- restore the htaccess file, generating a new one
- check if the error 403 is due to a plugin.
Also remember that you should make sure that the problem does not depend on CDN or hotlink protection, as we saw before.
Change file and folder permissions
As we have seen the 403 error can occur if the file and folder permissions are not set correctly.
The following file and folder permissions should be set for WordPress files and folders:
- 644 or 640 for files
- 755 or 750 for folders.
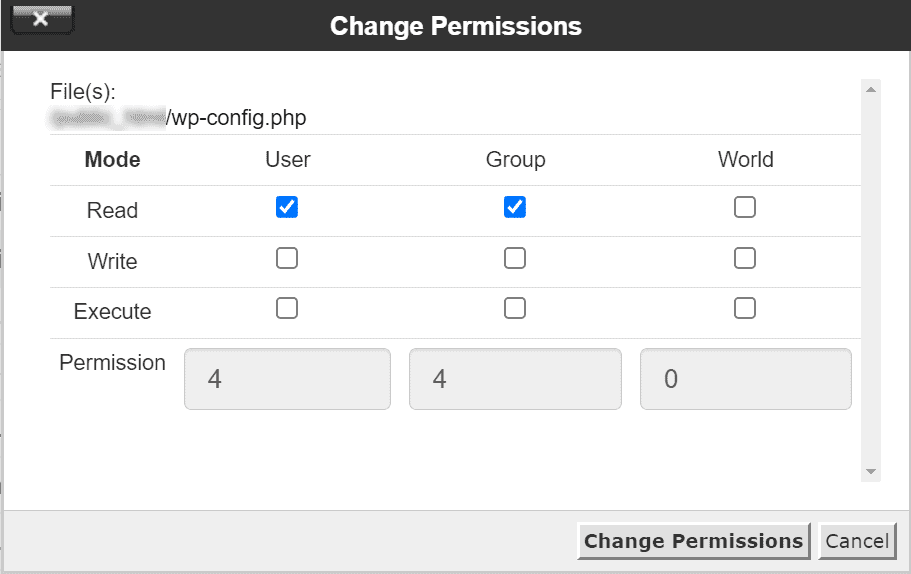
This is an exception to the wp-config.php file which should be set to 440 or 400.
You can verify that the permissions are set correctly in two ways: by using the file manager to access files and folders on your site or by using an FTP client such as FileZilla.
Use the cPanel file manager
Log in to cPanel and click on File Manager to access the file manager.
IMAGE
In the Permissions column, you will see the file and folder permissions.
IMAGE
To change them just select a file or folder and click on Permissions as you see in this screenshot.
IMAGE
Then change the permissions and click on Change Permissions to save. In this example, we see how to set permissions for the file wp-config.php.
Usare FileZilla
You can check the file and folder permissions using an FTP client like FileZilla. First, you have to connect to the server with FileZilla, the data to be entered are host, username, password and port.

If you have activated a plan with SupportHost such as a WordPress hosting or a dedicated solution like a dedicated server or VPS cloud hosting, you just need to use the login details you find in the activation email.
You can also create a new FTP account with cPanel.
After logging in browse to the file or folder for which you want to change the permissions, right-click on the file and click on File Permissions as you see here in this example.
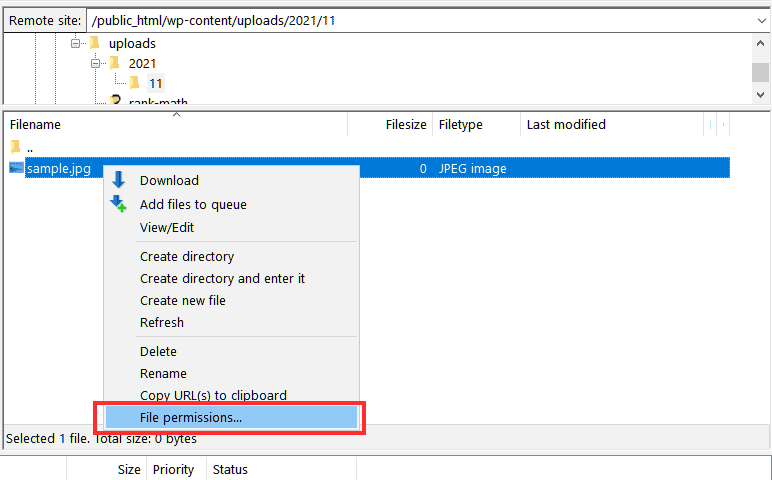
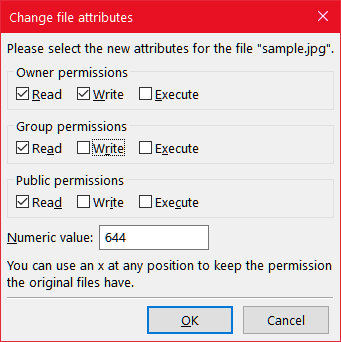
Change the read, write and execute settings and click OK.
In the case of folders, instead of having to change permissions for all subfolders and files within them, you can choose to apply them automatically. To do so, right-click on the top folder and click on File Permissions.
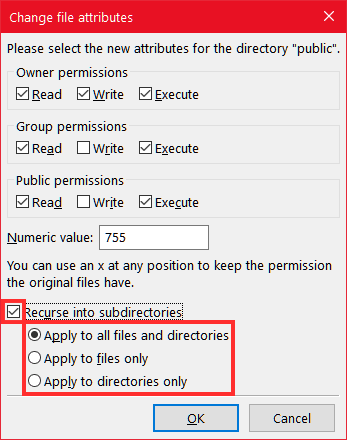
After setting the new permissions check the Include subfolders box and you can choose to:
- apply permissions to all files and folders
- apply only to files
- apply only to folders.
Regenerate htaccess file
The 403 Forbidden error can be caused by a problem in the .htaccess file, the best solution is to have WordPress regenerate the file in order to eliminate the error. Before proceeding, however, you need to create a backup copy of your current .htaccess file. To do this you need to access your site’s files, you can do this by using the control panel’s file manager or accessing the server via FTP, for example with FileZilla.
In this example, we will see how to do it with the cPanel file manager. Login to cPanel and click on File Manager.

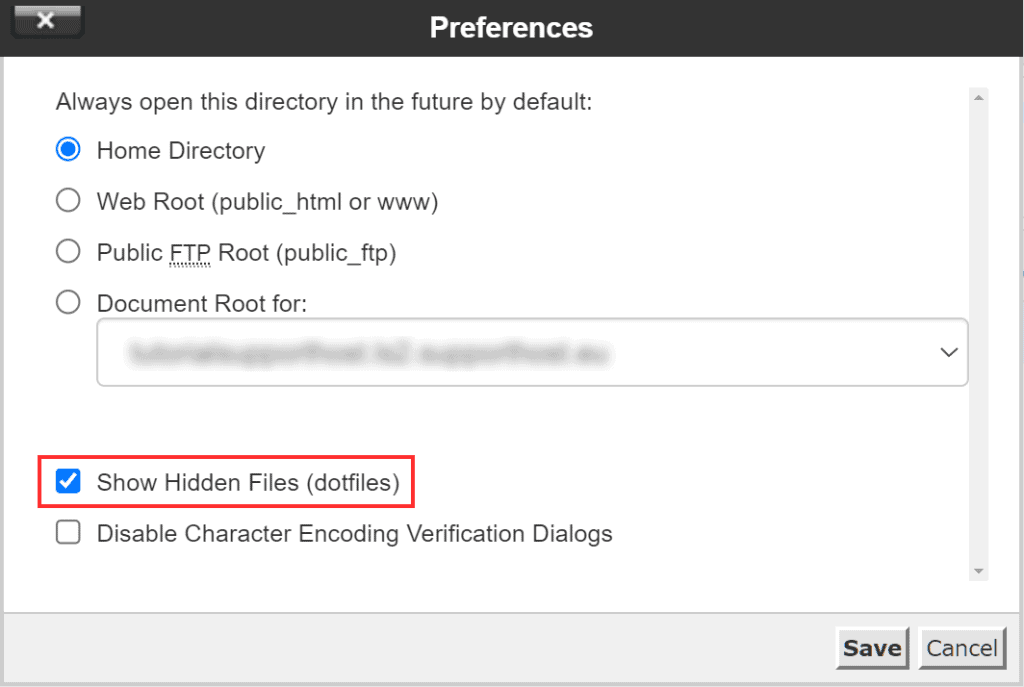
The .htaccess file is located at the root of the site, but in case you don’t see it, make sure that the option to show hidden files is enabled.
Click on the settings and check the Show hidden files (dotfiles) box as you see in this screenshot and click on Save.
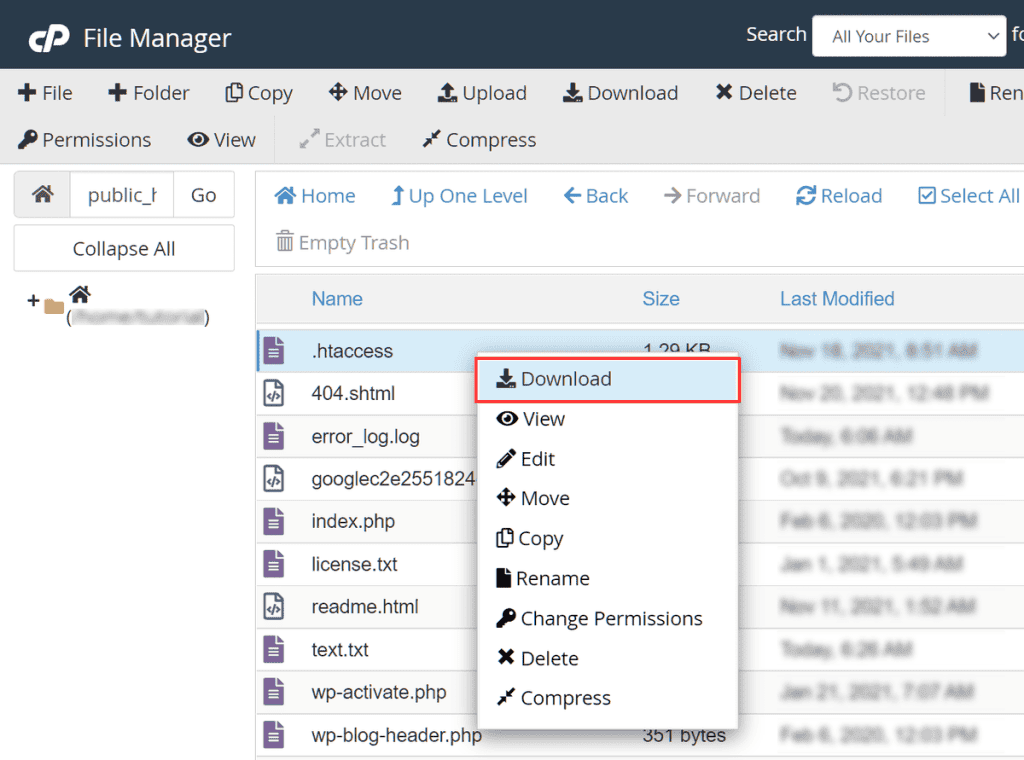
Locate the .htaccess file and download a copy onto your computer, simply right click on the file and then click on Download.
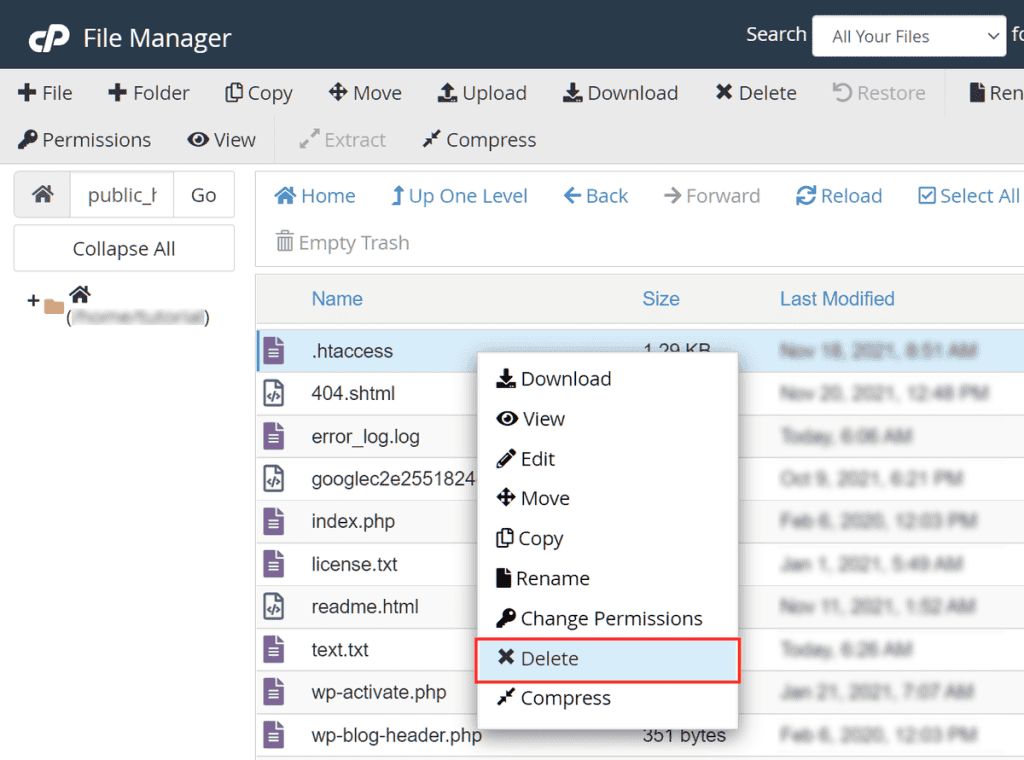
After that, you can delete the .htaccess file, right-click on the file and then click Delete.
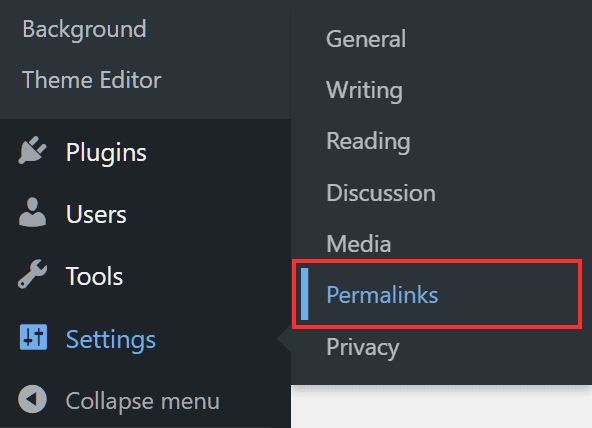
Login to your WordPress site dashboard and click on Settings → Permalink.
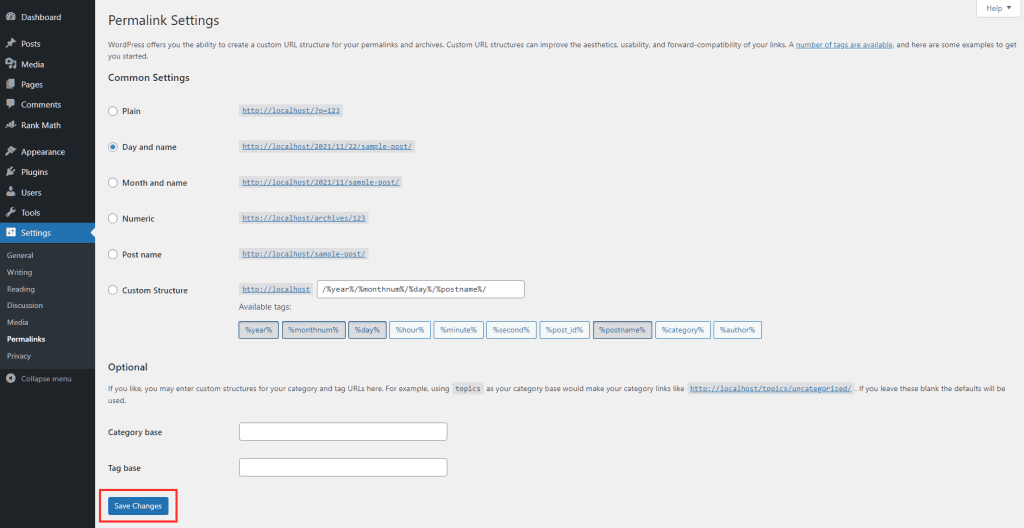
Scroll to the bottom of the page and click Save Changes, doing so will automatically generate a new .htaccess file for WordPress.
Deactivate and reactivate plugins
A recently installed WordPress plugin or an incompatibility issue between different plugins on your site can cause a 403 error. To figure out if a plugin is the cause of the error you’ll need to temporarily deactivate them, let’s see how to do that with two different methods.
If you can access the WordPress dashboard you can deactivate plugins directly from there, otherwise, you’ll have to proceed in a different way, which we’ll see in a moment.
Disable plugins from the dashboard
To deactivate plugins from the dashboard login to your WordPress site and click on the Plugins tab. From this section first, you need to check the box next to Plugins to select all of them.

After that from the Bulk Actions menu, click on the Deactivate item and then click on the Apply button.

This will deactivate all plugins.
Deactivate plugins by connecting to the server
If you can’t access the dashboard of your site, you’ll have to directly access the files hosted on the server. As we have seen before to delete the .htaccess file or change file permissions you could do it either from the file manager of your site’s control panel, for example from cPanel, or through an FTP client like FileZilla.
In this example, we will see how to do it with the file manager, but the procedure to follow is quite similar.
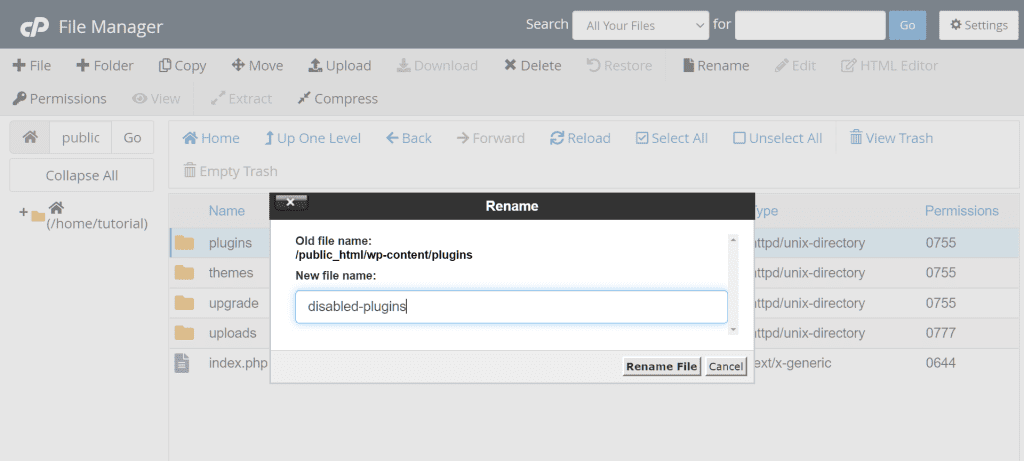
The folder we are interested in is the one where the plugins are contained, which in turn is located inside the wp-content folder. The full path will usually be /public_html/wp-content/plugins.
To deactivate all plugins we just need to rename the folder, for example in “deactivated plugins”, as you see in this screenshot.
Reactivate plugins
After deactivating the plugins, connect to the site again and check if the error 403 still appears. If the error does not appear anymore, then the cause is one of the plugins that were active on your site.
At this point you just need to figure out which plugin is causing the problem and to do that you need to reactivate the plugins one by one, checking each time if the 403 error reappears.
If you have deactivated the plugins from the dashboard, you only need to activate them manually one by one. If you renamed the plugins folder, you’ll have to change the name back to “plugins”. Then you can activate the plugins from the dashboard.
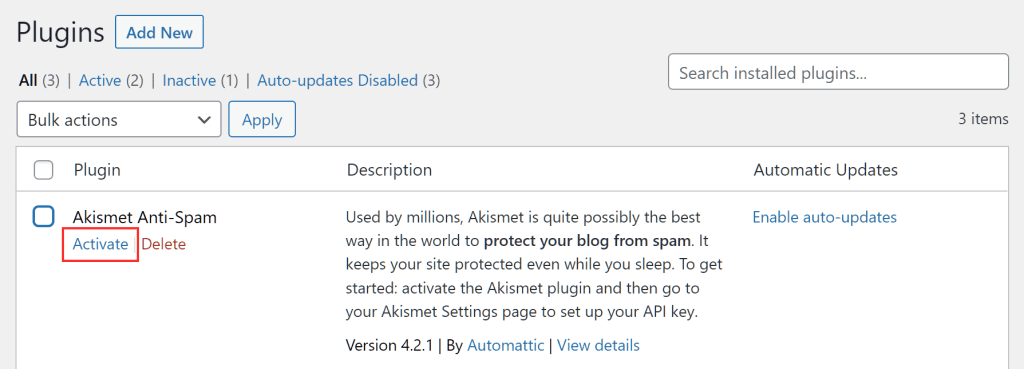
To activate plugins, login to WordPress, click on the Plugins tab and then click on Activate under the name of the plugin as you see in this screenshot.
Once you have identified the plugin causing the problem what can you do? First of all, check if the plugin is up to date and if not, update it. In case the error continues to appear after updating the plugin you can try to contact the developer and ask for assistance.
Otherwise, the only thing to do is to replace the plugin with one that has the same function.
Disable CDN
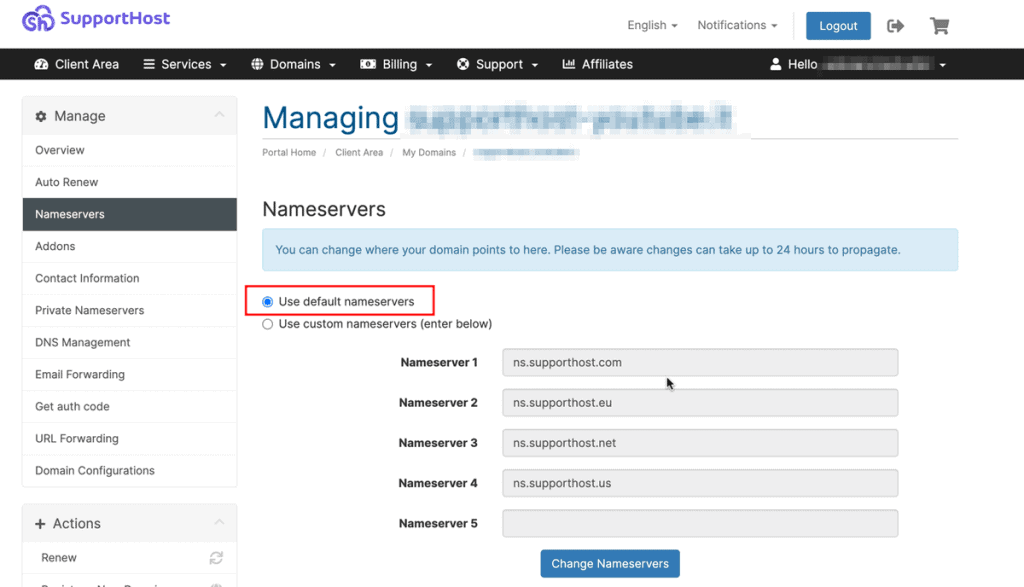
The causes for error 403 may also include a problem with the CDN (content distribution network). To rule this out, we can disable the CDN by changing the nameservers and setting the default ones from the hosting.
If you are our customer, you will need to make sure you are using our nameservers:
- ns.supporthost.com
- ns.supporthost.eu
- ns.supporthost.net
- ns.supporthost.us
All you have to do is go to the nameserver management section from the customer area and select the option Use default nameservers as shown here:
If you have any doubts, follow the detailed procedure described in our tutorial on nameservers.
Contact support
If you couldn’t solve the 403 error with the methods we’ve seen, you can contact your provider for assistance. If you are a SupportHost customer, you can open a ticket and one of our operators will guide you.

Conclusion
As we have seen in this article, the 403 error: how to solve it, the 403 forbidden error is displayed when you do not have the necessary permissions to access the requested page. In most cases, the error is caused by incorrect configuration of file or folder permissions or a problem with the .htaccess file.
We have seen how to bypass the 403 error code from user and how to get rid of 403 error if it occurs on your site. Did the error show up on your site as well? How did you solve it and if so with which method? Let me know in the comments below.


Leave a Reply