
These days, while I was writing a plugin and doing some research, I noticed that there are no updated and comprehensive tutorials for the WP_List_Table class on WordPress.
Since I had to study the class to make the plugin, I thought I would come up with a tutorial for WP List Table in order to explain it better.
By following this tutorial you will learn how to create a custom table in the WordPress database, insert data into it, and take this data to show it in the WordPress admin area.
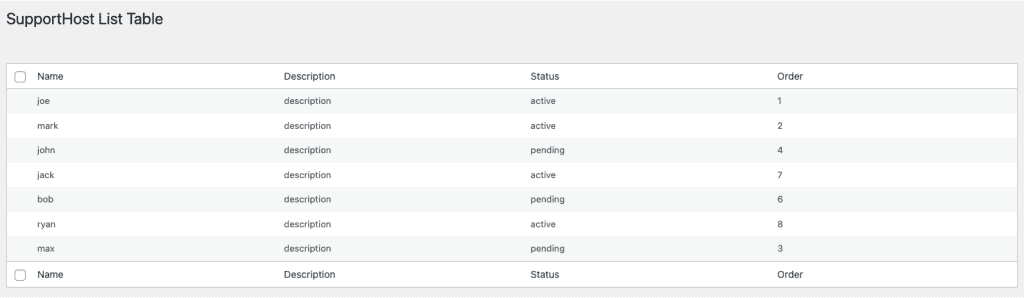
You will get a result like this:

I have uploaded the full code of the plugin to GitHub to make it easier to read this tutorial, you’ll find the link at the end of this post.
Table of Contents
In this tutorial I want to explain how to use the WP List Table class, but first let’s see what it is used for.
What is the WP_List_Table class?
The WP List Table class is used to display a table of contents such as a list of our articles:

As well as the list of pages:
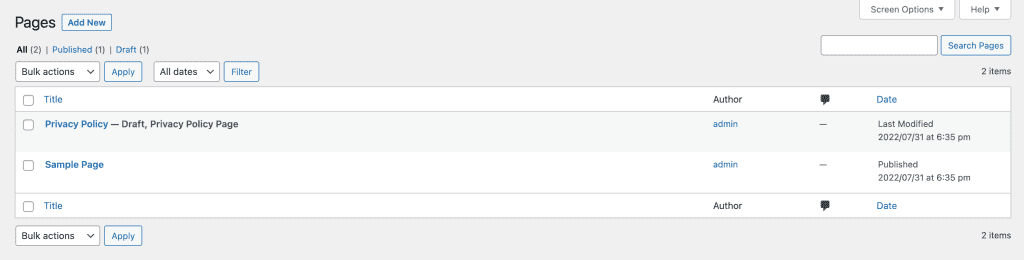
This class allows us to display a list of content, complete with the pagination, screen options, search, bulk actions, sorting and more.
Normally, if we create a custom post type, this page is automatically created by WordPress, but how can we show administrators a page with a list taken from a custom database table?
We can find the WP_List_Table class inside the file /wp-admin/includes/class-wp-list-table.php
Preparing the development environment
Let’s go and create our table.
Enter the database using a software such as phpMyAdmin, adminer (the default software if we’re to use local) or Sequel Ace to run this query:
CREATE TABLE `wp_supporthost_custom_table` (
  `ID` bigint(20) NOT NULL AUTO_INCREMENT PRIMARY KEY,
  `name` text NOT NULL,
  `description` longtext NOT NULL,
  `status` varchar(20) NOT NULL,
  `order` int NOT NULL
);
Now that we have created our custom table let’s go insert some data into it with this query:
INSERT INTO `wp_supporthost_custom_table` (`name`, `description`, `status`, `order`)
VALUES
('joe', 'description', 'active', '1'),
('mark', 'description', 'active', '2'),
('john', 'description', 'pending', '4'),
('jack', 'description', 'active', '7'),
('bob', 'description', 'pending', '6'),
('ryan', 'description', 'active', '8'),
('max', 'description', 'pending', '3');
At this point we have our custom table in the database, and we have data in it.
Remember that in both queries you need to change “wp_” to the prefix of your tables in the database.
The structure of WP List Table
In this article, WP List Table tutorial, we are going to create a PHP class that would extend the WP List Table.
Let’s see what items we can control with the WP_List_Table class:

- Ability to hide columns from screen options;
- Ability to decide the number of items per page from the screen options;
- Search form;
- Pagination;
- Custom columns;
- One-click column sorting;
- Customized bulk actions.
Set up the plugin
The code we will write in this tutorial for WP List Table can be inserted into your site in several ways.
You can put it inside your theme’s functions.php file, but it is not a good option for several reasons:
- If you change themes you lose this functionality;
- You risk having a functions.php file that is too large (with too much code) and it would become difficult to maintain.
Ideally, we should always try to separate it out for simplicity; it will come in handy in the future when we want to add a feature or make a change.
A second option is to use a plugin like code snippets which allows us to add custom code to our site without creating a special plugin.
In this article, WP_List_Table tutorial, I will follow the third option, that is, I am going to create a plugin to add this functionality to WordPress.
Create the plugin
We can start writing our WordPress plugin. Let’s go to the /wp-content/plugins folder and create the file supporthost-admin-table.php (of course you can use any name you like).
Inside our new php file, we add this code:
<?php

/*
Plugin Name:  SupportHost Admin Table
Description: It displays a table with custom data
Author: SupportHost
Author URI: https://supporthost.com/
License: GPLv2 or later
License URI: https://www.gnu.org/licenses/gpl-2.0.html
Text Domain: supporthost-admin-table
Version: 1.0
*/

// Loading WP_List_Table class file
// We need to load it as it's not automatically loaded by WordPress
if (!class_exists('WP_List_Table')) {
      require_once(ABSPATH . 'wp-admin/includes/class-wp-list-table.php');
}

// Extending class
class Supporthost_List_Table extends WP_List_Table
{
    // Here we will add our code
}

// Adding menu
function my_add_menu_items()
{
      add_menu_page('SupportHost List Table', 'SupportHost List Table', 'activate_plugins', 'supporthost_list_table', 'supporthost_list_init');
}
add_action('admin_menu', 'my_add_menu_items');

// Plugin menu callback function
function supporthost_list_init()
{
      // Creating an instance
      $table = new Supporthost_List_Table();

      echo '<div class="wrap"><h2>SupportHost List Table</h2>';
      // Prepare table
      $table->prepare_items();
      // Display table
      $table->display();
      echo '</div>';
}
Then, from the WordPress admin area we activate the plugin we just created:

Once our plugin is active and we can see a new entry in the administrator menu:
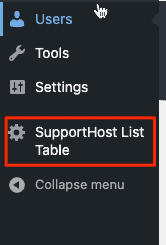
Obviously if we click on the link we get an error since we don’t have any code in our Supporthost_List_Table class yet.
Create the header of our table.
The first method we are going to add to our class will be get_columns() which allows us to create the columns in our table.
We then add the method in this way:
// Extending class
class Supporthost_List_Table extends WP_List_Table
{
    // Here we will add our code

    // Define table columns
    function get_columns()
    {
        $columns = array(
                'cb'            => '<input type="checkbox" />',
                'name'          => __('Name', 'supporthost-cookie-consent'),
                'description'         => __('Description', 'supporthost-cookie-consent'),
                'status'   => __('Status', 'supporthost-cookie-consent'),
                'order'        => __('Order', 'supporthost-cookie-consent')
        );
        return $columns;
    }
}
Basically all we are doing is returning an associative array, where each element is a column.
Remember that we call the first column “cb” which stands for checkbox.
Also note that I use WordPress’ native __() function for column names so that I can translate text strings into other languages in the future.
At this point if we visit our plugin page we can see the same error:

Let’s see how to fix it.
Connect table to data and columns
We see the error above because we have to define a prepare_items() method in our subclass in order to get it to function.
We then add the method within our class:
    // Bind table with columns, data and all
    function prepare_items()
    {
        $columns = $this->get_columns();
        $hidden = array();
        $sortable = array();
        $this->_column_headers = array($columns, $hidden, $sortable);

        $this->items = [];
    }
We then reload the page and we can see our table, obviously without any data in it.
Take data from the database
Now we need to pass an array to the prepare_items() method, at the moment we are passing an empty array where it shows:
$this->items = [];
We add a method to our class to take data from the database and pass it to $this->items.
We can insert this method:
    // Get table data
    private function get_table_data() {
        global $wpdb;

        $table = $wpdb->prefix . 'supporthost_custom_table';

        return $wpdb->get_results(
            "SELECT * from {$table}",
            ARRAY_A
        );
    }
All we need to do is take all the data from our custom table and return it in an array.
We can modify the prepare_items() method like this:
    // Bind table with columns, data and all
    function prepare_items()
    {
        //data
        $this->table_data = $this->get_table_data();

        $columns = $this->get_columns();
        $hidden = array();
        $sortable = array();
        $primary  = 'name';
        $this->_column_headers = array($columns, $hidden, $sortable, $primary);

        $this->items = $this->table_data;
    }
Note that we put our result array in a property called table_data, we will need it later. To make it work we need to define the property in our class like this:
    // define $table_data property
    private $table_data;
We are almost close to our final result, but there is still a bit more to go.
Show the data in the table
The reason we still do not see the results, despite the fact that we are getting them from the database, is that we have not defined the column_default() method within our class.
This way, we can define which value goes to each column on our table.
    function column_default($item, $column_name)
    {
          switch ($column_name) {
                case 'id':
                case 'name':
                case 'description':
                case 'status':
                case 'order':
                default:
                    return $item[$column_name];
          }
    }
Now we can see the table, but the checkboxes in the first column are missing:
To fix it we need to add a new method to our class like this:
    function column_cb($item)
    {
        return sprintf(
                '<input type="checkbox" name="element[]" value="%s" />',
                $item['id']
        );
    }
This checkbox will come in handy later when we need to create bulk actions to our table.
We now find ourselves with a usable, albeit minimal, table. From this point let’s see how to add features to our table using the WP_List_Table class so that it is usable.
In the next paragraphs, we’ll see how to add pagination, search, screen options, bulk actions, and more.
Ordering
By working with the WordPress admin area you probably noticed that some columns are blue and have an arrow.
By clicking on the link you can sort the results by that criteria.

Let’s see how we can do this for our table.
We add a method to our class:
protected function get_sortable_columns()
{
      $sortable_columns = array(
            'name'  => array('name', false),
            'status' => array('status', false),
            'order'   => array('order', true)
      );
      return $sortable_columns;
}
We use this method to create an array of columns that we can use to sort our data.
If a column is not in this array, you will not be able to sort it. In this WP List Table tutorial I intentionally left out the description.
The index of our array indicates the column we want to set as a “sortable”.
The value of our array, on the other hand, is an array where the first value is the column we will use to sort the data, and the second value is a boolean that works like this:
- If it is set to false (which is the default), as soon as we click on the column name the arrow will point upward and the values will be sorted in ascending order;
- If it is set to true, as soon as we click on the column name the arrow will point downward and the values will be sorted in descending order.
Remember that the second parameter (true/false) is optional and is set to false by default.
The sorting is not working since we are still missing two steps.
As a first step, we add another method that will allow us to change the sorting of the array that contains all the data in our table.
    // Sorting function
    function usort_reorder($a, $b)
    {
        // If no sort, default to user_login
        $orderby = (!empty($_GET['orderby'])) ? $_GET['orderby'] : 'user_login';

        // If no order, default to asc
        $order = (!empty($_GET['order'])) ? $_GET['order'] : 'asc';

        // Determine sort order
        $result = strcmp($a[$orderby], $b[$orderby]);

        // Send final sort direction to usort
        return ($order === 'asc') ? $result : -$result;
    }
Now that we have added these two methods all we need to do is modify the prepared items code to make our columns in a manner that can be sorted.
Firstly, we have to edit the line:
$sortable = array();
With:
$sortable = $this->get_sortable_columns();
So that we can pass our array correctly to _column_headers two rows down.
We then add this line to reorder our array when necessary:
usort($this->table_data, array(&$this, 'usort_reorder'));
Our method then becomes the following:
// Bind table with columns, data and all
    function prepare_items()
    {
        //data
        $this->table_data = $this->get_table_data();

        $columns = $this->get_columns();
        $hidden = array();
        $sortable = $this->get_sortable_columns();
        $primary  = 'name';
        $this->_column_headers = array($columns, $hidden, $sortable, $primary);

        usort($this->table_data, array(&$this, 'usort_reorder'));

        $this->items = $this->table_data;
    }
Now that we are able to sort the data in our table, let’s move on to a new feature: pagination.
Add pagination to WP_List_Table
If we have a substantial number of elements pagination is a must.
The WP List Table class allows us to display a pagination in a simple way, let’s see how.
Adding pagination is a piece of cake!
All we have to do is insert a few lines of code in our prepare_items() method.
        /* pagination */
        $per_page = 3;
        $current_page = $this->get_pagenum();
        $total_items = count($this->table_data);

        $this->table_data = array_slice($this->table_data, (($current_page - 1) * $per_page), $per_page);

        $this->set_pagination_args(array(
                'total_items' => $total_items, // total number of items
                'per_page'    => $per_page, // items to show on a page
                'total_pages' => ceil( $total_items / $per_page ) // use ceil to round up
        ));
Which becomes:
    // Bind table with columns, data and all
    function prepare_items()
    {
        //data
        $this->table_data = $this->get_table_data();

        $columns = $this->get_columns();
        $hidden = array();
        $sortable = $this->get_sortable_columns();
        $primary  = 'name';
        $this->_column_headers = array($columns, $hidden, $sortable, $primary);

        usort($this->table_data, array(&$this, 'usort_reorder'));

        /* pagination */
        $per_page = 3;
        $current_page = $this->get_pagenum();
        $total_items = count($this->table_data);

        $this->table_data = array_slice($this->table_data, (($current_page - 1) * $per_page), $per_page);

        $this->set_pagination_args(array(
                'total_items' => $total_items, // total number of items
                'per_page'    => $per_page, // items to show on a page
                'total_pages' => ceil( $total_items / $per_page ) // use ceil to round up
        ));

        $this->items = $this->table_data;
    }
Note carefully: the lines of code for pagination must be inserted after the function for sorting. If the sort is inserted after the array_slice function, when we sort a column the results will be sorted only for that page, the sort will not consider all the results, but only those on the screen we see.
To better understand this, I suggest you move the line beginning with usort after the code for pagination and sort by the order field to see what happens.
Note where it says the following:
$per_page = 3;
This means that we show 3 items per page.
With these few lines we can insert pagination into our table and get a result like this:

As you may have noticed, if you enter the page number in the box manually and hit enter nothing happens. This is because our table is not a form.
To solve this we need to modify the code of our function this way:
// Plugin menu callback function
function supporthost_list_init()
{
      // Creating an instance
      $table = new Supporthost_List_Table();

      echo '<div class="wrap"><h2>SupportHost Admin Table</h2>';
      echo '<form method="post">';
      // Prepare table
      $table->prepare_items();
      // Display table
      $table->display();
      echo '</div></form>';
}
In WordPress I normally can click on the screen options at the top and decide which columns to show and how many results to show.
That is exactly what we are going to see.
Screen options
To add screen options we do not have to add a method to our class, instead we will have to modify the code on our “admin_menu” hook.
We have to delete the initial code and replace it with the following:
// Adding menu
function my_add_menu_items() {

	global $supporthost_sample_page;

	// add settings page
	$supporthost_sample_page = add_menu_page(__('SupportHost List Table', 'supporthost-admin-table'), __('SupportHost List Table', 'supporthost-admin-table'), 'manage_options', 'supporthost_list_table', 'supporthost_list_init');

	add_action("load-$supporthost_sample_page", "supporthost_sample_screen_options");
}
add_action('admin_menu', 'my_add_menu_items');

// add screen options
function supporthost_sample_screen_options() {

	global $supporthost_sample_page;
        global $table;

	$screen = get_current_screen();

	// get out of here if we are not on our settings page
	if(!is_object($screen) || $screen->id != $supporthost_sample_page)
		return;

	$args = array(
		'label' => __('Elements per page', 'supporthost-admin-table'),
		'default' => 2,
		'option' => 'elements_per_page'
	);
	add_screen_option( 'per_page', $args );

    $table = new Supporthost_List_Table();

}
In the first function, we add a hook to load screen options.
In the second function we set $table as a global variable, this way WordPress takes the list of columns and allows us to decide which columns to show or hide from the screen options.
We also add an option called elements_per_page that allows us to decide how many elements to display per page.
If you have tried surely you have noticed that if you change the number of elements per page, they do not change.
In fact, we have to go and modify a line in our prepare_items() method:
$per_page = 3;
Becomes:
$per_page = $this->get_items_per_page('elements_per_page', 10);
In this way, we tell WordPress to take the value ‘elements_per_page’ from the usermeta table, in fact when we change the number of elements per page, WordPress saves the value in the database. It’s the same thing with selecting the columns we want to show or hide.
The value 10 we pass as the second parameter is the default number, if the user has not decided how many elements to show from the screen options. This value is optional, if we do not specify it WordPress sets it to 20 by default.
You may have also noticed that if you hide a column and reload the page, all columns are shown.
As in the case of the number of items per page, preferences related to hidden columns are saved in the database in the usermeta column.
Let’s edit the line:
$hidden = array();
With this if/else statement:
$hidden = ( is_array(get_user_meta( get_current_user_id(), 'managetoplevel_page_supporthost_list_tablecolumnshidden', true)) ) ? get_user_meta( get_current_user_id(), 'managetoplevel_page_supporthost_list_tablecolumnshidden', true) : array();
This way if the user has decided to hide some columns we hide them, otherwise we pass an empty array without hiding any columns.
At this point we want to be able to search the items we have in the database.
The search form
In order to search through the various elements we need a search form, and some modifications to our code to allow a search within the database.
Firstly, we need to add the form to our table, by adding this row:
$table->search_box('search', 'search_id');
In this way:
// Plugin menu callback function
function supporthost_list_init()
{
      // Creating an instance
      $table = new Supporthost_List_Table();

      echo '<div class="wrap"><h2>SupportHost Admin Table</h2>';
      echo '<form method="post">';
      // Prepare table
      $table->prepare_items();
      // Search form
      $table->search_box('search', 'search_id');
      // Display table
      $table->display();
      echo '</div></form>';
}
Now we are going to modify our prepare_items() method to take the $_POST[‘s’] parameter and do a database lookup, like this:
        //data
        if ( isset($_POST['s']) ) {
            $this->table_data = $this->get_table_data($_POST['s']);
        } else {
            $this->table_data = $this->get_table_data();
        }
So the complete method becomes:
    // Bind table with columns, data and all
    function prepare_items()
    {
        //data
        if ( isset($_POST['s']) ) {
            $this->table_data = $this->get_table_data($_POST['s']);
        } else {
            $this->table_data = $this->get_table_data();
        }

        $columns = $this->get_columns();
        $hidden = ( is_array(get_user_meta( get_current_user_id(), 'managetoplevel_page_supporthost_list_tablecolumnshidden', true)) ) ? get_user_meta( get_current_user_id(), 'managetoplevel_page_supporthost_list_tablecolumnshidden', true) : array();
        $sortable = $this->get_sortable_columns();
        $primary  = 'name';
        $this->_column_headers = array($columns, $hidden, $sortable, $primary);

        usort($this->table_data, array(&$this, 'usort_reorder'));

        /* pagination */
        $per_page = $this->get_items_per_page('elements_per_page', 10);
        $current_page = $this->get_pagenum();
        $total_items = count($this->table_data);

        $this->table_data = array_slice($this->table_data, (($current_page - 1) * $per_page), $per_page);

        $this->set_pagination_args(array(
                'total_items' => $total_items, // total number of items
                'per_page'    => $per_page, // items to show on a page
                'total_pages' => ceil( $total_items / $per_page ) // use ceil to round up
        ));

        $this->items = $this->table_data;
    }
We must then modify the get_table_data() method so that it performs a database search:
    // Get table data
    private function get_table_data( $search = '' ) {
        global $wpdb;

        $table = $wpdb->prefix . 'supporthost_custom_table';

        if ( !empty($search) ) {
            return $wpdb->get_results(
                "SELECT * from {$table} WHERE name Like '%{$search}%' OR description Like '%{$search}%' OR status Like '%{$search}%'",
                ARRAY_A
            );
        } else {
            return $wpdb->get_results(
                "SELECT * from {$table}",
                ARRAY_A
            );
        }
    }
Looking in the “name,” “description,” and “status” fields, you’ll see that the search works.
Action links
You know when you hover your mouse over a line and links appear that allow you to perform various actions, such as viewing the post/page or moving to the trash?
Let’s see how to use the WP List Table class to add these action links.
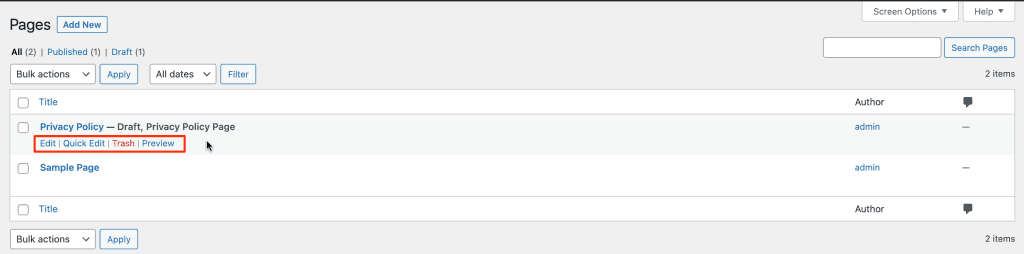
Simply by adding this method to our class we can add action links:
    // Adding action links to column
    function column_name($item)
    {
        $actions = array(
                'edit'      => sprintf('<a href="?page=%s&action=%s&element=%s">' . __('Edit', 'supporthost-admin-table') . '</a>', $_REQUEST['page'], 'edit', $item['ID']),
                'delete'    => sprintf('<a href="?page=%s&action=%s&element=%s">' . __('Delete', 'supporthost-admin-table') . '</a>', $_REQUEST['page'], 'delete', $item['ID']),
        );

        return sprintf('%1$s %2$s', $item['name'], $this->row_actions($actions));
    }
The function name must be created in this format: column_{column_identifier}.
Within this function, we create an array of links, in this case one link for editing and one for deleting the element.
$item[‘ID’] and $item[‘name’], ID and “name” are the identifiers of our columns as we defined them in the get_columns() method.
In this way, we only add links to the action. If you want these links to work properly, you have to create the actions.
We are almost done, we only need the bulk actions, let’s see how to do it.
Add bulk actions
Bulk actions are those actions that we can apply to several items after selecting them:

To add these actions all we have to do is add a method to our class:
    // To show bulk action dropdown
    function get_bulk_actions()
    {
            $actions = array(
                    'delete_all'    => __('Delete', 'supporthost-admin-table'),
                    'draft_all' => __('Move to Draft', 'supporthost-admin-table')
            );
            return $actions;
    }
We basically come back to an array with the actions. The index of the array is the action while the value of the array is the name we see in the dropdown.
Again, I used the __() function so that I could then translate these strings.
As with action links, here we have added only the action, we have not created the function to execute the action we are going to select, in fact if we select one of these actions nothing will happen.
Conclusion
In this article, WP_List_Table tutorial, we saw how to use the WP List Table class to create a table in the admin area by taking data from a custom table.
To make things easy for you, I’ve added the file on GitHub, you can find the full code in this tutorial here. This is the end result:
This class can be used to create tables in the WordPress admin area using already existing classes in WordPress, without having to reinvent anything.
Was the guide helpful? Were there any passages that weren’t clear? Do you have any doubts? If so, let me know in a comments below!
Ready to build your WordPress site?
Try our service free for 14 days. No obligation, no credit card required.


