Looking to migrate your website from Squarespace to WordPress?
Squarespace is an easy-to-use platform, but it has several limitations. At some point, you’ll want to access some features that Squarespace doesn’t provide. Migrating to WordPress is a smart choice and easier than you probably think.
In this guide, we’ll show you how to migrate from Squarespace to WordPress in a few simple steps.
Table of Contents
Why You Should Migrate From Squarespace to WordPress
Squarespace makes website building easy, but it has limits. You can only use the tools they give you.
If you want more control over your site, WordPress is the better choice because it gives you full ownership and endless ways to customize.
With Squarespace, you pay a monthly fee, and your site stays on their platform. You can’t move it anywhere else.
However, WordPress is open-source. You can choose where to host your site, which often saves money in the long run.
Squarespace has good design options, but you can only use the templates they offer. If you want a unique design or special features, you might feel stuck.
WordPress has thousands of themes and plugins. You can change your site however you want, whether you need better SEO, faster speed, or advanced e-commerce tools.
Plus you can add any of the thousands of plugins available in either the WordPress repository or directly from developers.
Another issue with Squarespace is scalability. If your site grows, you may find that the platform can’t handle everything you need. WordPress works for small sites and huge businesses alike. You can start simple and expand as your needs change.
If you want flexibility, ownership, and more options, WordPress is the way to go. In fact, it is one of the best alternatives to Squarespace.
You can also read our WordPress vs Squarespace comparison.
How to Migrate From Squarespace to WordPress
Migrating from Squarespace to WordPress is fairly straightforward. You need to install WordPress, export your Squarespace content, and import that content into a WordPress site.
Keep in mind, however, that you’ll still have to select and customize a WordPress theme and install plugins. But these migration steps will get all of your content over to WordPress.
Step 1: Get a Web Hosting Account
The first step to migrate from Squarespace to WordPress is to find a web host.
Squarespace hosts your website for you, but WordPress is just a content management system. You need a hosting account with a quality web hosting provider to store your site’s files.
Look for a host that supports WordPress, offers strong security, and has good customer support. Many web hosts offer a one-click WordPress installation tool.
For instance, a WordPress hosting plan with SupportHost comes with WordPress pre-installed. We handle the whole process and direct you to your WordPress dashboard.
All SupportHost WordPress hosting accounts come with a free domain and we’ll manage your website transfer for free.
Step 2. Install WordPress
After creating a web hosting account, the next step to migrate from Squarespace to WordPress is to install WordPress. Fortunately, this is super simple.
If it’s available, use your host’s one-click WordPress installation tool.
If your host doesn’t offer this service, you can also install WordPress manually. Follow the steps in our WordPress installation guide.
Step 3. Export Your Squarespace Content
Now that your WordPress installation is ready, in order to migrate from Squarespace to WordPress you’ll need to export all of your content from your Squarespace account.
Squarespace’s export tool is limited. It won’t give you everything. That said, we can get most of the hard-to-reproduce content, like your pages, posts, and images. Some other elements you’ll have to copy/paste manually.
Here’s what won’t be exported:
- Product pages
- Album pages
- Event pages
- Audio, Video, and Product blocks
- Style changes and custom CSS
- Folders and index pages
Important note: Your images and videos will not be exported during the export process, but we’ll show you how to get these assets later in this guide.
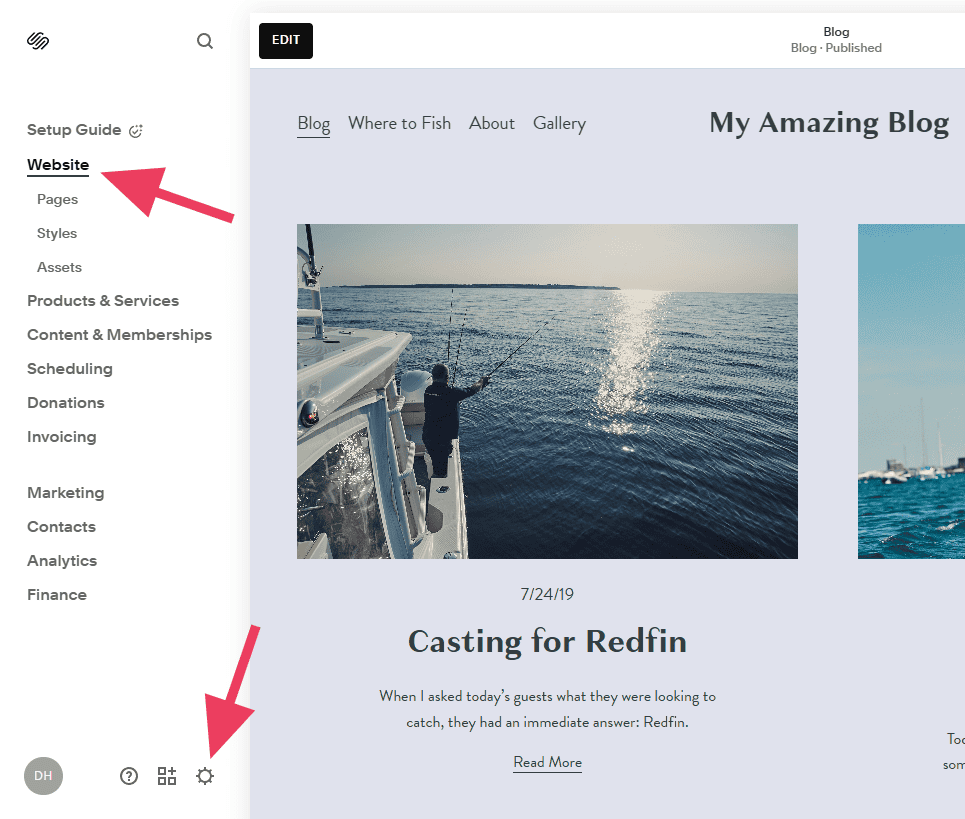
To export the content, go to Website > Settings.
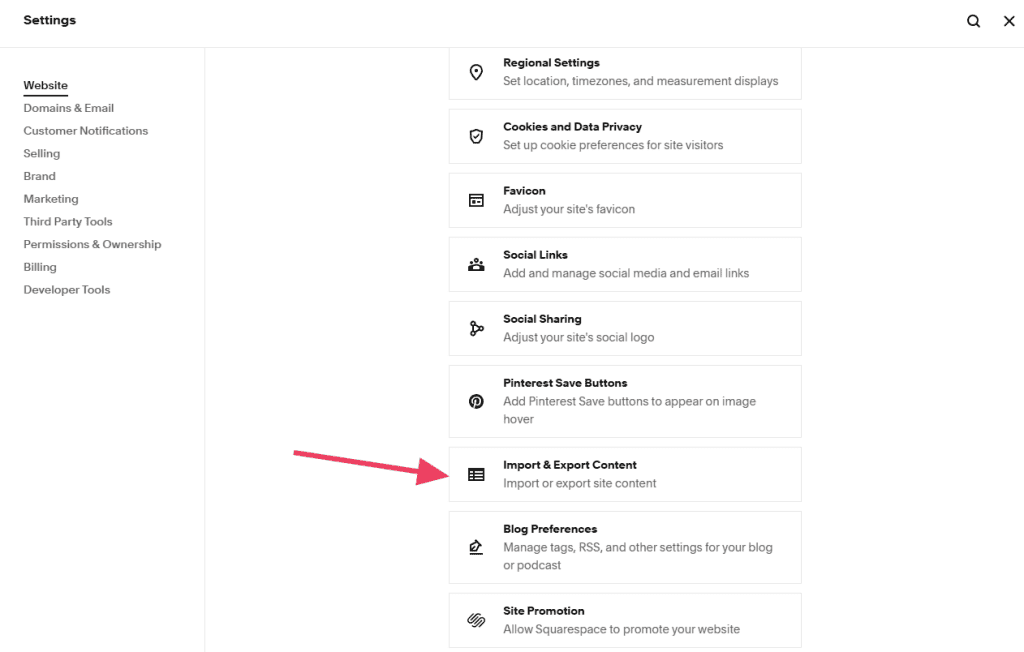
Click the Import & Export Content tab.
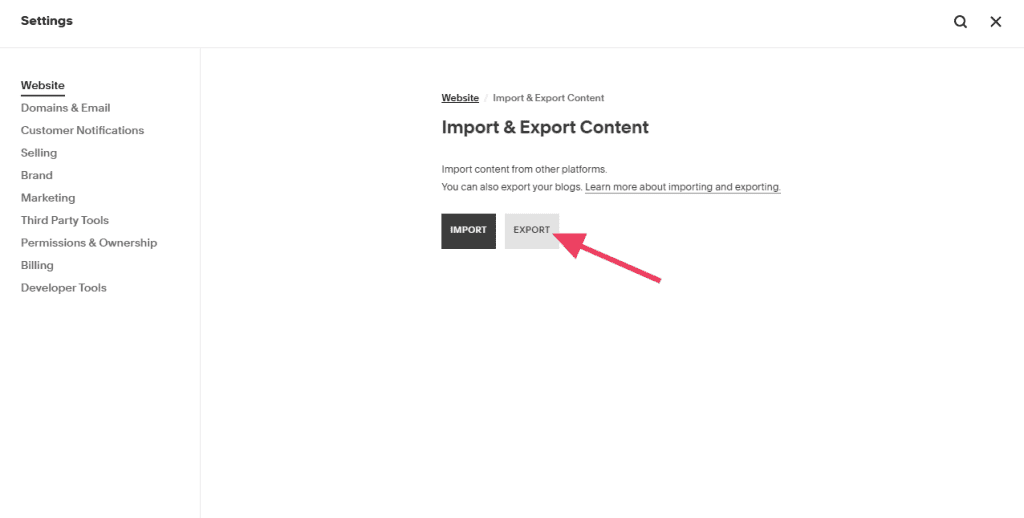
Next, click the Export button.
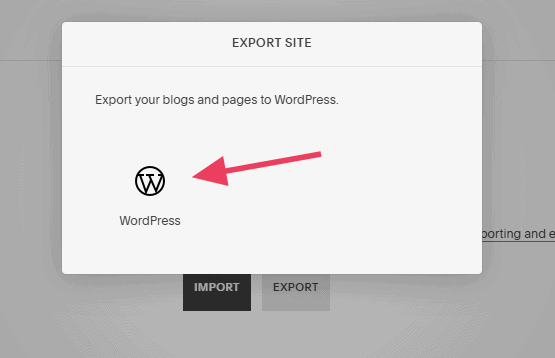
A popup will appear. At the moment, Squarespace only exports content into a WordPress format, so that’s your only option. Fortunately, that’s why you’re here!
Click on the WordPress logo to continue.
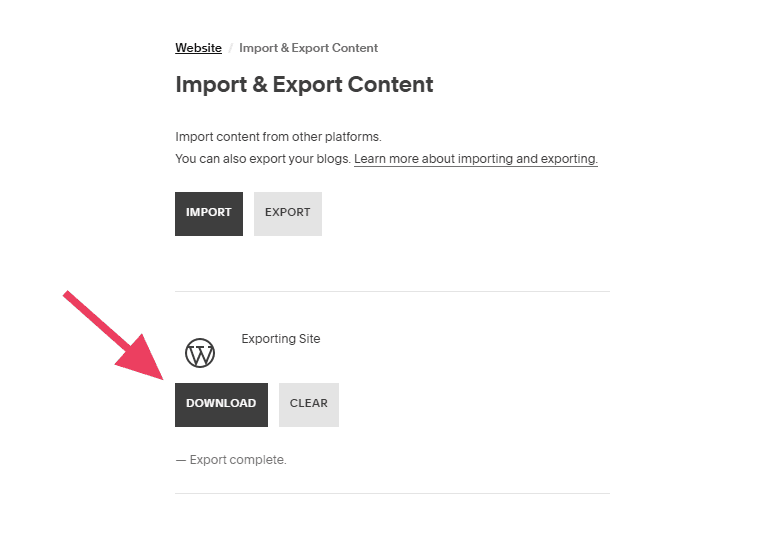
A progress bar will appear that tracks the export. Once it’s complete, click the Download button.
Step 4: Import the Content to WordPress
Now that you have your Squarespace content, your next step is to import it into WordPress.
Visit Tools > Import in your WordPress dashboard.
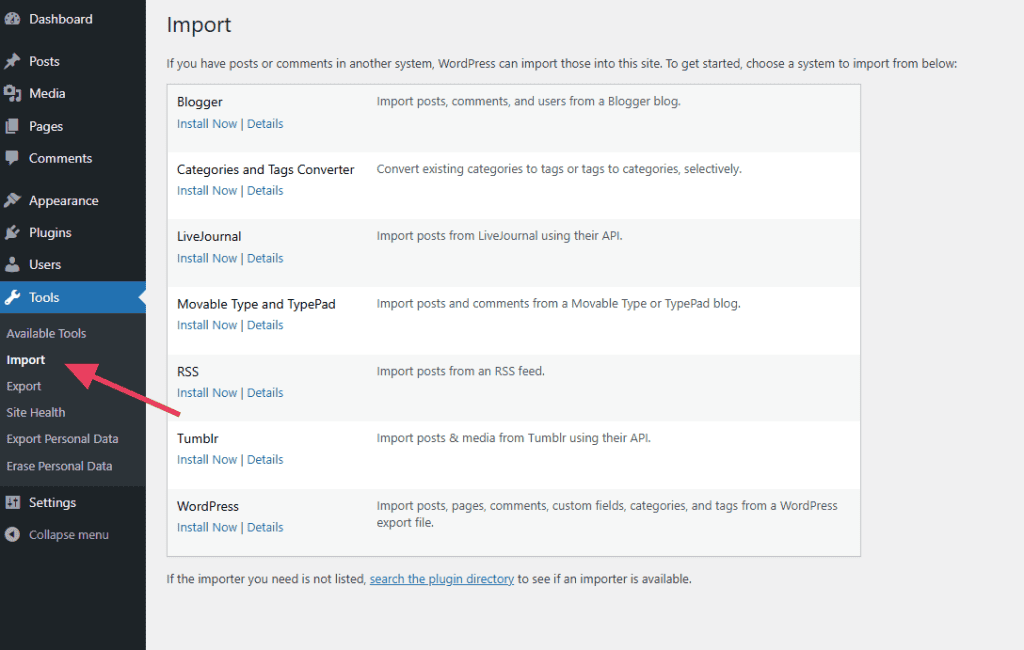
You’ll notice there’s no Squarespace option here. That’s because Squarespace exports to a WordPress-compatible format. So as far as WordPress is concerned, your files are coming from another WordPress installation.
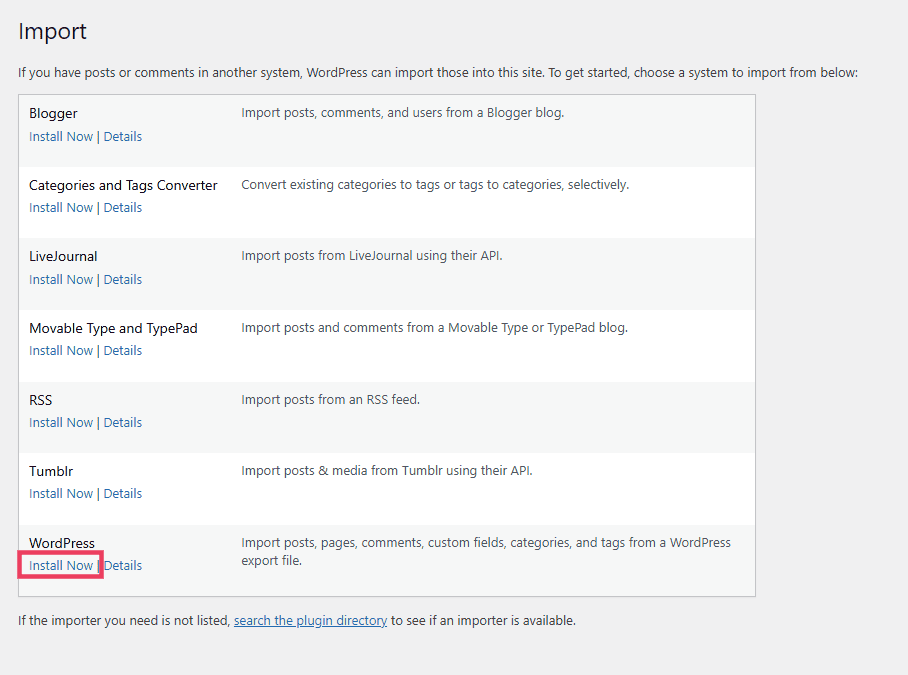
Click Install Now under WordPress to install the importer tool. It should only take a second.
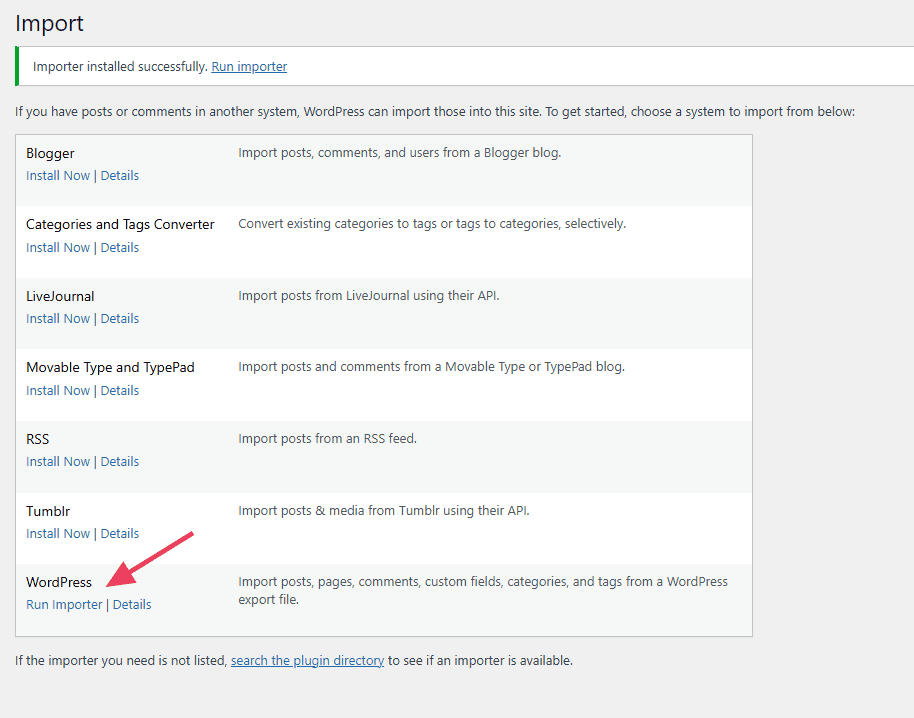
Next, click Run Importer.
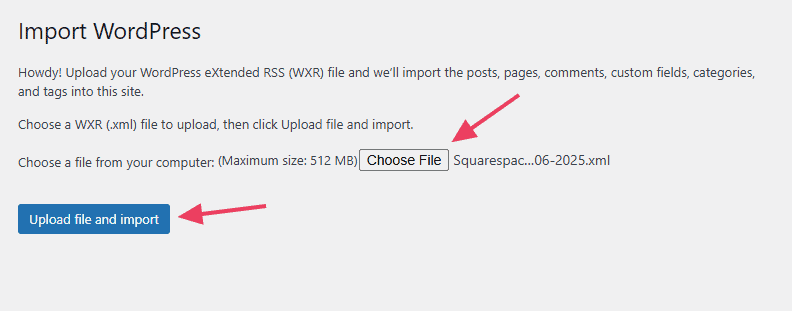
On the next screen, click Choose File. Select the file that you downloaded from Squarespace and click Upload File and Import.
Next, you’ll need to assign the content to an author in WordPress. If you only have a single author, this is simple. You can also create a new user now or assign posts to an existing user.
Unfortunately, it’s not possible to assign specific posts to specific authors. If your site uses multiple authors, you’ll have to go through your posts one-by-one to change authors.
You will also see the option to download and import file attachments (like images and videos), but this does not work with Squarespace. We’ll get to that part in a moment.
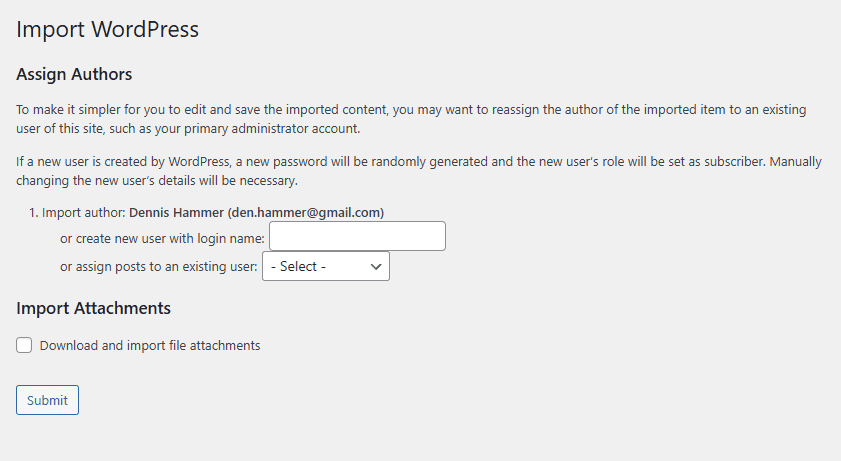
Click on the Submit button so WordPress can import content from your export file.
You will see a success message when the import is complete. You will see your pages in the Pages > All Pages list and your posts in the Posts > All Posts list.
Step 5: Import Images from Squarespace
Since the WordPress importer can’t grab images from Squarespace automatically, it adds them as external images. This means that when someone visits a page, WordPress requests the images from your Squarespace (site rather than store them in the Media Library).
This slows down your site because it has to make requests from another server. It also means your images will break if you close your Squarespace account.
So to full migrate from Squarespace to WordPress, you have to download those images, upload them to the media library, and then replace them in all of your posts and pages.
Fortunately, the Auto Upload Images plugin can do this for you. This tool will grab external images and replace them automatically.
If you’ve never installed a plugin before, see our guide on WordPress plugins.
(Yes, this is an older plugin that hasn’t been updated in a while. However, it’s a simple tool, so it still works today.)
To trigger the plugin’s import process, you simply have to edit all posts and pages that contain images. But you don’t have to do them one-by-one.
Navigate to Posts > All Posts. Click Screen Options at the top of the page. Set the Number of items per page to 999 (or the number of posts you need to edit) and click Apply.
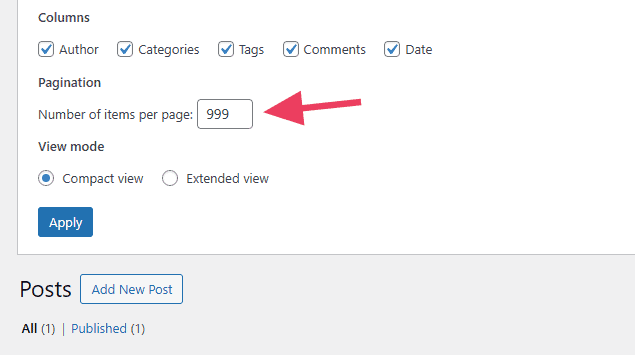
WordPress will reload the page and show all of your posts.
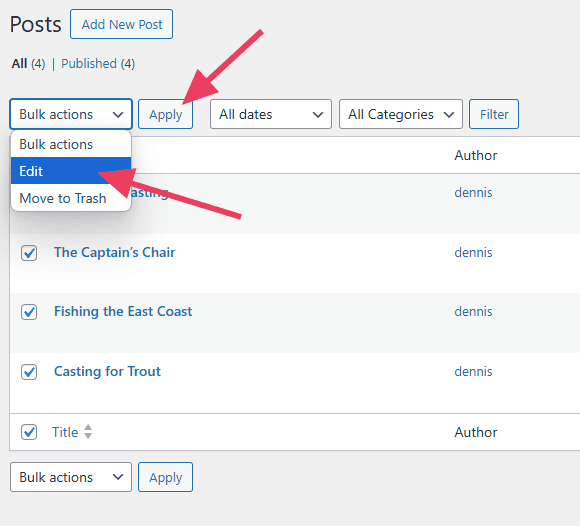
Check the box to select all of your posts.
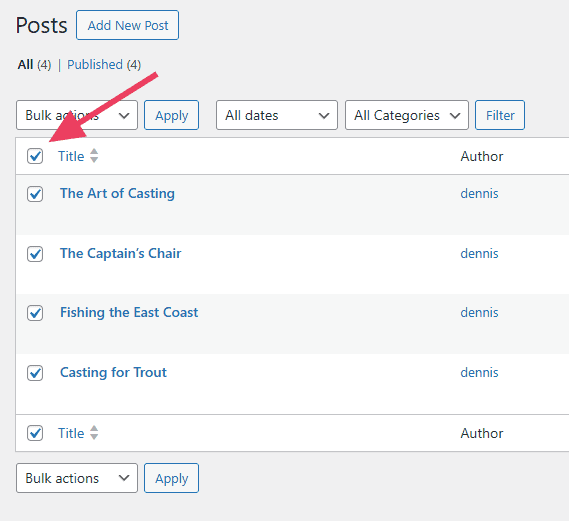
Open the Bulk Options dropdown menu and click Edit and Apply.
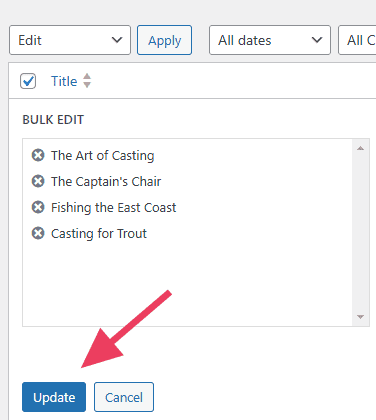
A quick edit box will appear that lists all of the posts you selected. Confirm the edit by clicking the Update button. This updates each post (even though you haven’t changed anything in them) and triggers the Auto Upload Images plugin.
Finally, navigate to Pages > All Pages and repeat the process. You’ll have to do this for any other custom post types as well.
Depending on the number of posts and pages you have, and the number of images they have, the plugin may not be able to grab everything in one shot.
In this case, repeat the process of selecting all of your posts and forcing another update. The plugin will only import images that have not been imported, so eventually it will get them all.
Step 6: Fix Your Permalinks
The next step to migrate from Squarespace to WordPress is to fix your links. You’ll want to make sure you’re using the same link structure on your WordPress as Squarespace uses. This way you don’t miss out on any of the traffic coming from links.
If you open any of your WordPress posts, the URL looks something like this:
yourwebsite.com/?p=123That’s the default URL structure, but it doesn’t match the URL structure from your Squarespace site. So you need to change the URL structure in WordPress to match.
Navigate to Settings > Permalinks. Here WordPress allows you to customize the link structure in a few different ways.
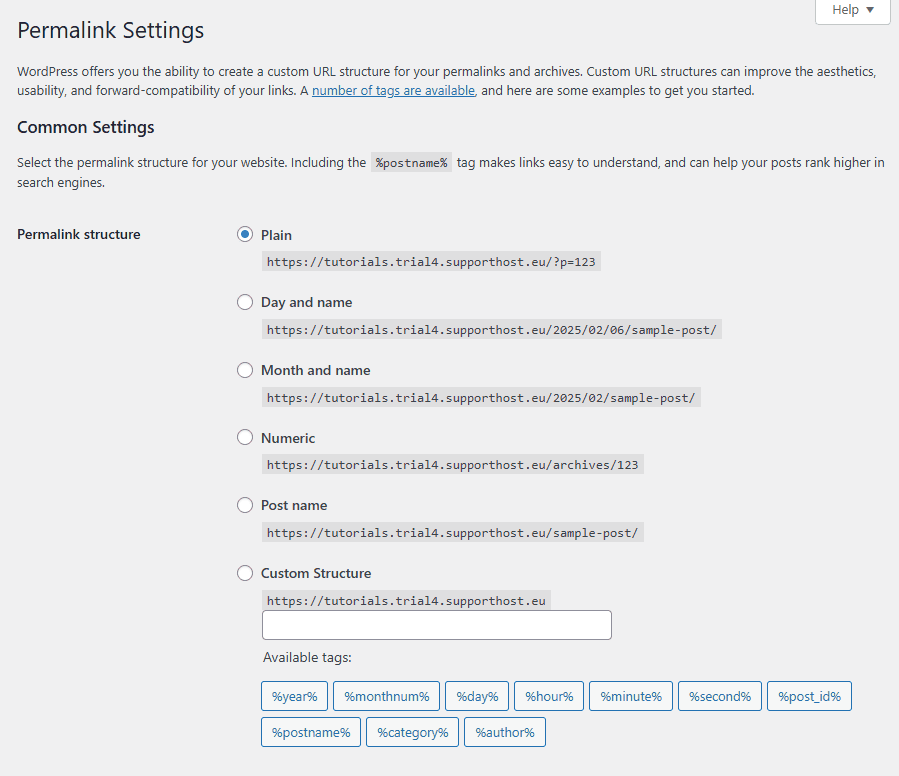
For some older sites, Squarespace uses the year/month/day/post-name format, which looks like this example:
https://mysite.squarespace.com/blog/2024/5/25/fishing-the-space-coast But for newer sites, it uses a simpler format with just the post title (because it’s better for SEO).
https://mysite.squarespace.com/blog/fishing-the-space-coast You’ll also notice that both URL types use the “blog” prefix.
Choose whichever URL format that matches your Squarespace URL format. You may have to build the URL using the Custom Structure option. Use text and tags to make it match your Squarespace format.
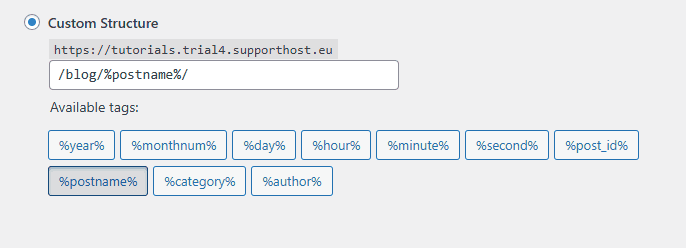
Click Save Changes to save your settings.
Now, this change may not fix every link, especially if you have a lot of pages or if your Squarespace pages use different URL formats. Some of your links may not work. See our guide on 404 errors to track and fix these broken links.
Step 7: Import Remaining Content
Since Squarespace can only export your pages and posts, you probably have some content on your site that needs to be manually imported to WordPress.
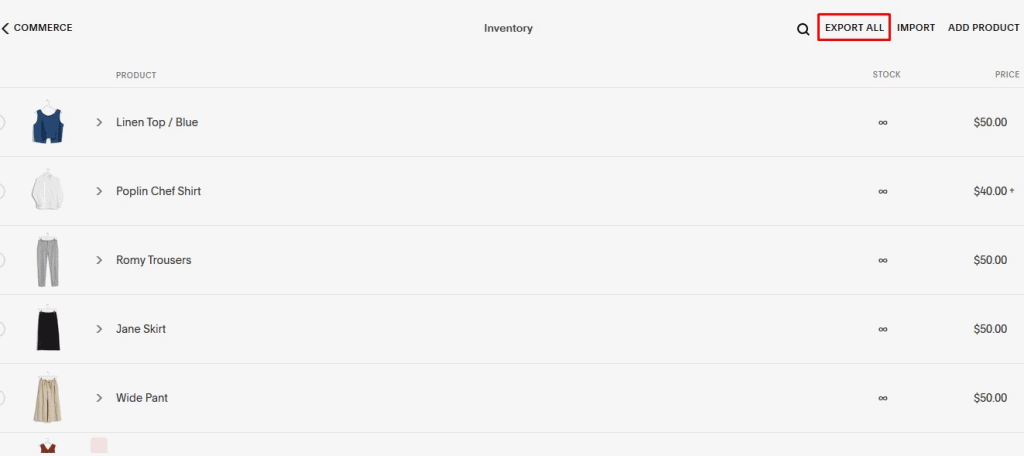
For instance, if you have an online store with Squarespace, you can download a product data sheet as a CSV file. Visit Settings > Selling > Products in your Squarespace account and then click Export All. Then follow our guide on importing products.
Step 8: Customize Your WordPress Site
Your final step to migrate from Squarespace to WordPress is to customize the look and feel of your WordPress site.
If you want your WordPress site to look like your old Squarespace site, choose a similar theme or a theme with lots of customization options. Make sure to focus on sites that are lightweight and load fast.
Next, you’ll need some plugins. Plugins extend WordPress’ capabilities. This is why WordPress sites can have incredible features that just aren’t available on WordPress.
Some essential plugins to consider:
- SEO – Plugins like Yoast SEO or Rank Math help improve search rankings.
- Performance & Security – WP Rocket speeds up your site while Wordfence or Sucuri protect it.
- Payment & Checkout – Add an ecommerce store with WooCommerce.
- Customer Support – LiveChat or Tidio let you chat with customers in real time.
- Custom Code – Code Snippets lets you add code without breaking your site.
- Page Builders – Create polished designs with Elementor, Bricks, or Divi.
Once everything looks good, take a final walkthrough, complete some test purchases (if you’re doing ecommerce), and launch your site.
FAQs About Migrating From Squarespace to WordPress
How difficult is it to migrate from Squarespace to WordPress?
Migrating from Squarespace to WordPress is straightforward if you follow the right steps. You’ll need to set up hosting, export content, import it into WordPress, and manually adjust images and design elements.
Will my SEO be affected when I migrate from Squarespace to WordPress?
Your SEO may take a temporary hit, but you can minimize the impact by matching your permalink structure, setting up redirects, and using an SEO plugin like Rank Math or Yoast.
Can I keep the same design when I move from Squarespace to WordPress?
WordPress doesn’t have exact Squarespace templates, but you can choose a similar theme or use a page builder like Elementor to recreate your design.
Do I need to manually move images when I migrate from Squarespace to WordPress?
Yes, Squarespace doesn’t include images in its export file. You can either manually download and upload them or use a plugin like Auto Upload Images to automate the process.
What happens to my Squarespace website after I migrate to WordPress?
Your Squarespace site will remain active until you cancel your subscription. It’s best to keep it running until you confirm everything is correctly transferred to WordPress.
Migrate From Squarespace to WordPress to Take Full Control Over Your Site
When you migrate from Squarespace to WordPress, the process might seem overwhelming, but with these steps, it’s a straightforward process. Once your WordPress site is ready, take the time to refine the design, optimize performance, and explore plugins to enhance functionality.
With WordPress, you have full control over your website’s future—so start customizing and make it your own!


Leave a Reply