You’ve done it all. You’ve selected the best high-performing WooCommerce hosting. You have a top WooCommerce theme to display your products. Now, you’re looking for ways to streamline your WooCommerce store.
Managing your eCommerce store means a lot of administrative tasks revolving around product data. If you have to manually update or upload your product data, you’re going to be spending a lot of time that’s better spent growing your store.
Luckily, there are a variety of ways to import WooCommerce products to help save you time from having to manage, upload, and update every product manually. This won’t be a big deal if you only have a handful of products, but if your store has hundreds of products, then this is a huge time sink.
Below, we’ll look at a few ways to simplify the process of importing your WooCommerce products and all related product data.
Table of Contents
Why Import Products into WooCommerce?
When you’re managing your WooCommerce store, you’ll need to add new products to your store or update existing products in bulk. By learning the different ways to import WooCommerce products, you can save yourself a lot of time and headaches.
Plus, being able to import WooCommerce products quickly means your products are never out of date. The last thing you want is for your customers to navigate through your online store and view old product specs, descriptions, or product images.
Another reason you may want to import WooCommerce products is if you’re migrating from a different platform. Importing your products means you don’t have to waste time inputting all of your product data manually.
Below, we’ll get into three different ways you can import and even export WooCommerce product data.
Method 1. Manually Importing Products into WooCommerce
WooCommerce has a built-in feature that lets you import your products. But, before you start importing products, it’s important to organize your WooCommerce data the right way. First, your file needs to be in CSV, XML, or TXT format.
CSV is the most widely accepted format, so you may need to export your data into a different format, depending on the import option you’re using below.
Next, your data needs to be in UTF-8 format to avoid encoding errors and have columns like Product Name, Price, SKU, Product Description, and Categories to match with existing WooCommerce product data fields.
The more information you can include, the less manual work you’ll have to do. This includes adding the URLs to your product images and product variations (if applicable).
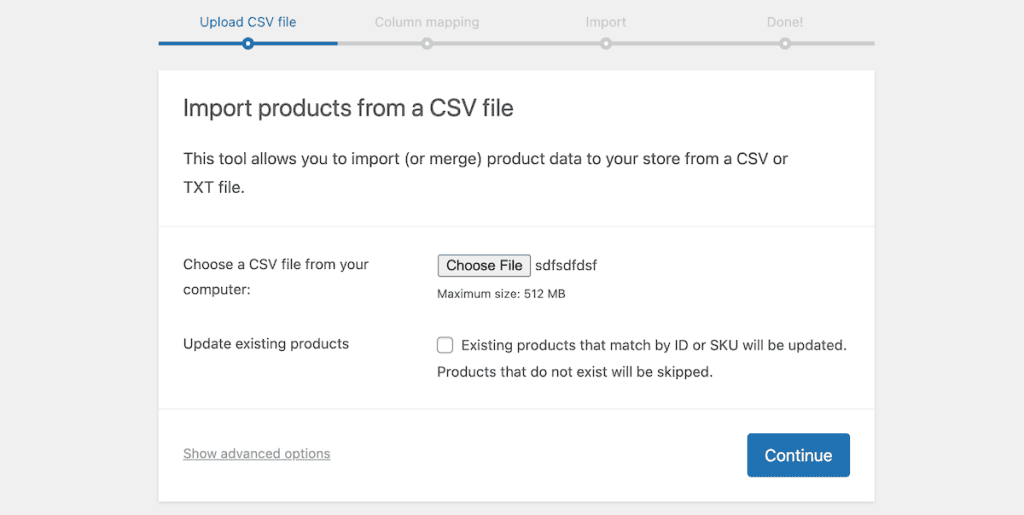
Once your data is ready to import, go to your WooCommerce dashboard and click on “Products“, then click the “Import” button at the top of the screen.

Then, click “Choose File” and select your file. Note that if you’re just updating products, then select the “Update existing products” checkbox. This will identify products with a matching ID or SKU and update the new data from your CSV file.
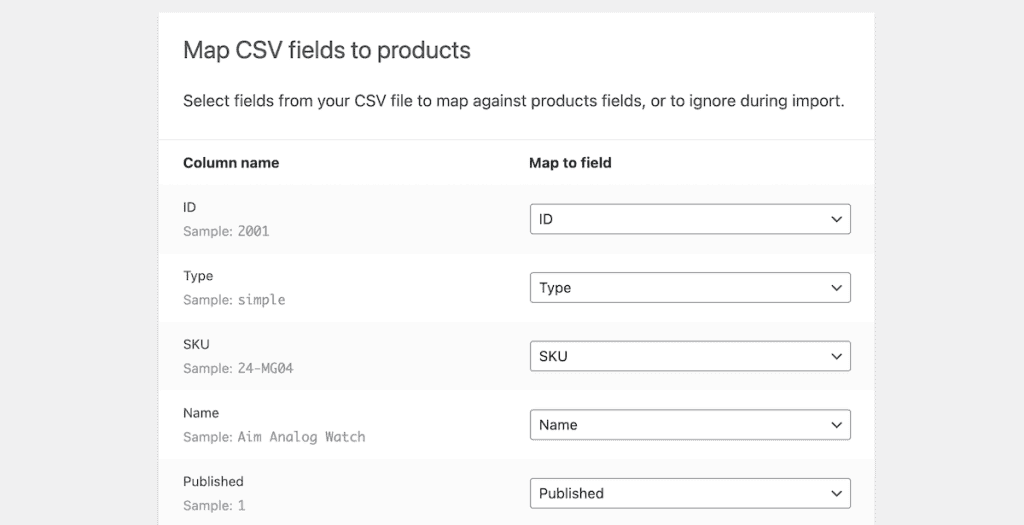
After that, you need to map your CSV file data to existing product fields in WooCommerce. WooCommerce will automatically map column names to fields if they match, but you’ll still want to double-check that the fields are correctly mapped.
Next, click “Run the Importer” to start the importing WooCommerce products into your store.
Exporting WooCommerce Product Data
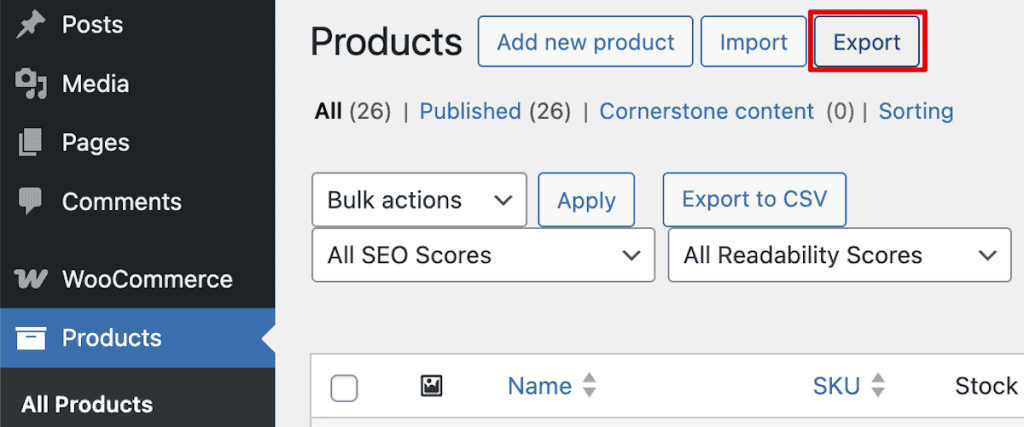
If you want to export product data, head back to the same “Products” screen in your dashboard and click the “Export” button.
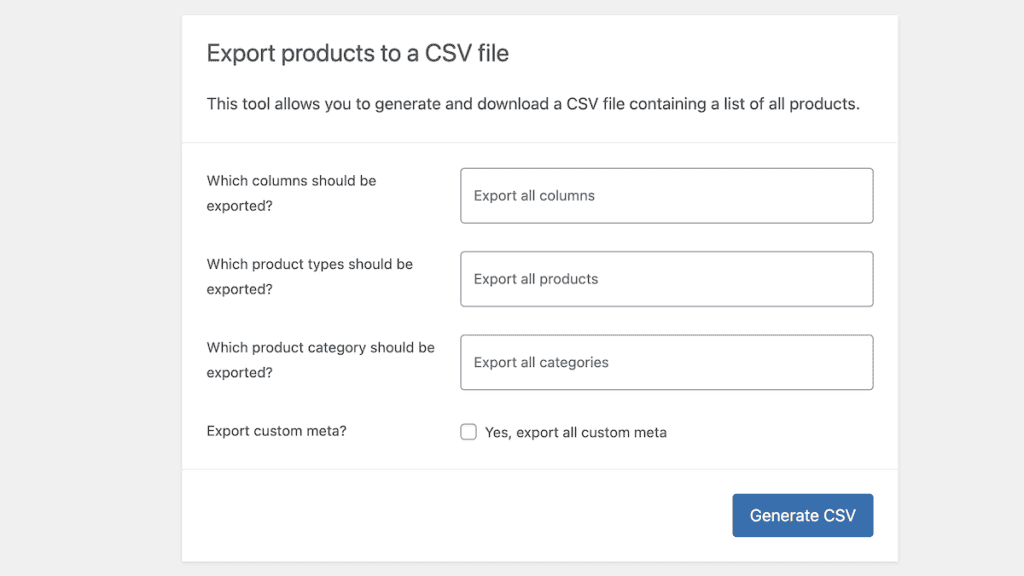
After that, specify which columns, product types, and product categories you want to export and click “Generate CSV“. The tool will automatically download the product data you specified into a CSV file.
Method 2. Import WooCommerce Products with the Free WP All Import Plugin and Extension
The first plugin you can use is called Import Products from any XML, CSV or Excel to WooCommerce. It’s a free plugin from the WP All Import team that lets you easily bulk-import your WooCommerce product data in as little time as possible.
All you have to do is drag and drop your CSV, XML, Google Sheets, or Excel data into the plugin, and you’re all set.
The free version mostly supports the bulk import of simple products. The premium version adds even more features like support for variable products, the ability to upload group and external/affiliate products, URL import, and more.
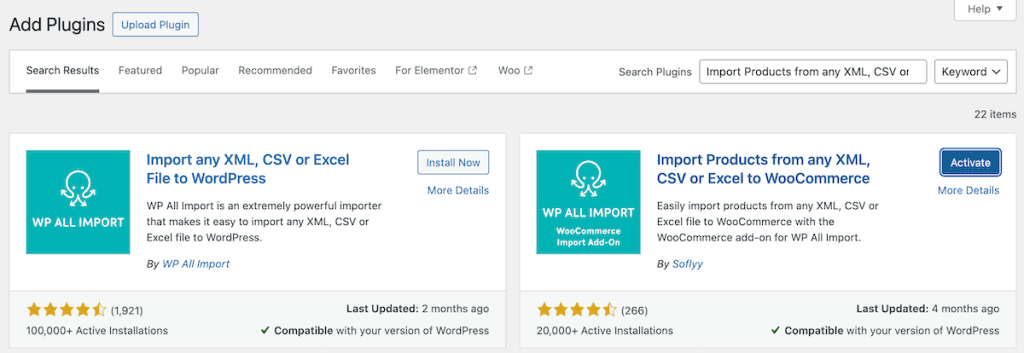
To use this plugin, you’ll need to install the free version of WP All Import first. To do this, go to “Plugins > Add New Plugin” and then search for “WP All Import”, and then click the “Install Now” button. After that, click “Activate”.
Then, head back to the plugin install screen, search for “Import Products from any XML, CSV or Excel to WooCommerce“, then install the plugin just as you did above.
Here are the two plugins that you’ll need to install.
After both plugins are installed, navigate to “All Import > New Import” in your WordPress dashboard and then click on “Upload a File” and select your WooCommerce product dataset.
Then, choose where you want to import the data. In this case, we’ll be importing this data into new “WooCommerce Products”. You can also select “Existing Items” if you want to update existing WooCommerce products.

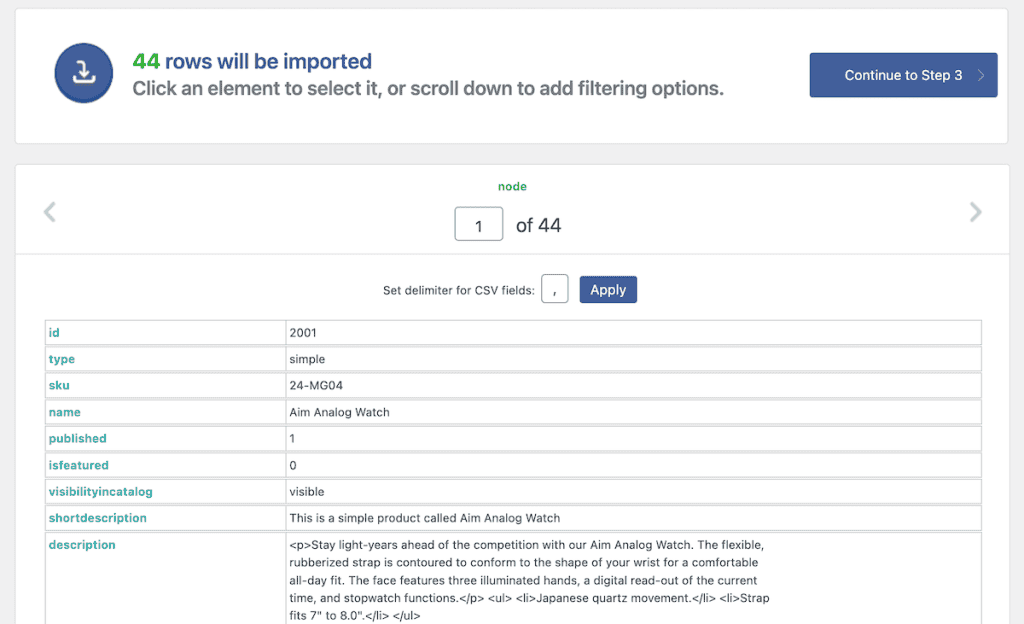
On the next screen, you’ll be able to view all of the product data you’re importing. In this case, we have 44 products that we’re importing.
It’ll show you a breakdown of how the data is mapping to existing WooCommerce fields. If you’re satisfied with how this looks, then click “Continue to Step 3” to move to the next step.
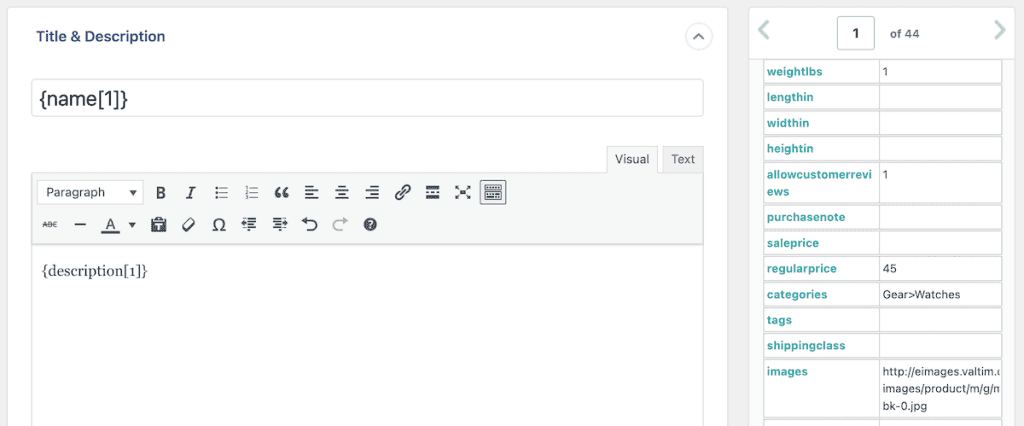
On the next screen, you can drag and drop your product data to the corresponding field just like you’re creating a new WooCommerce product from scratch. You don’t need to map every single product; instead, just drag and drop product data from a single product to the corresponding fields; the plugin will infer the data to match other products from the fields you map here.
Once you’ve mapped all of your product data to the correct field, then click the “Continue to Step 4” button.
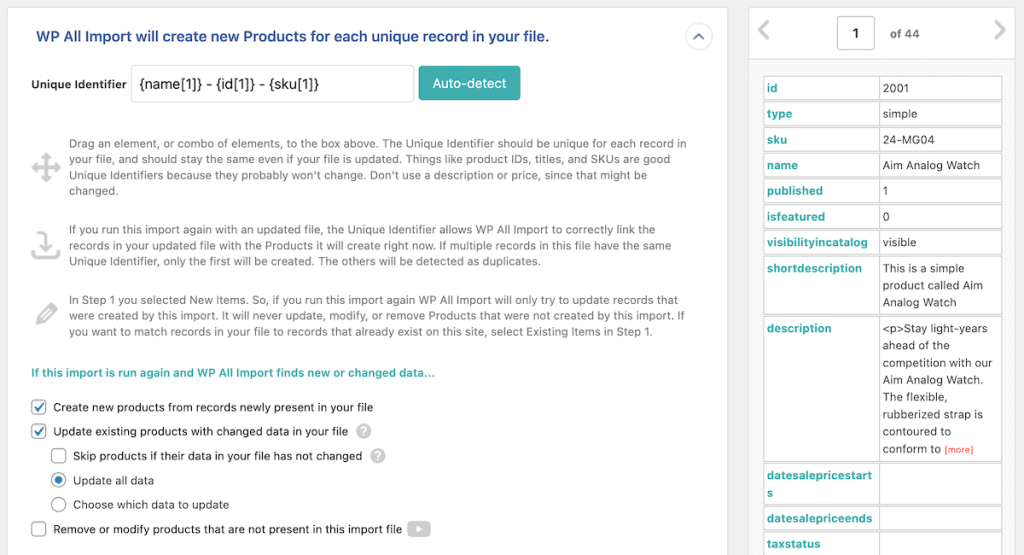
Then, you’ll be taken to another settings page. Here, you can create or auto-detect a unique identifier. You can also specify if you want the plugin to create new products, update existing products, and how to handle products that haven’t been updated or aren’t a part of this dataset.
Once you’re satisfied, click the “Continue” button.
On the final screen, all you need to do is click the “Confirm & Run Import” button, and the importer will automatically import your WooCommerce product data.
Depending on the size of your file, this might take a while. For reference, uploading 44 unique products took around 2 minutes to complete. After the importer is finished, you’ll get a notification, and you can review all of your newly imported or updated WooCommerce products.

Unfortunately, the free version of WP All Import doesn’t support exporting your WooCommerce products. So, if you want to export your product data, you’ll need to use the plugin below, or the built-in WooCommerce export feature.
Method 3. Import WooCommerce Products with the Product Import Export by WebToffee Plugin
Another plugin you can use is Product Import Export for WooCommerce by WebToffee. The free version of the plugin lets you import simple, grouped, and external or affiliate products. It imports product data like product images, product reviews, categories, tags, attributes, and more.
The premium version lets you import or export additional product types, import WooCommerce products from a URL, schedule import times, and more.
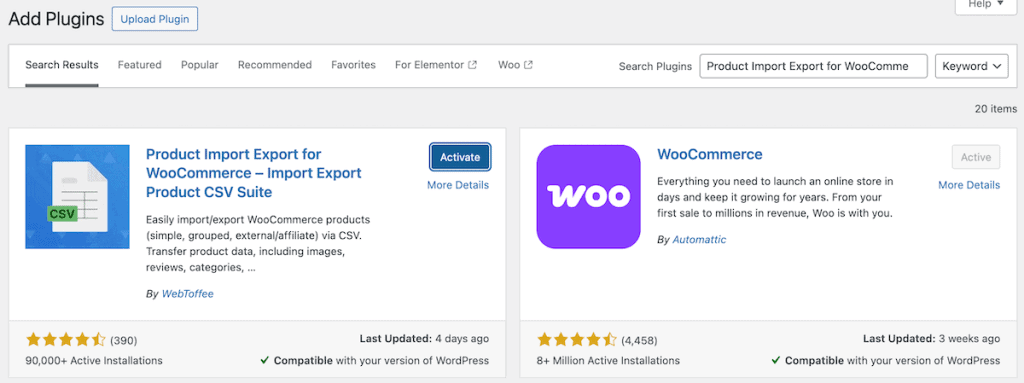
Importing products with this plugin is simple. The first thing you need to do is install the plugin. To do this, go to “Plugins>Add New Plugin” and then search for “Product Import Export for WooCommerce”, and then click the “Install Now” button. After that, click “Activate”.
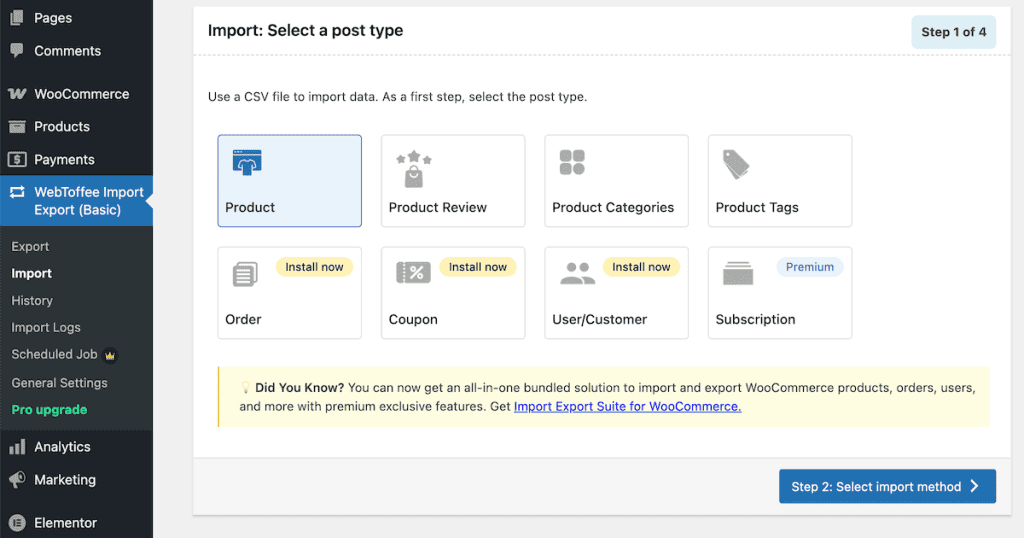
Once the plugin is installed navigate to “WebToffee Import Export (Basic) > Import” in your WordPress dashboard. Then click on the import type; in this case, we’ll select the “Product” option. Then, click the “Step 2: Select import method” button.
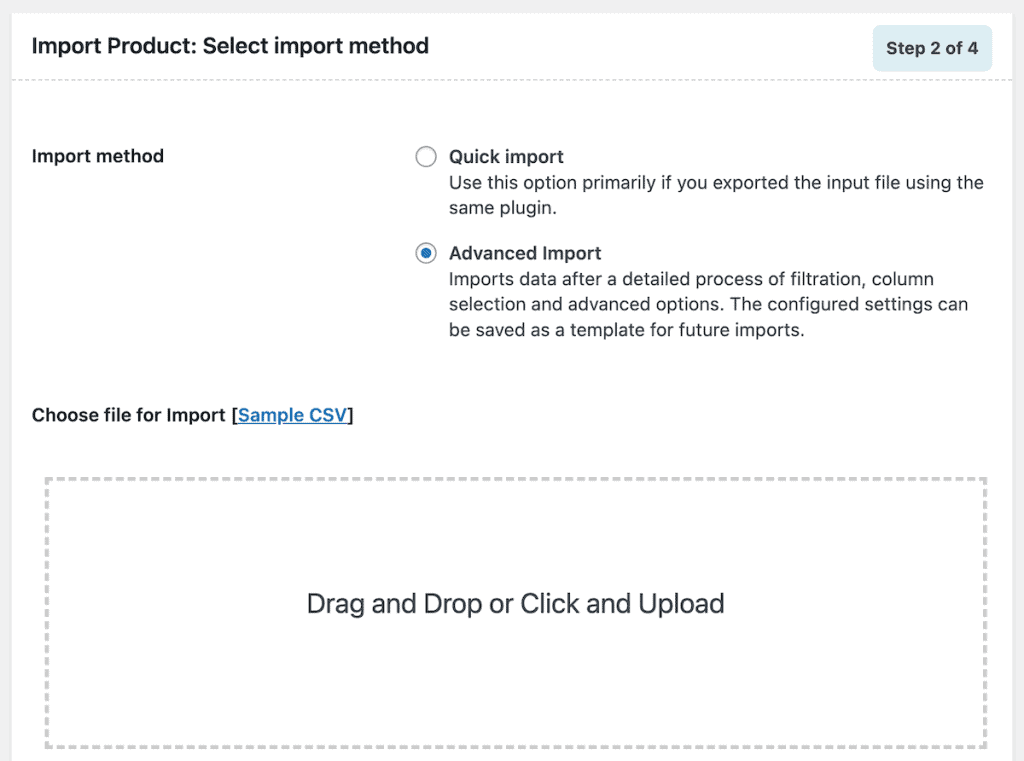
Then, you need to upload the CSV or XML file that contains your product data. Then, select the “Advanced Import” radio button to give you more control over your product data and make sure everything will be properly uploaded, and click “Step 3: Map import”.
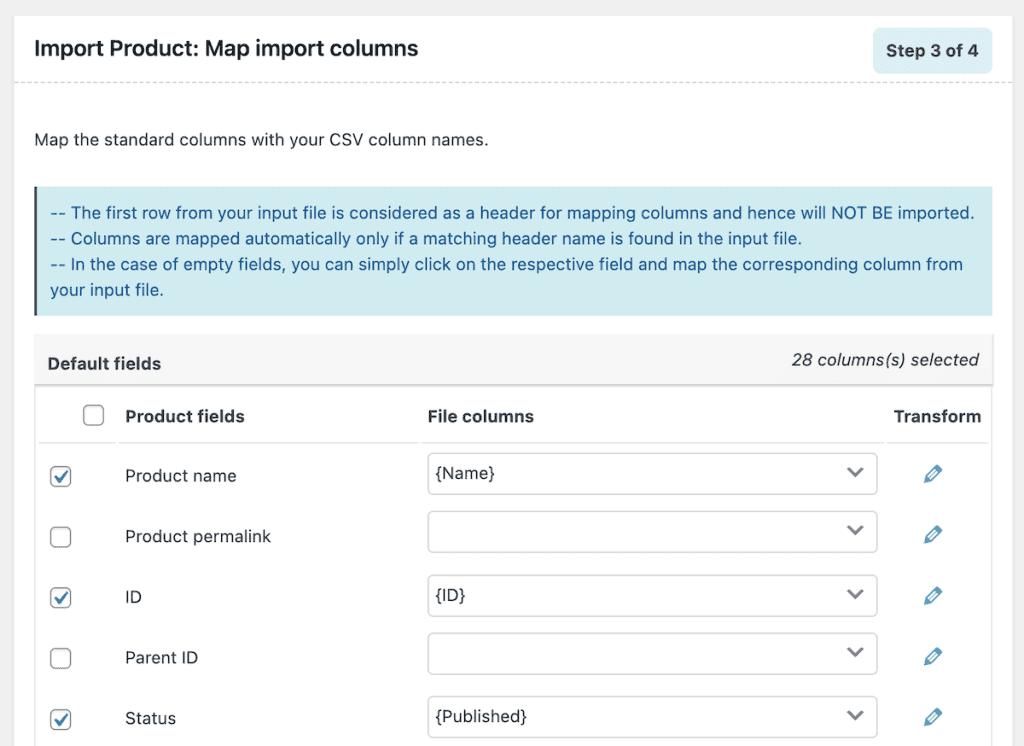
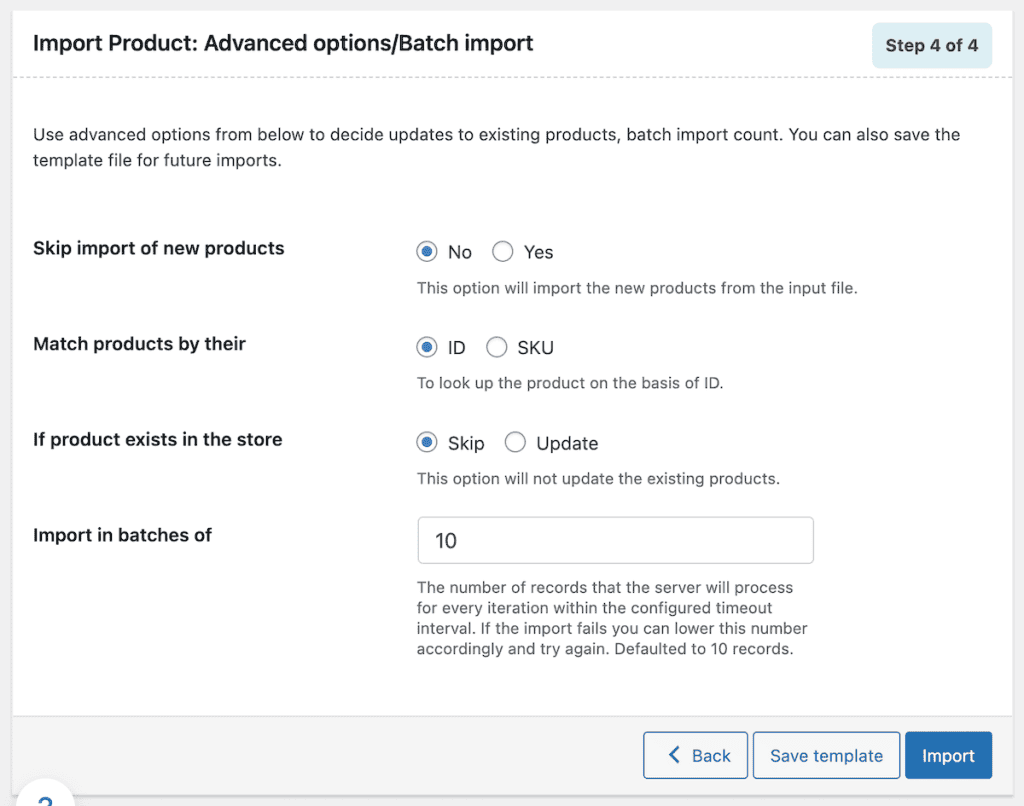
On the next screen, it’ll automatically create default fields based on your WooCommerce file. However, you can create new fields or modify the fields if needed. Once you’re happy with the product mapping, click “Step 4: Advanced options/Batch import“.
Next, you can specify the products that you want to import. If you’re uploading updated product data instead of new products, then make sure you enable skipping new products and updating existing products.
You might need to adjust the “Import in batches of” field if your server is timing out during upload. Once you’re happy, click the “Import” button.
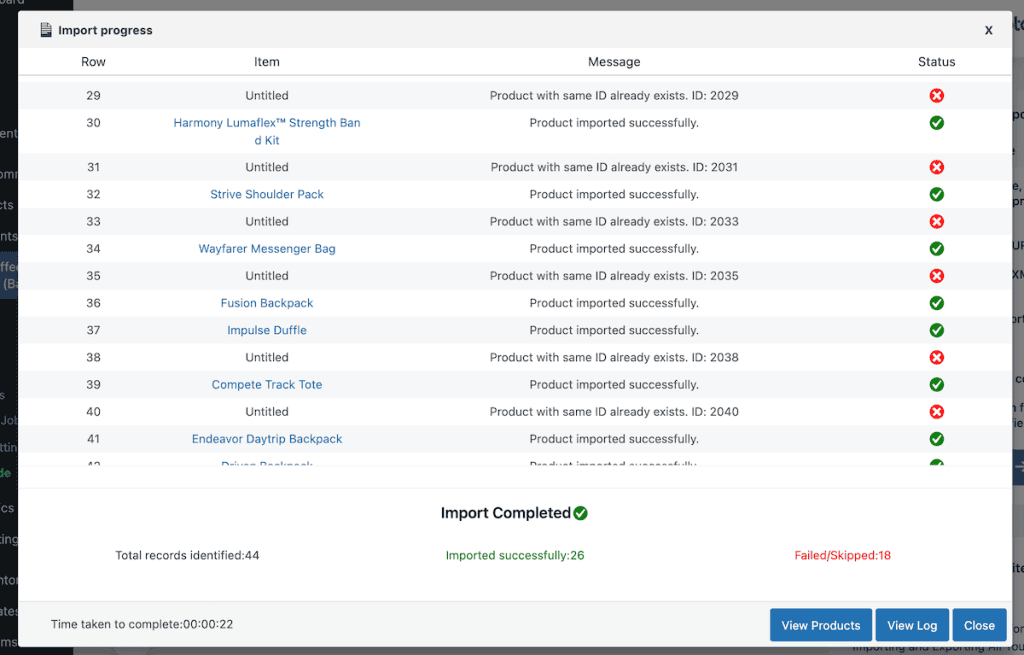
Once the import is complete, you’ll see a breakdown of products that were imported successfully and products that failed to upload or were skipped. You can view the entire log or jump straight to your product library by clicking the respective buttons.
Exporting WooCommerce Products with the Product Import Export by WebToffee Plugin
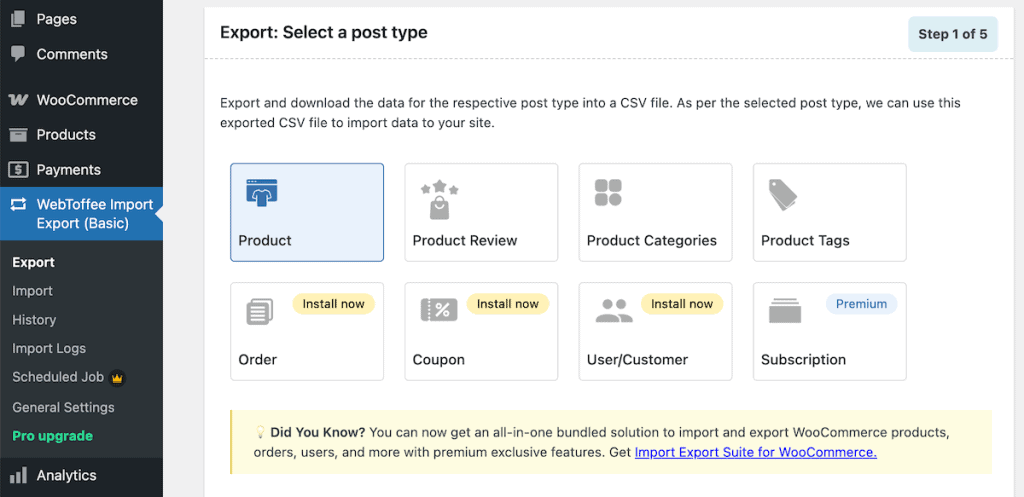
If you want to export product data using the same plugin, then the steps are very simple. All you need to do is navigate to “WebToffee Import Export (Basic) > Export” and click “Product” to export your product data.
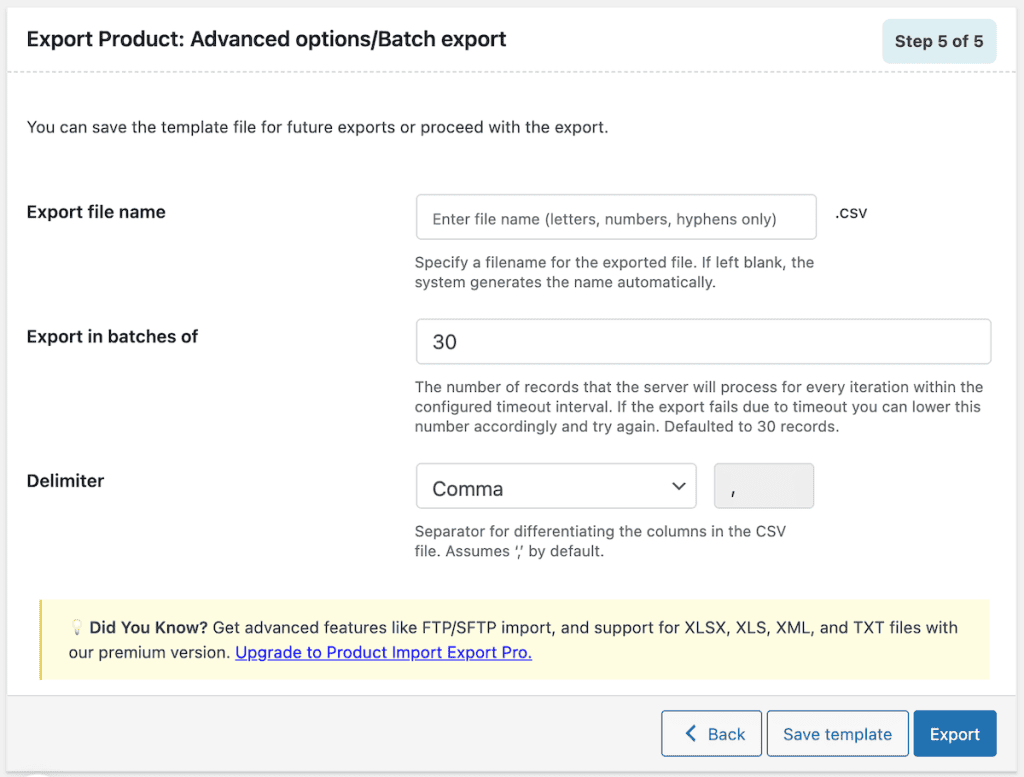
After that, all you need to do is follow the plugin steps to specify the product details you want to export. The free version lets you export into CSV format.
What to do After Importing WooCommerce Products
Once you’ve imported all of your WooCommerce product data, you’ll want to verify that everything was actually imported correctly.
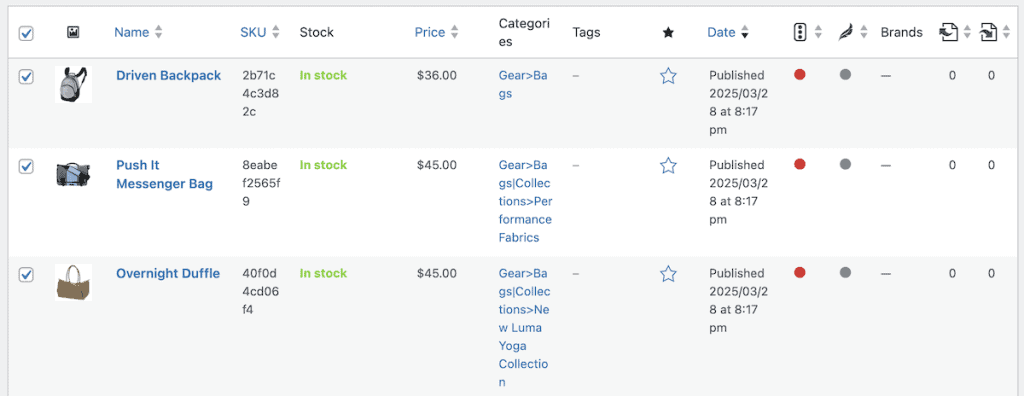
This might take some time, but here are the most important elements to verify:
- Go to your main ‘Products‘ page and quickly go through each product to verify the product name, description, price, category, and more to make sure everything is accurate.
- If you imported product images, then make sure all images correspond to the correct product and are sized properly.
- If you have product variations, then make sure all product variations are properly linked to the main product.
- Check your product meta descriptions and SEO fields to make sure they’re filled out properly.
Once you’ve done that, go through the checkout process to make sure the process works smoothly and you don’t have issues with any of the products.
Import WooCommerce Products FAQs
How to import a product in WooCommece?
If you’re going to be adding a single product, you can either add the product manually by going to “Products > Add New” in your WooCommerce store. Or, you can use the built-in import feature in WooCommerce to upload a single product via a CSV or TXT file.
How do I automatically import WooCommerce products?
To automatically import WooCommerce products into your store, you’ll need to use a premium plugin like WP ALL Import or Product Import Export by WebToffee. Then, you can configure the plugin to automatically download product data from a URL or FTP connection and schedule it to upload at a specific interval.
How do I import WooCommerce products for free?
To import WooCommerce products for free, you can use the built-in product import features or use a plugin like Product Import Export by WebToffee or the free version of WP All Import.
How do I import bulk products into WooCommerce?
To bulk import WooCommerce products, make sure you have all of your product data in a CSV or TXT file. Then, go to “Products > All Products,” click the “Import” button, and then upload your file. Alternatively, you can use a WooCommerce product import plugin to streamline the process and add more import options.
How do I add a product to my WooCommerce store?
To add a new product to your store, navigate to “Products > Add New”, and then enter your product information like name, price, description, attributes, category, and more, then add your product images. Once you’re finished, click ‘Publish’, and the product will be live in your store.
Closing Thoughts: Importing WooCommerce Product Data
As you can see, there are a variety of ways to import WooCommerce product data to streamline the management of your store and product catalog. From using built-in WooCommerce features, to third-party plugins, there are multiple ways to more easily manage product data.
Overall, most users can get away with using the built-in import feature or the free versions of the plugins highlighted above. However, if you’re looking to automatically update your WooCommerce product data, or keep a very large product library or complex products up to date, then you might want to explore premium versions of the plugins highlighted above.
Now, over to you. Have you had to import or export your WooCommerce product data before? Which of the options above did you use?


Leave a Reply