
Have you recently purchased or are considering purchasing a hosting reseller plan and want to know how to manage it effectively?
In this tutorial, we’ll show you how to quickly use WHM to set up hosting accounts for your customers.
WHM is a control panel for hosting resellers, and it’s the same system we use to manage our clients.
At SupportHost, we integrate WHM with WHMCS to manage billing and automate some operations, which I will also cover in this guide.
If you don’t have a hosting plan yet, you can follow along with this tutorial by activating a free trial plan to ensure you don’t miss any steps.
Let’s get started!
Table of Contents
Advantages of Hosting Reseller?
It’s important to distinguish between purchasing a multidomain plan, such as semi-dedicated hosting, and opting for reseller hosting.
The key differences lie in resources, security, and management.
But let’s delve into these differences.
Resources
With hosting reseller, you can create separate accounts, each with its own cPanel and resource limits (CPU, RAM, etc.).
What does this mean in practice?
If a single account experiences a resource spike, whether due to increased traffic or an attack, only that specific account will be suspended. Meanwhile, all other accounts hosted under the same reseller plan are kept online.
In contrast, with multidomain hosting, all sites share the same resources. If one site uses up all the resources, the entire account is suspended, causing all sites to go offline.
Security
A reseller hosting plan allows you to create separate accounts for your clients, each with their own cPanel credentials.
What is the benefit?
If one site is compromised, all other websites remain safe because they are on separate accounts
Conversely, with a multidomain plan, if one site is hacked, it’s easy for the attacker to extend the attack to all other sites.
Management
An important feature of hosting reseller, unlike a classic multidomain plan, is that it allows you to grant clients their own access.
By creating a cPanel account for each customer, you can provide them with login credentials. This enables clients to manage their files and emails independently.
Essentially, you are offering your clients a comprehensive and accessible service.
Choose the hosting reseller and associated domain
When selecting a hosting reseller plan, you should primarily consider the number of sub-accounts you can create.
At SupportHost, we offer four plans:
Reseller 1: 15 account;
Reseller 2: 50 account;
Reseller 3: 75 account;
Reseller 4: 100 account.
Our service is a white-label reseller hosting service, meaning your customers do not interact with SupportHost and are unaware that you are a reseller.
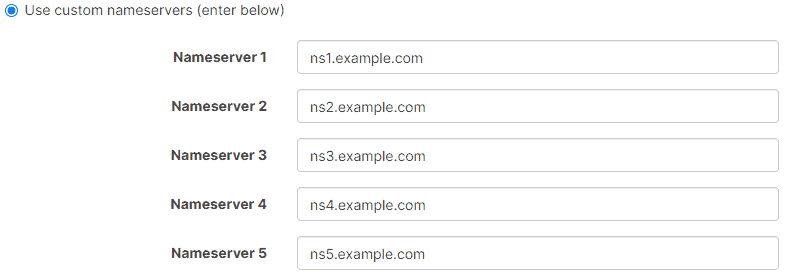
With the Reseller 1 and 2 plans, you will use anonymous nameservers, while with the Reseller 3 and 4 plans, you can set up your own custom nameservers.
That is why, to best set your nameservers, you should choose wisely the domain name associated with your reseller plan.
Which domain should you choose?
We recommend choosing a domain related to your business, whether you are a freelancer or an agency.
This way, you can create nameservers with your domain name. For example, if you select “ivandesign.co.uk” as your domain, you can create branded nameservers like:
ns1.ivandesign.co.uk
If you are still unsure which domain to choose but want to start familiarizing yourself with the WHM panel by following this guide, you can activate a free hosting plan right away. This way, you can access the reseller plan for free for 14 days.
Also, check out comparison of reseller hosting plans.
How to Use WHM
WHM (Web Host Manager) is the dashboard that allows you to manage your reseller account.
Through this panel, you can:
- create hosting packages;
- create sub-accounts, i.e., cPanel accounts for your clients.
This quick guide will help you get acquainted with the most important functions of the WHM panel and start managing your hosting reseller business right away.
It is primarily intended for those who already have a hosting reseller business or are professionals or web agencies managing clients’ sites.
For more detailed information, I recommend following the guide on how to start a web hosting business. This guide includes information on the WHMCS billing system, which allows you to automate account management.
Log into WHM
If you have activated a reseller hosting plan or a trial plan, you will receive an email confirming successful activation.
This email will contain your WHM login credentials.
Simply log in at the following address, replacing “servername” with the name of the server hosting your account:
servername/whm/
Or, if domain propagation has occurred, you can use your domain name as in the example below, replacing “yourdomain.com” with your actual domain:
yourdomain.com/whm/

Customize cPanel accounts
With the reseller hosting plan, WHM allows you to customize the appearance of your clients’ cPanel.
You can insert your logo, change the default color, add a link to your client area, and more.
To access customization options, use the search bar to go to “Customization.”

You will see a series of tabs.
Let’s briefly go over the customizations you can make. For a detailed explanation, refer to our tutorial on how to customize cPanel.
Logos
Here you can upload your logo and enter a description.
Colors
You can change the base color used as the background of the main menu of the cPanel theme.
Below is an example of a customized cPanel with a new logo and default color.

Favicon
You can upload a favicon that will be displayed in the browser tab.
Links
Here you can insert links to your support system (Help Link) and to your tutorials (Documentation Link).
Public Contact
Through this tab, you can enter contact information that will be displayed on default pages such as the account suspension page.

Create a feature list
Before creating the hosting packages, we need to set up the feature list. This is essentially a list of features that we enable for our clients’ cPanels.
Start by using WHM’s search bar to open the “Feature Manager” tool.

First, create a new feature by entering the name and clicking on “Add feature list.”

From the list, select which features to make available.
For example, if you want to create a plan that only offers email to customers, select all email features as shown here:

You can also select all functions by clicking the option at the top and then unchecking only those you want to disable. For a hosting plan, you might want to enable all or most of the cPanel functions.

After selecting the functions, click “Save.”
Now, we’re ready to create a hosting package. Let’s go over that in the next section of this reseller hosting tutorial.
Create a hosting package
Use WHM’s search bar to open the “Add a Package” tool.
You can also click on the same item from the sidebar as shown below.

First, choose the name of the package. In our example, we used “hosting 1.”
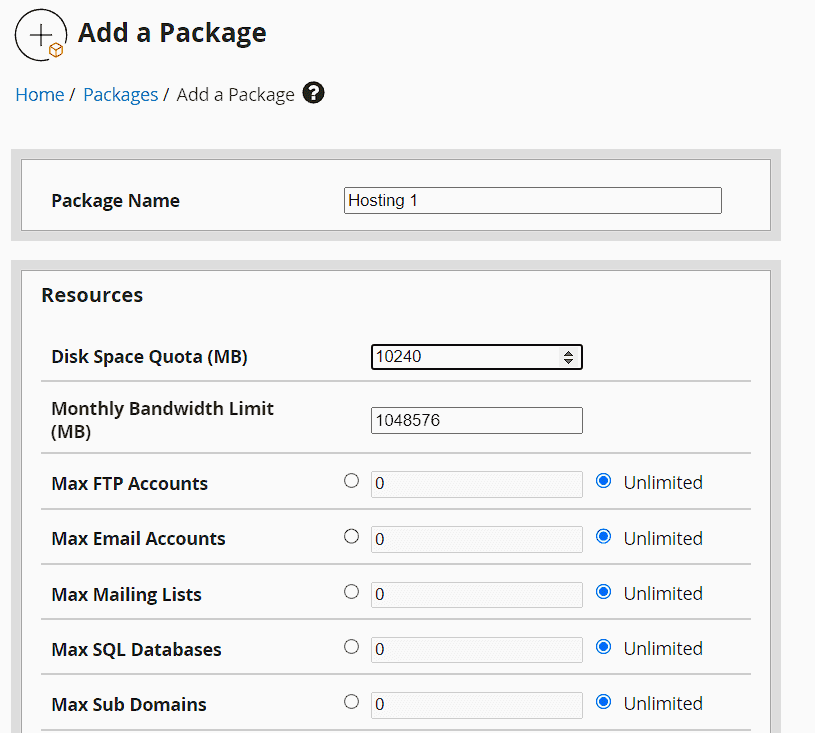
Next, select the resources for the package.
For instance, you might offer a small number of email accounts with the basic plan and more with the advanced plan.
Here are some clarifications about the resources:
- Maximum Hourly Email by Domain Relayed.
- Maximum percentage of failed or deferred messages a domain may send per hour.
These parameters depend on the limits of the hosting reseller plan, so there is no need to set them as the plan limits are already applied.
Options > Dedicated IP: you cannot directly associate a dedicated IP address from here. You need to open a ticket and order a dedicated IP before associating it with your client’s account.
Feature List: from the Settings section, you can select the feature list. You can set the one you just created, like “list 1,” or use “default” to include all cPanel features.
Locale: set the default cPanel language.
After adjusting the parameters, click “Add” to create your hosting package.
Note that RAM, CPU, and the number of processes are not listed among the resources. As a reseller, you cannot assign specific amounts of RAM or CPU to an account.
These resources are assigned by SupportHost based on the settings of the entire reseller plan.
Each individual cPanel account will have the following resources:
2 GB of RAM
2 CPU
10 MB/s IO
20 concurrent PHP processes
Reseller plans are not suitable for sites requiring extensive resources since these limits cannot be changed.
If a site has many visits and the reseller resources become insufficient, you will need to move it to a separate plan, such as a semi-dedicated one, depending on the site’s specific needs.
Create a skeleton
Before creating cPanel accounts for your clients, you can prepare a basic account template to use for all new accounts.
Use WHM’s skeleton directory feature for this.
In the main cPanel account associated with the reseller plan, you will find a folder. All files and folders created in this folder are added to the public_html of all sub-accounts.
The folder is located at this path:
/home/name-account-reseller/cpanel3-skel/public_html
Please note that the WHM “skeleton directory” tool shown in the video has been removed. You can use this feature by adding files directly from the file manager, as shown below.
Log into cPanel from your main account by going to “List Accounts” in WHM and clicking on the cPanel symbol:

Next, open the file manager and locate the “cpanel3-skel” folder. Inside, you will find two folders:
- public_html
- public_ftp
What might be a useful application?
for example, at SupportHost, we use it to provide customers with a courtesy page. This way, those who have just activated a hosting plan but have not yet created the site can see a page like this when they visit their domain.

Simply upload or create this file within cpanel3-skel/public_html and name it “default.html” as shown below.

Now that we have created a hosting package and set up our accounts, we are ready to create cPanel accounts for our clients.
Create a cPanel account
From WHM access the “Create a New Account” tool:

The first thing you’ll see are the account limits, which I’ll explain.
Reseller account limits
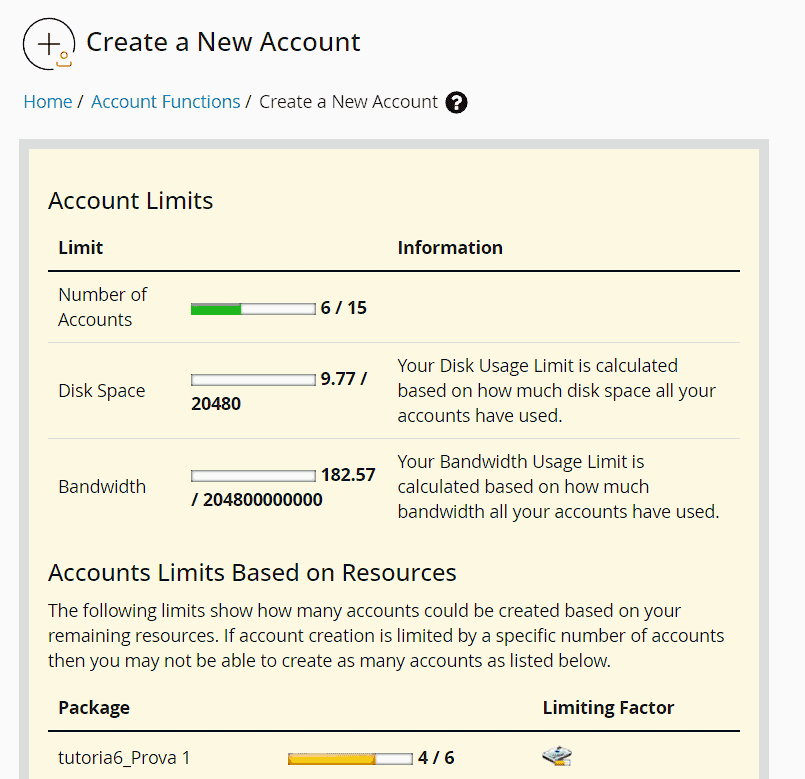
The limits for creating sub-accounts depend on the reseller plan you have selected. For example, the trial plan in this guide has the same limits as the Reseller 1 plan.
Number of Accounts
The number of accounts you can create depends on your hosting Reseller plan. For instance, with the Reseller 1 plan, you can create up to 15 accounts.
Disk Space
The maximum disk space also depends on your hosting Reseller plan. The Reseller 1 plan allows up to 20 GB of space.
However, you can oversell, meaning you can offer hosting packages with more space than what is actually available. For example, you could create 15 accounts with 10 GB each.
What matters is the actual space used. If each account uses 1 GB, they collectively use 15 GB, staying within the limit. Always monitor the total space to avoid exceeding the limit.
If you need more space, you can upgrade to a higher reseller plan. If you surpass even the Reseller 4 limits (200 GB), you will need to get a second reseller account and migrate sub-accounts accordingly.
Bandwidth
All SupportHost’s hosting Reseller plans offer unlimited bandwidth.
Now let’s move on to the actual account creation.
Create the sub-account
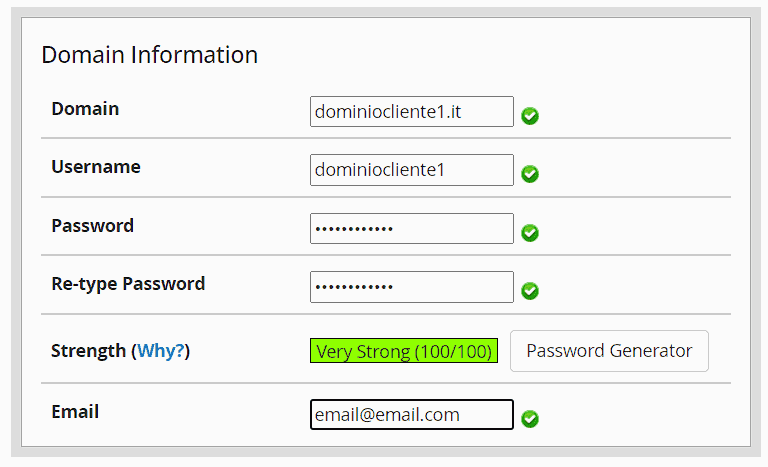
Fill in the necessary account creation details, with domain, username and password.
Domain: enter your client’s domain.
Username: this is generated automatically, but you can customize it.
Password and Re-Type Password: you can use the generator for a complex password.
Email: enter your client’s email address to receive notifications, such as alerts when account space is nearly full.
Next, choose the hosting package from the ones you’ve created.
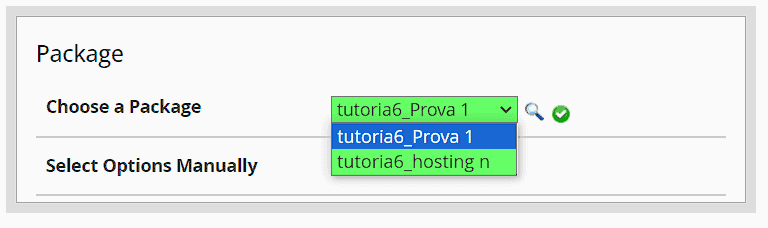
Nota: you can also manually set options and create a new hosting package here, although it is recommended to create packages first and then assign them.
cPanel theme: currently, the only available theme is jupiter.
Locale: choose the default language for the cPanel account.
We can also adjust Mail Routing and DNS Settings.
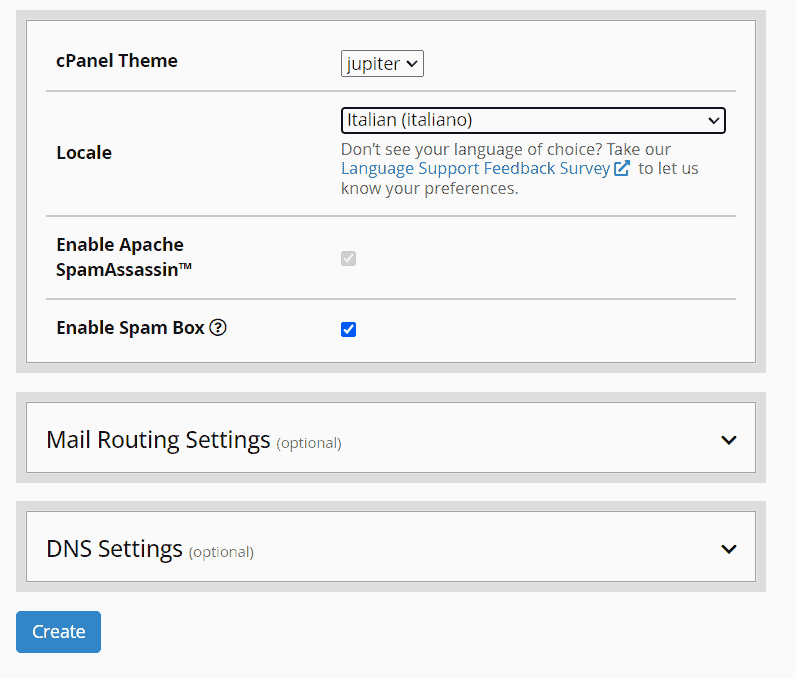
Finally, click the “Create” button.
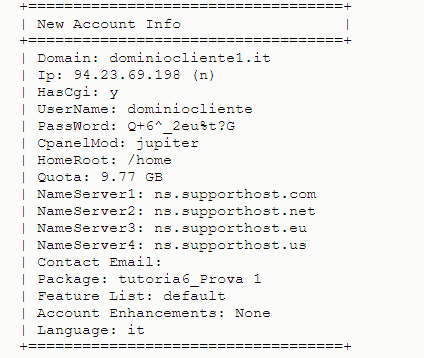
After creation, you will see the account information (domain, username, password, nameserver). Send this information to your client so they can access their cPanel account.
Now that we know how to create accounts, let’s discuss managing them.
One last thing beofre moving on: let’s just see how to link your client’s domain to their hosting account.
Associate domain with cPanel sub-account
To link the client’s domain with the cPanel account:
Create the cPanel account with WHM, entering the client’s domain name.
Register or transfer the domain to SupportHost and set your reseller’s nameservers during the order.
Once the order is complete, the domain will point to the correct hosting plan.
Manage cPanel accounts
To manage your clients’ cPanel sub-accounts, access the “List Accounts” tool from WHM.

Here, you will see a list of all created accounts.

Dominio: clicking on the domain opens it in a new tab. If you have set up a default.html page, you will see the courtesy page.
cPanel: click the cPanel logo next to an account to log in to the client’s cPanel.
IP address: previously, clicking on the IP address allowed access to a temporary URL, but this function is no longer active.
In this WHM section, you can also edit existing accounts.
Click the “+” icon next to the account you wish to edit.
Here you can see options such as change password, change contact email, or suspend account.
Change Password
You can change the cPanel password, such as when a client needs to reset their password.

Change Contact Email
In this section, you can update the contact email address.

Suspend Account
Here, you can enter a note and click “Suspend” to suspend an account.

When an account is suspended, it will be highlighted in red in the list. To reactivate the account, click on the “+” and then select “Unsuspend.”

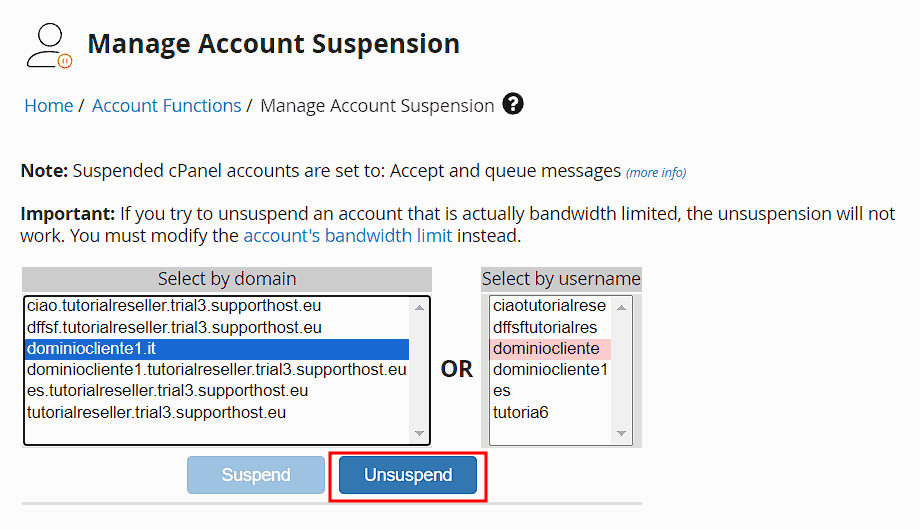
Another way to suspend accounts is by using the “Manage Account Suspension” tool.

From here, you can select the account by both domain and username, enter the reason, and click “Suspend.”

Suspended accounts will appear in red in the list. To reactivate, click on the account and then select the “Unsuspend” button.
Let’s go back to account management.
From the “Actions” list, you can make other changes to the account, such as change quota, change plan, modify account, or terminate account. Let’s explore these options in detail.

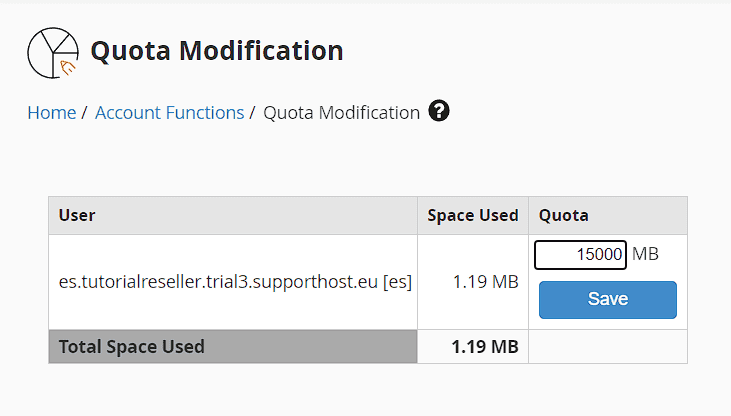
Change Quota
Click “Change Quota” from the account list to adjust the space allocated to an individual account. Simply change the Quota and click “Save.”
Change Plan
Click “Change Plan” to switch the hosting package assigned to an account.
At the top, you will see the current package. Select the new package from the list and click the “Upgrade/Downgrade” button.
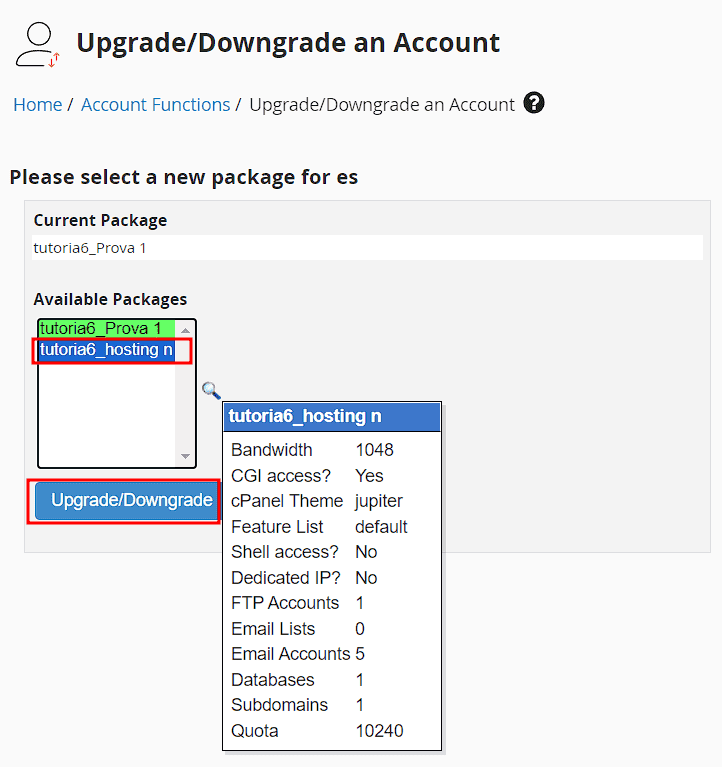
Note: hover over the magnifying glass icon to see the features of the selected hosting package.
Changing the plan does not impact the site, and there is no downgrade for the customer.
Modify Account
Click “Modify Account” to access the page seen when the account was created. Here, you can edit resources or cPanel options.
If you change resources, you will be asked if you want to create a new package with these resources (this is recommended).

Be cautious when updating a package. If you update the package, changes will apply to all accounts associated with that hosting package. It’s best to create a separate package when making changes.
Terminate Account
There are two methods to terminate an account.
The first method is to click the “+” from the list of accounts and then select “Terminate Account.”
A new screen will open, asking you to confirm before terminating the account. Keep in mind that removal is permanent.

Alternatively, go directly to the “Terminate Accounts” tool, select one or more accounts, and click the “Remove” button (for a single account) or “Remove selected accounts” (for multiple accounts).

Conclusions
We’ve covered how to use the most important functions of WHM. Getting started with your hosting reseller business is straightforward by following this tutorial.
Now, you know how to modify cPanel features available to your customers, create different hosting packages, and manage cPanel accounts.
If you have any questions or need further clarification, let’s discuss them in the comments.
Ready to build your WordPress site?
Try our service free for 14 days. No obligation, no credit card required.


