

Resource compression is something you should never overlook, having a fast website is important to ensure your users have an optimal browsing experience.
With this tutorial you can learn how to enable Gzip compression on your website making its loading times faster.
Table of Contents
What is Gzip compression
Gzip is a file compression tool used to reduce the size of many resources such as, for example, HTML files, style sheets, scripts, web fonts.
Compression of a file is nothing but the process of reducing its size by means of compression algorithms.
When you connect to a web site, your browser tells the web server that it can accept compressed files. The web server processes this information and checks to see if file compression is enabled.
If Gzip compression is enabled, your browser will receive a page with a smaller size than the original one, otherwise it will get an uncompressed page.
Why use Gzip compression?
Optimizing resource size is useful to save bandwidth. By reducing the size of files, it will take less time for your site’s users to view its content.
If you want to speed up your WordPress site, enabling Gzip compression can help you improve loading times.
How to enable Gzip compression with cPanel
You can enable Gzip compression on all our shared hosting, semidedicated hosting and WordPress hosting plans very quickly, directly from cPanel.
After logging into cPanel, search and select “Optimize Website” in the Software section.

Selecting the “Compress all content” option will compress all the resources on your website.
The “Compress specified MIME types” option, on the other hand, will allow you to manually select the resources to which compression is to be applied.
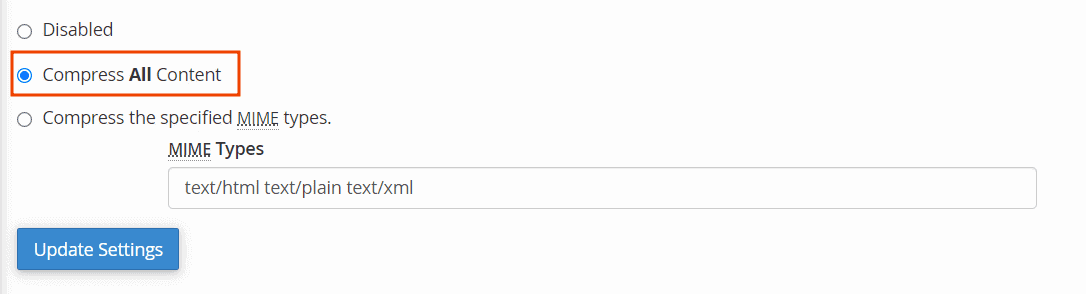
If you decide to enter values manually, you can browse a list of the most common MIME types to choose the ones that best suit your needs, or you can browse the complete and up-to-date list of all Media Types.
After applying the changes, press the “Update Information” button to make the changes take effect.
How to disable Gzip compression
If after enabling compression you notice problems with viewing or functioning on your website you may decide that you want to temporarily disable Gzip compression.
You can do this by selecting the “Disabled” field and pressing the “Update Settings” button.

Check compression status
You can check the status of Gzip compression quickly using your browser’s developer tools.
Open the developer tools and select the “Network” tab. From this area you can see all the resources that are being interpreted by your browser.
By clicking on a resource, you can analyze the details of http requests and responses.
If, among the response headers, “content-encoding” says gzip, it means that the resources of your website have been correctly compressed.
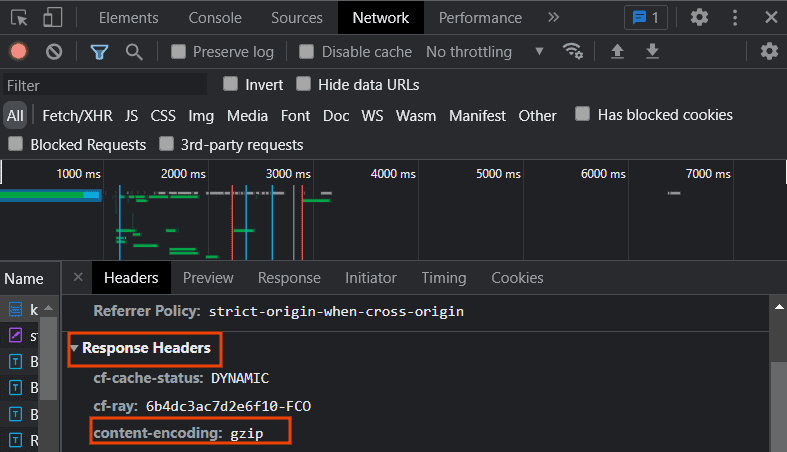
On the contrary, if you do not find any entry in the response headers, it means that the files have not been compressed.